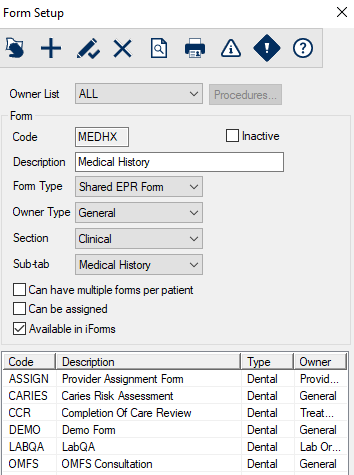
Form Setup Window
The Form Setup window allows you to create and configure basic forms.
 Form Setup - Field Definitions Form Setup - Field Definitions
| Owner List
|
A drop-down list that filters according to owner type which forms display in the list view:
-
ALL
-
EPR
-
Lab Order
-
Referral
-
Provider Assignment
-
Treatment
|
| Procedures...
|
A button that displays the Form Definitions (by procedure) window and allows you to view and manage which procedures the form will be used with.
Note: The button is only enabled if the Owner List field is set to Treatment.
|
| Code
|
A text field that indicates the short code that identifies the form.
|
| Inactive
|
A checkbox that, when selected, indicates that the form is inactive and not in use.
|
| Description
|
A text field that describes the form.
|
| Form Type
|
A drop-down list that indicates which clinical module has access to the form:
|
| Owner Type
|
A drop-down list that indicates which axiUm activity type owns the form:
-
General: Used when adding EPR forms to the patient’s record.
-
Lab Order: Used when creating lab orders.
-
Referral: Used when making a referral.
-
Provider Assignment: Used when working with provider assignments.
-
Treatment: Used for specific procedures.
|
| Section / Sub-tab |
Drop-down lists that indicate which section and sub-tab the form saves to in the Attachments/Consents module.
|
| Can have multiple forms per patient
|
A checkbox that, when selected, indicates that this form is multi-instance.
Examples:
-
A medical history form should only be added once, then updated at each subsequent appointment.
-
A day of surgery form should be added each time the patient has a surgery.
|
| Can be assigned
|
A checkbox that, when selected, indicates that this form can be assigned to either a user or group.
|
| Available in iForms |
A checkbox that, when selected, indicates that the form is available in PatientAccess. |
Form Setup - Tasks
| Add Forms
|
- Click the Clear Data (
 ) icon. ) icon.
- Complete the fields as necessary and click the Add a new Record (
 ) icon. ) icon.
|
|
Edit Forms
|
- Select a listed entry.
- Make any necessary changes and click the Modify Record (
 ) icon. ) icon.
|
| Configure Form Pages
|
-
Select a listed entry and click the Form Definition ( ) icon to display the Form Pages window. ) icon to display the Form Pages window.
-
Make any necessary changes and close the window.
|
| Configure Form Status Codes
|
-
Select a listed entry and click the Form Status Codes ( ) icon to display the Form Status Codes window. ) icon to display the Form Status Codes window.
-
Make any necessary changes and close the window.
|
| Set Form Instructions
|
Form instructions are optional. If added, they display at the form level to give users information they need to complete the form properly.
-
Select a listed entry and click the Instructions ( ) icon to display the Form Instructions window. ) icon to display the Form Instructions window.
-
Make any necessary changes and close the window.
|
| Delete Forms
|
- Select a listed entry and click the Delete Record (
 ) icon. ) icon.
- When prompted, click Yes to confirm the deletion.
|
| Preview/Print Report
|
- Select a listed entry.
- (Optional) To preview the form report, click the Preview Report (
 ) icon. ) icon.
- To print the form report, click the Print Report (
 ) icon. ) icon.
|
Form Pages Window
(Maintenance > EHR > Form Setup)
The Form Pages window allows you to configure the pages in a selected form. It displays when you open the Form Setup window and click the Form Definition () icon.
Form Pages - Field Definitions
| Form
|
A read-only field that indicates the selected form.
|
| Page
|
A text field that indicates the order in which this page displays.
Entries may be a numeric value from 1-9.
|
| Label
|
A text field that indicates the page name that displays when completing the form.
|
| Allows Comment |
A checkbox that, when selected, indicates that users can enter comments on the page. |
| Shows in Health Summary |
A checkbox that, when selected, indicates that answered questions display in the EHR module > In Progress tab > Health Summary section. |
| Is an ASA Page |
A checkbox that, when selected, indicates that answered questions will trigger an ASA value. |
| Requires Patient Signature |
A checkbox that, when selected, indicates that the patient must sign the page. |
| Requires Other Signatures |
A checkbox that, when selected, indicates that another person must sign the page.
Example: A witness.
|
| Signatures... |
A button that displays the Form Page Signatures window and allows you to configure the signatures required for the form page.
Note: This button is only enabled if the Requires Other Signatures checkbox is selected.
|
| Available in iForms |
A checkbox that, when selected, indicates that the page is available in PatientAccess.
Note: This checkbox is only enabled if the form has been set as available in iForms.
|
Form Pages - Tasks
| Add Form Pages
|
- Click the Clear Data () icon.
- Complete the fields as necessary and click the Add a new Record () icon.
|
| Edit Form Pages
|
- Select a listed entry.
- Make any necessary changes and click the Modify Record () icon.
|
| Move Form Pages
|
- Select a listed entry.
- Click the Up / Down buttons as necessary to change the order.
|
| Delete Form Pages
|
- Select a listed entry and click the Delete Record () icon.
- When prompted, click Yes to confirm the deletion.
|
| Configure Form Pages
|
- Select a listed entry and click the Page Definition () icon to display the Form Page Definition window.
- Make any necessary changes and close the window.
|
| Manage Form Pages Access
|
- Select a listed entry and click the Level Access (
 ) icon to display the Form Page Access window. ) icon to display the Form Page Access window.
- Make any necessary changes and close the window.
|
| Configure Form Reports
|
- Click the Form Reports (
 ) icon to display the Form Reports window. ) icon to display the Form Reports window.
- Make any necessary changes and close the window.
|
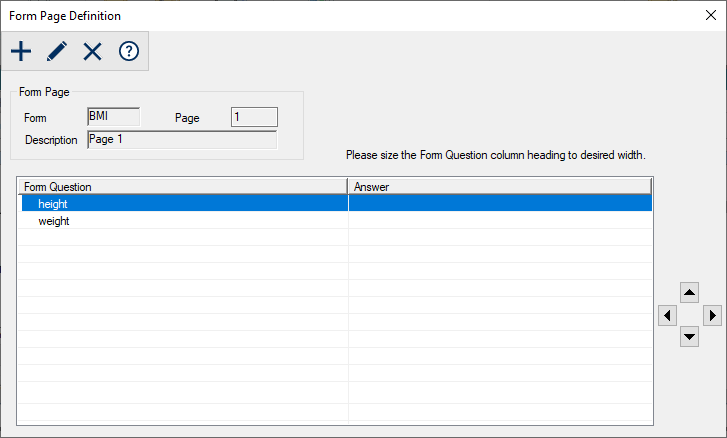
Form Page Definition Window
(Maintenance > EHR > Form Setup > Form Pages)
The Form Page Definition window allows you to determine content for a page in your form. It displays when you open the Form Pages window and click the Page Definition () icon.
Each form page may include any of the following:
-
Headings: These separate and categorize questions on a page. Although they cannot be answered, they can contain questions under them.
-
Questions: Questions draw information from patients. Some questions may require additional content under them.
-
Sub-questions: These are attached to a parent question and are designed to capture additional information, depending on the answer given to the parent. If the answer to the parent question meets the specified criteria, they display.
Example: Asking a patient their pregnancy due date only applies if a patient is pregnant.
Question: Are you currently pregnant?
Sub-question (only displays if the answer is yes): When is your due date?
Form Page Definition - Field Definitions
| Form
|
A read-only field that indicates the selected form.
|
| Page
|
A read-only field that indicates the value of the selected form page and identifies where the page displays in the form.
|
| Description
|
A read-only field that describes the selected form page.
|
Form Item - Question Window
(Maintenance > EHR > Form Setup > Form Page Definition)
The Form Item - Question window allows you to create questions for the form page. It displays when you open the Form Page Definition window and click the Add a new Record () icon and select Question or select a listed question and click the Edit Record ( ) icon. ) icon.
Form Item- Question - Field Definitions
| Form
|
A read-only field that indicates the selected form.
|
| Page
|
A read-only field that indicates the value of the selected form page and identifies where the page displays in the form.
|
| Description
|
A read-only field that describes the selected form page.
|
| Reference Code |
A text field that indicates the reference code for this question in reports and custom form reports, and when calculating functions.
|
| Question Text |
A text field that indicates the question. |
| Answer Type |
A drop-down list that indicates the answer type for the question:
|
| Allow "Don't Know" as an answer |
A checkbox that, when selected, indicates that users can select Don’t Know as an answer.
Note: The checkbox is only enabled if Answer Type is set to Yes/No.
|
| Answer Scheme |
A text field that indicates which number ranges and values are allowed in the user’s answers.
The ellipsis is used to display the Answer Schemes window and select an answer scheme.
Note: This field only displays if Answer Type is set to Number.
|
| Answer List |
A text field that indicates the list of possible answers.
The ellipsis is used to display the EPR Answer Lists window and select an answer list.
Note: This field only displays if Answer Type is set to List.
|
| Answer Image |
A text field that indicates the image file that displays for the question. Users will draw on the image to answer the question.
The ellipsis is used to display the EPR Image Codes window and select an image code.
Note: This field only displays if Answer Type is set to Image.
|
| Function Name |
A text field that indicates the Oracle function which will calculate the answer.
Note: This field only displays if Answer Type is set to Calculated.
|
| Column Details… |
A button that displays the Form Column Details window and allows you to view and manage the spreadsheet answer details.
Note: This button only displays if Answer Type is set to Spreadsheet.
|
| Sub-questions |
A checkbox that, when selected, indicates that the question will prompt sub-question(s).
A drop-down list that indicates the type of prompted sub-question:
-
Checklist
-
Additional Info
Note: The checkbox is only enabled if Answer Type is set to Yes/No. The checkbox but is selected by default but remains disabled with the drop-down set to Spreadsheet Rows if Answer Type is set to Spreadsheet.
|
| Limit # of checked answers to ___ |
A checkbox that, when selected, indicates that the number of answers that can be selected in this list is limited.
A text field that indicates the value for the maximum number of answers.
Note: The checkbox and field only display if Answer Type is set to Yes/No and Sub-questions is selected with the drop-down set to Checklist.
|
| Prompt for sub-questions when answer is ___ |
A drop-down list that indicates which answer prompts the sub-question:
Note: The field only displays if Answer Type is set to Yes/No and Sub-questions is selected.
|
| Approved answer can be changed by users who ‘Require Approval’ |
A checkbox that, when selected, indicates that answers to this question can be modified after it has been approved, but will require re-approval.
|
| Available in iForms |
A checkbox that, when selected, indicates that the question is enabled in PatientAccess.
Note: This field is enabled and defaults to selected if the form page is set to Available in iForms.
|
| Required... |
A button that displays the Required Form Item Status Codes window and allows you to view and manage which status codes require this question to be completed. |
| Additional… |
A button that displays the Form Item Additional Definitions window and allows you to view and manage which value(s) should trigger alerts, allergies, medical problems, or needs. |
Form Item - Question - Tasks
| Add Questions
|
- Complete the fields as necessary and click OK.
|
| Edit Questions
|
- Make any necessary changes and click OK.
|
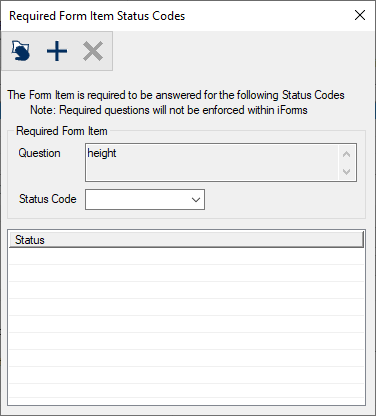
Required Form Item Status Codes Window
(Maintenance > EHR > Form Setup > Form Pages > Form Page Definition > Form Item - Question, Form Item - Additional Info, or Form Item - Spreadsheet Row)
The Required Form Item Status Codes window allows you to determine if a question or sub-question is required when a form is set to a specific status. It displays when you open the Form Item - Question window, Form Item - Additional Info window, or Form Item - Spreadsheet Row window and click the Required... button.
If a question or sub-question is configured to be required, the selected question or sub-question must be answered when the form is in this status.
Note: Required questions or sub-questions display in pink when a form is in the specified status.
Required Form Item Status Codes - Field Definitions
| Question
|
A read-only field that indicates the selected question for the required form item status code.
|
| Status Code
|
A drop-down list that indicates the status code for which this form item is required.
Note: The available statuses are configured by your institution.
|
Required Form Item Status Codes - Tasks
| Add Required Form Item Status Codes
|
- Click the Clear Data () icon.
- Complete the fields as necessary and click the Add a new Record () icon.
|
| Delete Required Form Item Status Codes
|
- Select a listed entry and click the Delete Record () icon.
- When prompted, click Yes to confirm the deletion.
|
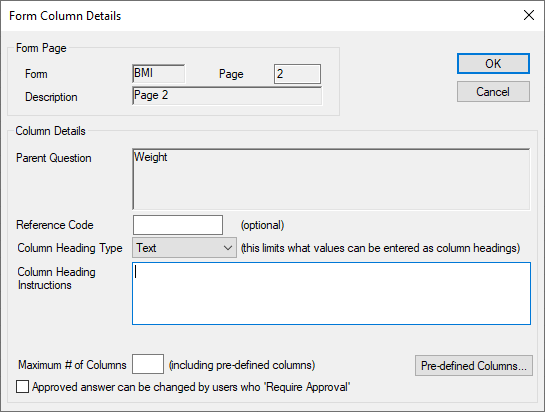
Form Column Details Window
(Maintenance > EHR > Form Setup > Form Pages > Form Page Definition > Form Item - Question)
The Form Column Details window allows you to configure columns in the selected spreadsheet for entering answers. It displays when you open the Form Item - Question window and click the Column Details... button.
Form Column Details - Field Definitions
| Form
|
A read-only field that indicates the selected form.
|
| Page
|
A read-only field that indicates the value of the selected form page and identifies where the page displays in the form.
|
| Description
|
A read-only field that describes the selected form page.
|
| Parent Question |
A read-only field that indicates the parent question the spreadsheet is being defined for.
|
| Reference Code |
A text field that indicates the reference code for this question in reports and custom form reports, and when calculating functions.
|
| Column Heading Type |
A drop-down list that indicates the answer type that the question requires:
|
| Column Heading Instructions |
A text field that indicates the instructions that axiUm displays when you add or edit
columns.
Example: Create next 15-minute interval.
|
| Answer List |
A text field that indicates the list of possible answers.
The ellipsis is used to display the EPR Answer Lists window and select an answer list.
Note: This field only displays if Column Heading Type is set to List.
|
| Answer Scheme |
A text field that indicates which number ranges and values are allowed in the user’s answers.
The ellipsis is used to display the Answer Schemes window and select an answer scheme.
Note: This field only displays if Column Heading Type is set to Number.
|
| Maximum # of Columns |
A text field that indicates the maximum number of columns allowed in this spreadsheet.
Note: This is the total
number of pre-defined columns plus any created on-the-fly.
|
| Pre-defined Columns... |
A button that displays the Form Pre-defined Columns window and allows you to view and manage pre-defined columns (i.e., columns with headings already defined) for the selected spreadsheet. |
| Approved answer can be changed by users who 'Required Approval' |
A checkbox that, when selected, indicates that answers to this question can be modified after it has been approved, but will require re-approval. |
Form Column Details - Tasks
| Add Form Column Details
|
- Complete the fields as necessary and click OK.
|
| Edit Form Column Details
|
- Make any necessary changes and click OK.
|
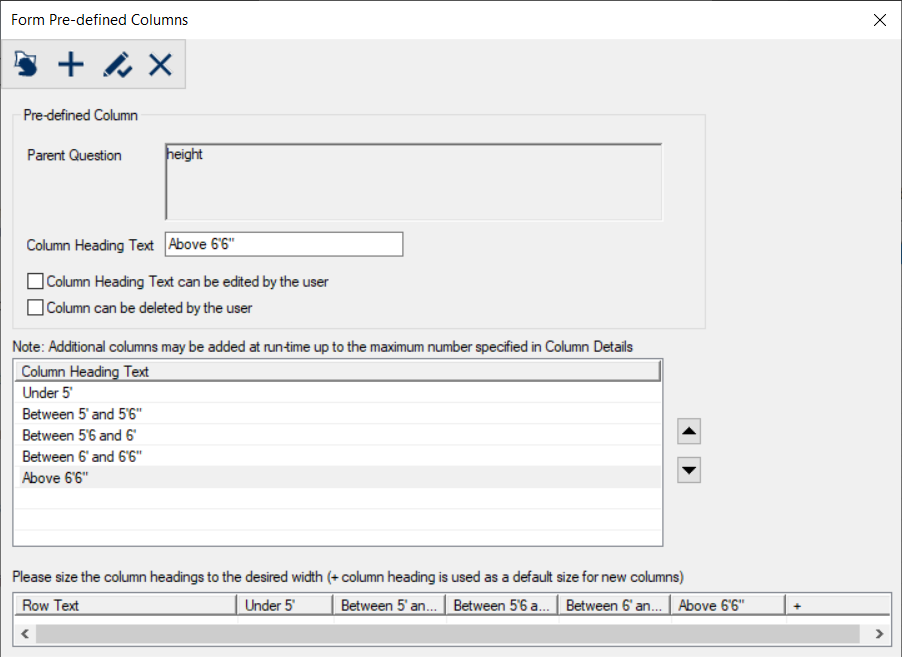
Form Pre-Defined Columns Window
(Maintenance > EHR > Form Setup > Form Pages > Form Page Definition > Form Item - Question > Form Column Details)
The Form Pre-Defined Columns window allows you to create predefined columns (i.e., columns with headings already defined) for a selected spreadsheet. It displays when you open the Form Column Details window and click the Pre-defined Columns... button.
Form Pre-Defined Columns - Field Definitions
| Parent Question
|
A read-only field that indicates the parent question the spreadsheet is being defined for.
|
| Column Heading Text
|
A text field that indicates the name of the column heading.
|
| Column Heading Text can be edited by the user
|
A checkbox that, when selected, indicates that users can edit the text in the column heading when filling out the spreadsheet.
|
| Column can be deleted by the user
|
A checkbox that, when selected, indicates that users can delete the column when filling out the spreadsheet.
|
Form Pre-Defined Columns - Tasks
| Add Pre-defined Columns
|
- Click the Clear Data () icon.
- Complete the fields as necessary and click the Add a new Record () icon.
|
| Edit Pre-defined Columns
|
- Select a listed entry.
- Make any necessary changes and click the Modify Record () icon.
|
| Move Pre-defined Columns
|
- Select a listed entry.
- Click the arrow buttons as necessary to change the order.
|
| Resize Pre-defined Columns
|
- Select and drag a column edge to modify the width.
- Repeat as necessary for each column.
|
| Delete Pre-defined Columns
|
- Select a listed entry and click the Delete Record () icon.
- When prompted, click Yes to confirm the deletion.
|
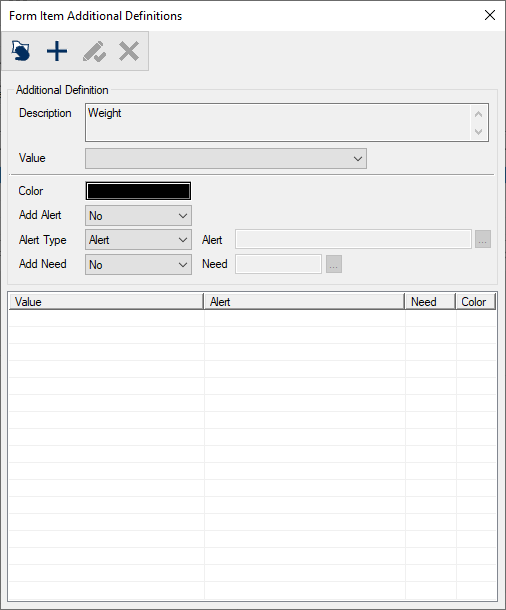
Form Item Additional Definitions Window
(Maintenance > EHR > Form Setup > Form Pages > Form Page Definition > Form Item - Question)
The Form Item Additional Definitions window allows you to define medical alerts and patient needs if you want a question in the EPR form to trigger a medical alert or patient need. It displays when you open the Form Item - Question window and click the Additional... button.
Tip: Multiple alerts/needs can be set for different answers to the same question.
Form Item Additional Definitions - Field Definitions
| Description
|
A read-only field that describes the selected form question.
|
| Value
|
A drop-down list that indicates the entry that will trigger the alert or need.
Note: The entries that are available depend on which answer list is selected for the question.
|
| Color
|
The text color used when displaying the text for the selected need/alert.
|
| Add Alert |
A drop-down list that indicates if and how an alert will be added:
-
No: A patient alert is not added.
-
Yes: A patient alert is added automatically.
-
Prompt: The user is prompted to choose whether to add a patient alert.
|
| Alert Type |
A drop-down list that indicates the alert type:
-
Alert
-
Allergy
-
Medical Problem
|
| Alert |
A text field that indicates which specific alert is being added.
The ellipsis is used to display the Medical Alert Codes window, the Search Allergies window, or the Search Medical Problems window and select an entry.
Notes:
|
| Add Need |
A drop-down list that indicates if and how a patient need will be added:
-
No: A patient need is not added.
-
Yes: A patient need is added automatically.
-
Prompt: The user is prompted to choose whether to add a patient need.
|
| Need |
A text field that indicates which specific need is being added.
The ellipsis is used to display the Need Codes window and select a need code.
Notes: This field is only enabled if Add Need is set to Yes or Prompt.
|
Form Item Additional Definitions - Tasks
| Add Alerts/Needs
|
- Click the Clear Data () icon.
- Complete the fields as necessary and click the Add a new Record () icon.
|
| Edit Alerts/Needs
|
- Select a listed entry.
- Make any necessary changes and click the Modify Record () icon.
|
| Delete Alerts/Needs
|
- Select a listed entry and click the Delete Record () icon.
- When prompted, click Yes to confirm the deletion.
|
Form Item - Heading Window
(Maintenance > EHR > Form Setup > Form Pages > Form Page Definition)
The Form Item - Heading window allows you to create headings to group questions on the form page. It displays when you open the Form Page Definition window and click the Add a new Record () icon and select Heading or select a listed heading and click the Edit Record () icon.
Form Item - Heading - Field Definitions
| Form
|
A read-only field that indicates the selected form.
|
| Page
|
A read-only field that indicates the value of the selected form page and identifies where the page displays in the form.
|
| Description
|
A read-only field that describes the selected form page.
|
| Text
|
A text field that indicates the name of the heading.
|
| Sub-questions
|
A checkbox that, when selected, indicates that this heading has sub-questions.
|
| Limit # of checked answers to
|
A checkbox that, when selected, indicates that the number of answers that can be selected in the list is limited.
A text field that indicates the value for the maximum number of answers.
Note: The checkbox and field only display if Sub-questions is selected.
|
| Available in iForms
|
A checkbox that, when selected, indicates that the heading is available in PatientAccess.
Note: This checkbox is only enabled if the page has been set as available in iForms.
|
Form Item - Heading - Tasks
| Add Headings
|
- Complete the fields as necessary and click OK.
|
| Edit Headings
|
- Make any necessary changes and click OK.
|
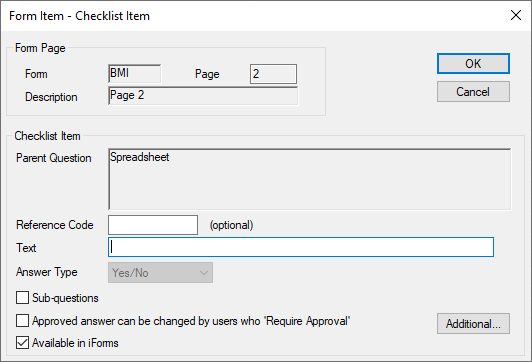
Form Item - Checklist Item Window
(Maintenance > EHR > Form Setup > Form Pages > Form Page Definition)
The Form Item - Checklist window allows you to create checklist sub-questions for the form page. It displays when you open the Form Page Definition window, select a listed question, click the Add a new Record () icon and select Checklist Item or select a listed checklist sub-question and click the Edit Record () icon.
Note: The Checklist Item option is only enabled if the selected question has the Sub-questions checkbox selected and the drop-down set to Checklist.
Form Item - Checklist - Field Definitions
| Form
|
A read-only field that indicates the selected form.
|
| Page
|
A read-only field that indicates the value of the selected form page and identifies where the page displays in the form.
|
| Description
|
A read-only field that describes the selected form page.
|
| Parent Question |
A read-only field that indicates the parent question the checklist item is being defined for.
|
| Reference Code |
A text field that indicates the reference code for this question in reports and custom form reports.
|
| Text |
A text field that indicates the content to display for this checklist item. |
| Answer Type |
A read-only field that indicates the answer type for the sub-question is Yes/No.
|
| Sub-questions |
A checkbox that, when selected, indicates that the item will prompt sub-question(s).
A drop-down list that indicates the type of prompted sub-question:
-
Checklist
-
Additional Info
|
| Limit # of checked answers to
|
A checkbox that, when selected, indicates that the number of answers that can be selected in the list is limited.
A text field that indicates the value for the maximum number of answers.
Note: The checkbox and field only display if Sub-questions is selected.
|
| Approved answer can be changed by users who 'Require Approval' |
A checkbox that, when selected, indicates that answers to this item can be modified after it has been approved, but will require re-approval. |
| Additional... |
A button that displays the Form Item Additional Definitions window and allows you to view and manage which value(s) should trigger alerts, allergies, medical problems, or needs.
|
| Available in iForms |
A checkbox that, when selected, indicates that the item is available in PatientAccess.
Note: This checkbox is only enabled if the form has been set as available in iForms.
|
Form Item - Checklist - Tasks
| Add Checklist Items
|
- Complete the fields as necessary and click OK.
|
| Edit Checklist Items
|
- Make any necessary changes and click OK.
|
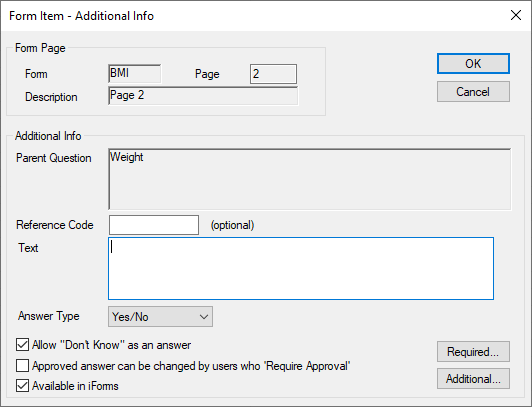
Form Item - Additional Info Window
(Maintenance > EHR > Form Setup > Form Pages > Form Page Definition)
The Form Item - Additional Info window allows you to create sub-questions that provide additional information. It displays when you open the Form Page Definition window, select a listed question, click the Add a new Record () icon and select Additional Info or select a listed additional info sub-question and click the Edit Record () icon.
Note: The Additional Info option is only enabled if the selected question has the Sub-questions checkbox selected and the drop-down set to Additional Info.
Form Item - Additional Info - Field Definitions
| Form
|
A read-only field that indicates the selected form.
|
| Page
|
A read-only field that indicates the value of the selected form page and identifies where the page displays in the form.
|
| Description
|
A read-only field that describes the selected form page.
|
| Parent Question |
A read-only field that indicates the parent question the additional info item is being defined for.
|
| Reference Code |
A text field that indicates the reference code for this question in reports and custom form reports.
|
| Text |
A text field that indicates the content to display for the additional information. |
| Answer Type |
A drop-down list that indicates the answer type for the sub-question:
|
| Sub-questions |
A checkbox that, when selected, indicates that the item will prompt sub-question(s).
A drop-down list that indicates the type of prompted sub-question:
-
Checklist
-
Additional Info
|
| Answer Scheme |
A text field that indicates which number ranges and values are allowed in the user’s answers.
The ellipsis is used to display the Answer Schemes window and select an answer scheme.
Note: This field only displays if Answer Type is set to Number.
|
| Answer List |
A text field that indicates the list of possible answers.
The ellipsis is used to display the EPR Answer Lists window and select an answer list.
Note: This field only displays if Answer Type is set to List.
|
| Allow "Don't Know as an answer |
A checkbox that, when selected, indicates that users can select Don’t Know as an answer.
Note: The checkbox is only enabled if Answer Type is set to Yes/No.
|
| Approved answer can be changed by users who 'Require Approval' |
A checkbox that, when selected, indicates that answers to this item can be modified after it has been approved, but will require re-approval. |
| Required... |
A button that displays the Required Form Item Status Codes window and allows you to view and manage which status codes require this question to be completed.
|
| Additional... |
A button that displays the Form Item Additional Definitions window and allows you to view and manage which value(s) should trigger alerts, allergies, medical problems, or needs.
Note: This button is only enabled if Answer Type is set to Yes/No, Number, or List.
|
| Available in iForms
|
A checkbox that, when selected, indicates that the item is available in PatientAccess.
Note: This checkbox is only enabled if the form has been set as available in iForms.
|
Form Item - Additional Info - Tasks
| Add Additional Info Items
|
- Complete the fields as necessary and click OK.
|
| Edit Additional Info Items
|
- Make any necessary changes and click OK.
|
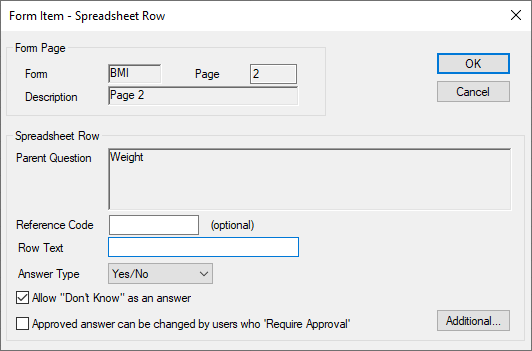
Form Item - Spreadsheet Row Window
(Maintenance > EHR > Form Setup > Form Pages > Form Page Definition)
The Form Item - Spreadsheet Row window allows you to define rows of questions (e.g., vital signs) for the selected spreadsheet. It displays when you open the Form Page Definition window, select a listed question, click the Add a new Record () icon and select Spreadsheet Row or select a listed additional info sub-question and click the Edit Record () icon.
Note: The Spreadsheet Row option is only enabled if the selected question has the Answer Type field set to Spreadsheet Row.
Form Item - Spreadsheet Row - Field Definitions
| Form
|
A read-only field that indicates the selected form.
|
| Page
|
A read-only field that indicates the value of the selected form page and identifies where the page displays in the form.
|
| Description
|
A read-only field that describes the selected form page.
|
| Parent Question |
A read-only field that indicates the parent question the spreadsheet row is being defined for.
|
| Reference Code |
A text field that indicates the reference code for this question in reports and custom form reports.
|
| Row Text |
A text field that indicates the content to display on the row. |
| Answer Type |
A drop-down list that indicates the answer type for the sub-question:
|
| Sub-questions |
A checkbox that, when selected, indicates that the item will prompt sub-question(s).
A drop-down list that indicates the type of prompted sub-question:
-
Checklist
-
Additional Info
|
| Answer Scheme |
A text field that indicates which number ranges and values are allowed in the user’s answers.
The ellipsis is used to display the Answer Schemes window and select an answer scheme.
Note: This field only displays if Answer Type is set to Number.
|
| Answer List |
A text field that indicates the list of possible answers.
The ellipsis is used to display the EPR Answer Lists window and select an answer list.
Note: This field only displays if Answer Type is set to List.
|
| Allow "Don't Know as an answer |
A checkbox that, when selected, indicates that users can select Don’t Know as an answer.
Note: The checkbox is only enabled if Answer Type is set to Yes/No.
|
| Approved answer can be changed by users who 'Require Approval' |
A checkbox that, when selected, indicates that answers to this item can be modified after it has been approved, but will require re-approval. |
| Required... |
A button that displays the Required Form Item Status Codes window and allows you to view and manage which status codes require this question to be completed.
|
| Additional... |
A button that displays the Form Item Additional Definitions window and allows you to view and manage which value(s) should trigger alerts, allergies, medical problems, or needs.
Note: This button is only enabled if Answer Type is set to Yes/No, Number, or List.
|
| Available in iForms
|
A checkbox that, when selected, indicates that the item is available in PatientAccess.
Note: This checkbox is only enabled if the form has been set as available in iForms.
|
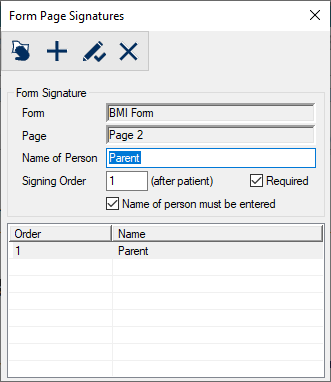
Form Page Signatures Window
(Maintenance > EHR > Form Setup > Form Pages)
The Form Page Signatures window allows you to configure which additional signatures aside from the patient are required for the form page and the order in which they are captured. It displays when you open the Form Pages window, select a listed page and click the Signatures... button.
Note: The Signatures... button is only enabled if the Requires Other Signatures checkbox is selected.
Form Page Signatures - Field Definitions
| Form
|
A read-only field that indicates the selected form.
|
| Page
|
A read-only field that indicates the value of the selected form page and identifies where the page displays in the form.
|
| Name of Person
|
A text field that indicates the name or title of the person signing the form.
Examples: Witness, Instructor, or Guarantor.
|
| Signing Order
|
A text field that indicates the prompt order for entering each person’s signature, after capturing
the patient’s signature.
Example: If this is to be the first signature to capture after the patient’s signature,
enter 1. If you have a second signature to capture after the first signee, enter 2 for
the second person.
|
| Required
|
A checkbox that, when selected, indicates that the signature is not optional. |
| Name of person must be entered
|
A checkbox that, when selected, indicates that the name of the signing person must also be typed in. |
Form Page Signatures - Tasks
| Add Page Signatures
|
- Click the Clear Data () icon.
- Complete the fields as necessary and click the Add a new Record () icon.
|
| Edit Page Signatures
|
- Select a listed entry.
- Make any necessary changes and click the Modify Record () icon.
|
| Delete Page Signatures
|
- Select a listed entry and click the Delete Record () icon.
- When prompted, click Yes to confirm the deletion.
|
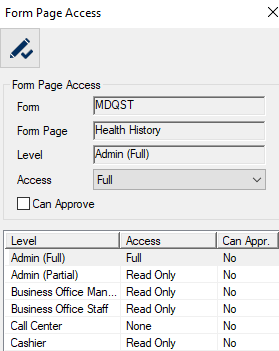
Form Page Access window
(Maintenance > EHR > Form Setup > Form Page)
The Form Page Access window allows you to manage access to the selected form page. It displays when you open the Form Pages window, select a listed page and click the Level Access () icon.
Form Page Access - Field Definitions
| Form
|
A read-only field that indicates the selected form.
|
| Form Page
|
A read-only field that indicates the value of the selected form page and identifies where the page displays in the form.
|
| Level
|
A read-only field that indicates the selected user level(s).
Tip: You can select multiple levels to save time. If multiple are selected, a comma and ellipsis (, ...) display after the first level.
|
| Access
|
A drop-down list that indicates access for the selected user level(s):
- None: The user level has no access to the form page.
- Read Only: The user level cannot make changes to the form page.
- Require Approval: The user level can make changes to the form page but requires approval.
- Full: The user level has full access (read/write/delete) to the form page.
|
| Can Approve
|
A checkbox that, when selected, indicates that the security level has rights to approve the form
page. |
Form Page Access - Tasks
| Configure Form Page Access
|
-
Select one or more user levels that should have the same access.
-
Complete the fields as necessary and click the Modify Record () icon.
-
Repeat the steps for all necessary user levels.
|
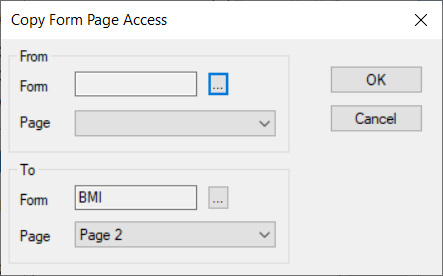
Copy Form Page Access window
(Maintenance > EHR > Form Setup > Form Pages)
The Copy Form Page Access window allows you to copy access between form pages quickly. It displays when you open the Form Pages window and click the Copy Level Access ( ) icon. ) icon.
Copy Form Page Access - Field Definitions
| Form (From) |
A read-only field that indicates the form you are copying from.
The ellipsis is used to display the Form Setup window and select a form.
|
| Page (From) |
A drop-down list that indicates the page you are copying access from.
|
| Form (To) |
A read-only field that indicates the form you are copying to.
The ellipsis is used to display the Form Setup window and select a form.
|
| Page (To) |
A drop-down list that indicates the page you are copying access to.
|
Form Reports window
(Maintenance > EHR > Form Setup > Form Pages)
The Form Reports window allows you to associate form pages with a Crystal Report file. It displays when you open the Form Pages window and click the Form Reports () icon.
Form Reports - Field Definitions
| Form
|
A read-only field that indicates the selected form.
|
| Page
|
A read-only field that indicates the value of the selected form page and identifies where the page displays in the form.
|
| Name
|
A text field that indicates the name for the report.
|
| Report File
|
A text field that indicates the selected Crystal Report file.
The ellipsis is used to locate and select the Crystal Report file.
|
| Run Before Report
|
A text field that indicates the name of an Oracle stored procedure that should run on the axiUm database before this report is run.
Tip: This would most commonly be used to pre-populate and custom tables used by the form report.
|
| Run After Report
|
A text field that indicates the name of an Oracle stored procedure that should run on the axiUm database after this report is run.
Tip: This would most commonly be used to clean up any custom tables populated for the form report.
|
Form Reports - Tasks
| Add Form Reports
|
- Click the Clear Data () icon.
- Complete the fields as necessary and click the Add a new Record () icon.
|
| Edit Form Reports
|
- Select a listed entry.
- Make any necessary changes and click the Modify Record () icon.
|
| Delete Form Reports
|
- Select a listed entry and click the Delete Record () icon.
- When prompted, click Yes to confirm the deletion.
|
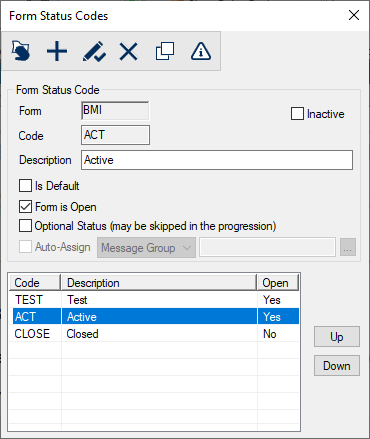
Form Status Codes Window
(Maintenance > EHR > Form Setup)
The Form Status Codes window allows you to define status codes applicable to the selected form. It displays when you open the Form Pages window and click the Form Status Codes () icon.
Form status codes can be used to track a form’s progression as it is completed and approved. If utilized, status codes can identify required fields.
Form status codes can also be used to assign the form to a specific user or group.
Form Status Codes - Field Definitions
| Form
|
A read-only field that indicates the selected form.
|
| Code
|
A text field that indicates the unique code that identifies the status code.
|
| Description
|
A text field that describes the status code.
|
| Is Default
|
A checkbox that, when selected, indicates that the status is the default assigned to a form when first created.
Note: Only one status code can be default.
|
| Form is Open |
A checkbox that, when selected, indicates that the form will display in the list of open forms in the Personal Planner module when assigned to a group or user. |
| Optional Status (may be skipped in the progression) |
A checkbox that, when selected, indicates that status code is optional and may be skipped. |
| Auto-Assign |
A checkbox that, when selected, indicates that the form will be auto-assigned to a group or user when set to the status.
A drop-down list that indicates which type the form will be auto-assigned to:
A text field that indicates which user or message group the form will be auto-assigned to.
The ellipsis is used to display the Users List window or Message Groups window and select a user or message group.
Note: The checkbox is only enabled if the Form Setup window > Can be assigned checkbox is selected.
|
Form Status Codes - Tasks
| Add Form Status Codes
|
- Click the Clear Data () icon.
- Complete the fields as necessary and click the Add a new Record () icon.
|
| Edit Form Status Codes
|
- Select a listed entry.
- Make any necessary changes and click the Modify Record () icon.
|
| Delete Form Status Codes
|
- Select a listed entry and click the Delete Record () icon.
- When prompted, click Yes to confirm the deletion.
|
| Reorder Form Status Codes
|
- Select a listed entry.
- Click the Up and Down buttons to move the selected entry within the list.
|
| Copy Form Status Codes
|
You can copy a form’s status codes if you want to use the same codes for multiple forms.
- Click the Copy Form Status Codes (
 ) icon. ) icon.
- Copy the form status codes to another form as necessary and click OK.
|
| Configure Required Questions by Form Status
|
You can designate which questions show up as required fields when a form is set to a specific status.
Note: You cannot make headings, checklist items, or spreadsheet rows required.
-
Select a listed entry and click the Status Code Required Form Items () icon to display the Status Code Required Form Items window.
-
Make any necessary changes and click OK.
|
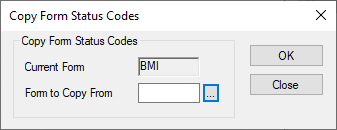
Copy Form Status Codes window
(Maintenance > EHR > Form Setup > Form Status Codes)
The Copy Form Status Codes window allows you to copy a form’s status codes to another form. It displays when you open the Form Status Codes window and click the Copy Form Status Codes () icon.
Copy Form Status Codes - Field Definitions
| Current Form
|
A read-only field that indicates the selected form you are copying to.
|
| Form to Copy From
|
A text field that indicates which form you are copying from.
The ellipsis is used to display the Form Setup window and select a form.
|
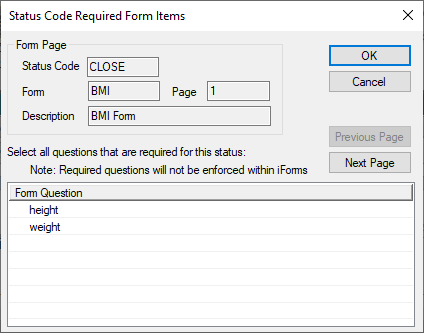
Status Code Required Form Items window
(Maintenance > EHR > Form Setup > Form Status Codes)
The Status Code Required Form Items window allows you to designate which questions show up as required fields when a form is set to a specific status. It displays when you open the Form Status Codes window, select a status and click the Status Code Required Form Items () icon.
Status Code Required Form Items - Field Definitions
| Status Code
|
A read-only field that indicates the selected status code.
|
| Form
|
A read-only field that indicates the selected form.
|
| Page
|
A read-only field that indicates the value of the selected form page and identifies where the page displays in the form.
|
| Description
|
A read-only field that describes the selected form.
|
Status Code Required Form Items - Tasks
| Configure Items as Required
|
-
Select all questions that you want required for this status and click OK.
Tip: Click the Previous Page and Next Page buttons as necessary to navigate through all form questions.
|
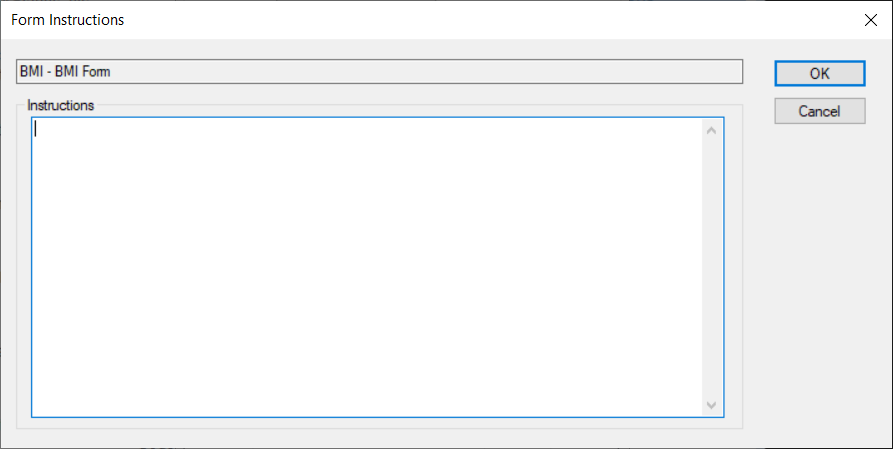
Form Instructions window
(Maintenance > EHR > Form Setup)
The Form Instructions window allows you to configure instructions that display at the form level to give users information they need to complete the form properly. It displays when you open the Form Setup window, select a form and click the Instructions () icon.
Form instructions are optional.
Form Instructions - Tasks
| Add Form Instructions
|
- Complete the fields as necessary and click OK.
|
| Edit Form Instructions
|
- Make any necessary changes and click OK.
|
Form Definitions (by Procedure) window
(Maintenance > EHR > Form Setup)
The Form Definitions (by Procedure) window allows you to configure which procedures this form will be used with. It displays when you open the Form Setup window, select a treatment-based form and click the Procedures... button.
Note: The Procedures... button is only enabled if the Owner List field is set to Treatment.
Form Definitions (by Procedure) - Field Definitions
| Form
|
A read-only field that indicates the selected form.
|
| Criteria
|
A text field that is used to enter your search criteria.
|
| Type of Code
|
A drop-down list that indicates which type of code to search on:
- ADA: American Dental Association codes.
- CPT: Current Procedural Terminology codes.
- Condition: Condition codes.
- Material: Material codes.
|
| Search On
|
A drop-down list that indicates which field to search on:
|
| Default Form
|
A checkbox that, when selected, indicates that this is the default form to use for the
procedure highlighted in the Assigned Procedures list box. |
| Required
|
A checkbox that, when selected, indicates that this form must be completed
before starting the procedure highlighted in the Assigned Procedures list box. |
|


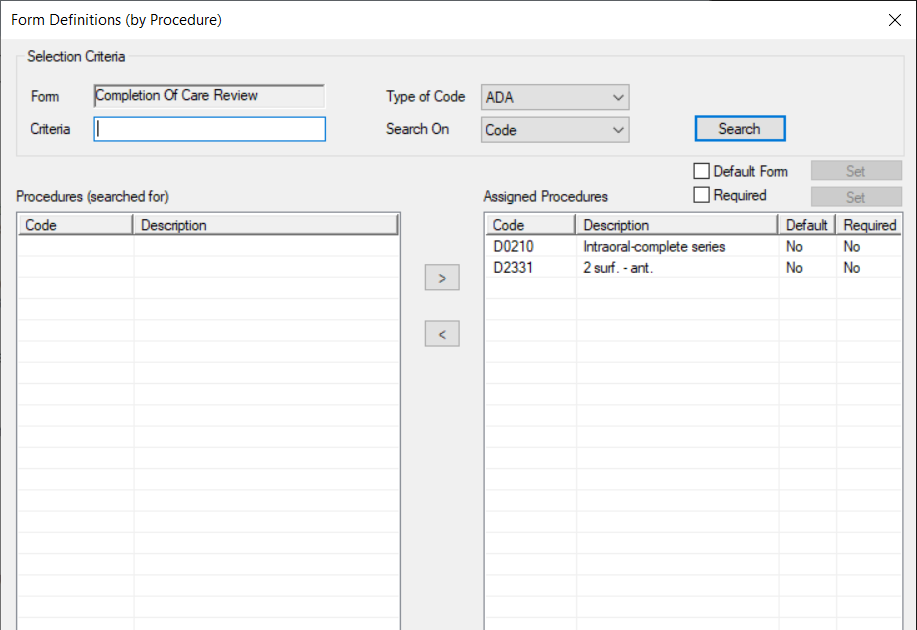
 ) button to move to the Assigned Procedures list box.
 ) button to move to the Procedures (searched for) list box.