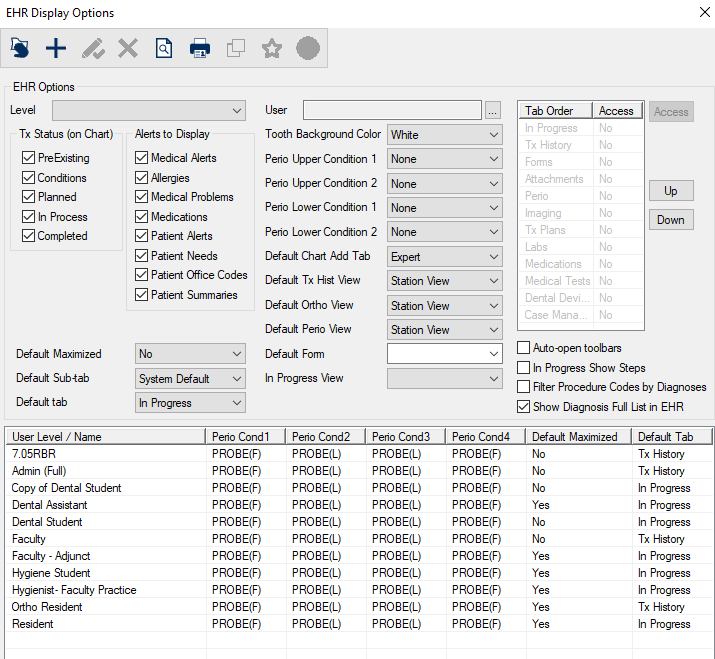
EHR Display Options Window
The EHR Display Options window allows you to configure how the EHR window will look and behave for specific individuals or users of specific security levels.
 EHR Display Options - Field Definitions EHR Display Options - Field Definitions
| Level
|
A drop-down list that indicates the security level for this EHR display view setup.
Note: The entries are the security levels configured in PowerAdmin.
|
| User
|
A text field that indicates a specific user for or this EHR display view setup.
The ellipsis is used to display the Users List window and select a user.
|
| PreExisting
|
A checkbox that, when selected, indicates that materials and treatment with a pre-existing status display on the odontogram.
|
| Conditions
|
A checkbox that, when selected, indicates that conditions display on the odontogram.
|
| Planned
|
A checkbox that, when selected, indicates that treatments with a planned status display on the odontogram.
|
| In Process
|
A checkbox that, when selected, indicates that treatments with an in process status display on the odontogram.
|
| Completed
|
A checkbox that, when selected, indicates that treatments with a completed status display on the odontogram.
|
| Medical Alerts
|
A checkbox that, when selected, indicates that patient medical alerts display on the EHR module > Alerts sub-tab.
|
| Allergies
|
A checkbox that, when selected, indicates that patient allergies display on the EHR module > Alerts sub-tab.
Note: If selected, the Show Allergies Reviews right-click option is also enabled.
|
| Medical Problems
|
A checkbox that, when selected, indicates that medical alerts display on the EHR module > Alerts sub-tab.
Note: If selected, the Show Medical Problems Reviews right-click option is also enabled.
|
| Medications |
A checkbox that, when selected, indicates that patient's current medications display in the EHR module. |
| Patient Alerts |
A checkbox that, when selected, indicates that patient alerts display on the EHR module > Alerts sub-tab. |
| Patient Needs |
A checkbox that, when selected, indicates that patient needs display on the EHR module > Alerts sub-tab. |
| Patient Office Codes |
A checkbox that, when selected, indicates that patient office codes display on the EHR module > Alerts sub-tab. |
| Patient Summaries |
A checkbox that, when selected, indicates that patient summaries display on the EHR module > Alerts sub-tab.
Note: This checkbox is used in conjunction with the Patient > Summary Codes window > Show In Alerts checkbox.
|
| Default Maximized |
A drop-down list that indicates which default screen mode to display when you open the EHR module:
|
| Default Sub-tab |
A drop-down list that indicates the EHR tab to display when you open the EHR module:
-
System Default: Opens to the Objectives sub-tab if any planned treatments are in process and the Alerts tab if none are in process.
-
Alerts: Opens to the Alerts sub-tab.
-
Problems: Opens to the Problems sub-tab.
-
Objectives: Opens to the Objectives tab.
-
Prev Care: Opens to the Prev Care sub-tab.
|
| Default tab |
A drop-down list that indicates the default tab to display when you open the EHR module. |
| Tooth Background Color |
A drop-down list that indicates the default background color to display on the odontogram when you open the EHR module:
|
| Perio Upper Condition 1 |
A drop-down list that indicates the perio condition to display in the first line of the maxillary arch on the EHR window.
Perio conditions are configured by your institution and will vary according to your perio setup.
|
| Perio Upper Condition 2 |
A drop-down list that indicates the perio condition to display in the second line of the maxillary arch on the EHR window.
Perio conditions are configured by your institution and will vary according to your perio setup.
|
| Perio Lower Condition 1 |
A drop-down list that indicates the perio condition to display in the first line of the mandibular arch on the EHR window.
Perio conditions are configured by your institution and will vary according to your perio setup.
|
| Perio Lower Condition 2 |
A drop-down list that indicates the perio condition to display in the second line of the mandibular arch on the EHR window.
Perio conditions are configured by your institution and will vary according to your perio setup.
|
| Default Chart Add Tab |
A drop-down list that indicates the default sub-tab to display when you view the EHR module > Chart
Add tab:
-
Expert
-
Codes
-
Details
-
Diagnosis
|
| Default Tx Hist View |
A drop-down list that indicates the default view to display when you view the EHR module > Tx History
tab.
Note: If you select the Station View option, the settings defined in the EHR module > EHR Options window > Tx History tab are used as the default view for the Tx History tab.
|
| Default Ortho View |
A drop-down list that indicates the default view to display in the Ortho module > Ortho Tx
History window.
Note: If you select the Station View option, the settings defined in the Ortho module > Tx History Options window are used as the default view for the Ortho Tx History window.
|
| Default Perio View |
A drop-down list that indicates the default view to display in the Perio module > Perio Tx History window.
Note: If you select the Station View option, the settings defined in the Perio module > Tx History Options window are used as the default view for the Perio Tx History window.
|
|
Default Form
|
A drop-down list that indicates the default form to display in the EHR
module > Forms tab.
The entries are configured by your institution and will vary according to your form setup.
|
| In Progress View |
A drop-down list that indicates the default view to display when you view the EHR module > In Progress tab.
The entries are configured by your institution and will vary according to your patient care views setup.
|
| Tab Order |
This section indicates the order in which tabs display in the EHR module. |
| Access |
A button that displays the EHR Tab Access by Level window and allows you to configure access to individual tabs for each security level. |
| Auto-open toolbars |
A checkbox that, when selected, indicates that the toolbars display by default when you open the
EHR module. |
| Up / Down |
Buttons that control the EHR tab display order for this security level/user.
Selected tabs can be reordered in the list box as necessary.
|
| In Process Show Steps |
A checkbox that, when selected, indicates that stepped procedures display in the EHR module > In Progress
tab. |
| Filter Procedures by Diagnosis |
A checkbox that, when selected, indicates that IntelliSense fields for procedure codes filter
your search criteria based on the selected diagnosis. |
| Show Diagnosis Full List in EHR |
A checkbox that, when selected, indicates that the Full
List tab displays in the Select Clinical Diagnosis window. |
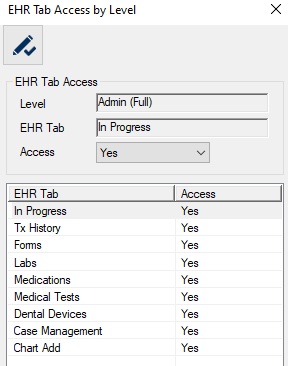
EHR Tab Access by Level Window
(Maintenance > EHR > EHR Display Options)
The EHR Tab Access window allows you to configure access to individual tabs for each security level. It displays when you open the EHR Display Options window and click the Access button.
EHR Tab Access by Level - Field Definitions
| Level
|
A read-only field that indicates the selected security level.
|
| EHR Tab
|
A read-only field that indicates the selected EHR tab.
|
| Access
|
A drop-down list that indicates the access level for the selected security level and EHR tab:
|
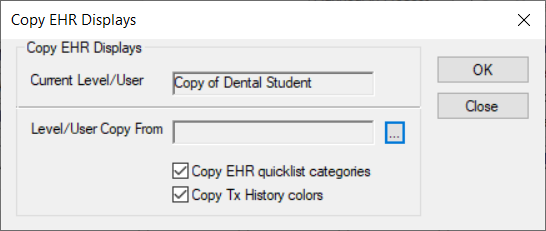
Copy EHR Displays Window
(Maintenance > EHR > EHR Display Options)
The Copy EHR Displays window allows you to copy settings from an existing level / user to a different level / user. It displays when you open the EHR Display Options window and click the Copy EHR Displays ( ) icon. ) icon.
Copy EHR Displays - Field Definitions
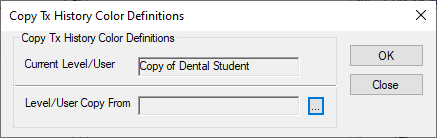
| Current Level/User
|
A read-only field that indicates the selected security level or user that you are copying to.
|
| Level/User Copy From
|
A text field that indicates the security level or user that you are copying from.
The ellipsis is used to display the Select EHR Display window and select an EHR display.
|
| Copy EHR quick list categories
|
A checkbox that, when selected, indicates that the EHR quick list categories will also be copied.
|
| Copy Tx History colors
|
A checkbox that, when selected, indicates that the treatment history color definitions will also be copied.
|
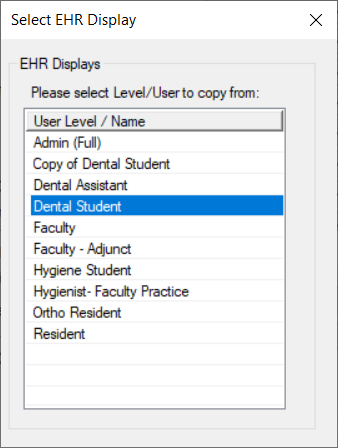
Select EHR Display window
(Maintenance > EHR > EHR Display Options > Copy EHR Displays)
The Select EHR Display window allows you to select the level or user to copy settings from in the Copy EHR Displays window. It displays when you open the EHR Display Options window and click the Level/User Copy From ellipsis.
Quick List Categories Window
(Maintenance > EHR > EHR Display Options)
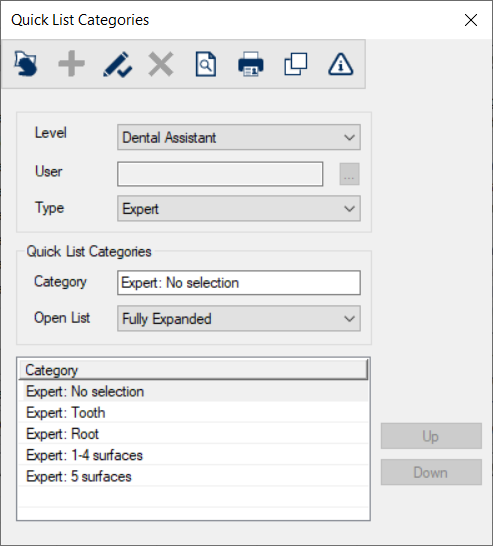
The Quick List Categories window allows you to configure quick lists for the security level or specific user. It displays when you open the EHR Display Options window and click the Quick Lists ( ) icon. ) icon.
Quick lists allow users to select from a list of procedures determined by your institution rather then selecting from the full list of ADA procedure codes.
Quick lists can be collections of conditions, materials, and procedures that may be used to quickly set up a treatment plan. Procedures that are often performed during a treatment or in a series of treatments can be placed together so the user does not have to search for and select individual treatments. There are no restrictions as to what codes or macros can be placed in a category or list type.
Categories are user-defined for a specific user level and type.
Quick List Categories - Field Definitions
| Level
|
A drop-down list that indicates the selected security level for the quick list category.
Note: The entries are the security levels configured in PowerAdmin.
|
| User
|
A text field that indicates the selected user for the quick list category.
The ellipsis is used to display the Users List window and select a user.
|
| Type
|
A drop-down list that indicates the type of quick list category being defined:
-
Finding: This quick list category displays in the EHR module > Chart Add tab > Codes tab > in the Findings option.
Note: This option displays by default if you access this window from the Procedure Codes List window and the Type of Code field displays Condition or Material.
-
Dental Tx: This quick list category displays in the EHR module > Chart Add tab > Codes tab > in the Dental Tx option.
Note: This option displays by default if you access this window from the Procedure Codes List window and the Type of Code field displays ADA.
-
Medical Tx: This quick list category displays in the EHR module > Chart Add tab > Codes tab > in the Medical Tx option.
Note: This option displays by default if you access this window from the Procedure Codes List window and the Type of Code field displays CPT.
-
Expert: This quick list category displays in the EHR module > Chart Add tab > Codes tab > in the Expert tab.
Note: This option displays by default if you access this window from the EHR Display Options window.
-
Diagnosis: This quick list category displays in the EHR module > Chart Add tab > Codes tab > in the Diagnosis tab.
Note: This option displays by default if you access this window from the Clinical Diagnosis List window.
|
| Category
|
A text field that indicates the name of the category being defined.
|
| Open List
|
A drop-down list that indicates how axiUm displays Quick list type categories:
-
Fully Expanded: Sub-categories for the Quick List type automatically expand when you view it in the EHR module.
Example: If the Type drop-down list displays Diagnosis, the EHR module > Chart Add tab > Diagnosis tab displays all the sub-categories fully expanded.
-
Collapsed: Sub-categories for the Quick list type automatically collapse when you view it in the EHR module.
Example: If the Type drop-down list displays Expert, the EHR module > Chart Add tab > Expert tab displays all the sub-categories fully expanded.
|
Quick List Categories - Tasks
| Add Quick List Categories
|
- Click the Clear Data (
 ) icon. ) icon.
- Complete the fields as necessary and click the Add a new Record (
 ) icon. ) icon.
|
| Edit Quick List Categories
|
- Select a listed entry.
- Make any necessary changes and click the Modify Record (
 ) icon. ) icon.
|
| Manage Quick List Definitions
|
- Select a listed entry and click the Quick List Definitions(
 ) icon to display the Quick List Definitions window. ) icon to display the Quick List Definitions window.
- Manage the quick list definitions as necessary and close the window.
|
| Copy Quick List Categories
|
- Click the Copy Quick List Categories & Definitions () icon to display the Copy Quick List Categories & Definitions window.
- Copy the quick list category and definitions(s) as necessary and close the window.
|
| Delete Quick List Categories
|
- Select a listed entry and click the Delete Record (
 ) icon. ) icon.
- When prompted, click Yes to confirm the deletion.
|
| Preview/Print Report
|
- (Optional) To preview the Quick List Categories report, click the Preview Report (
 ) icon. ) icon.
- To print the Quick List Categories report, click the Print Report (
 ) icon. ) icon.
|
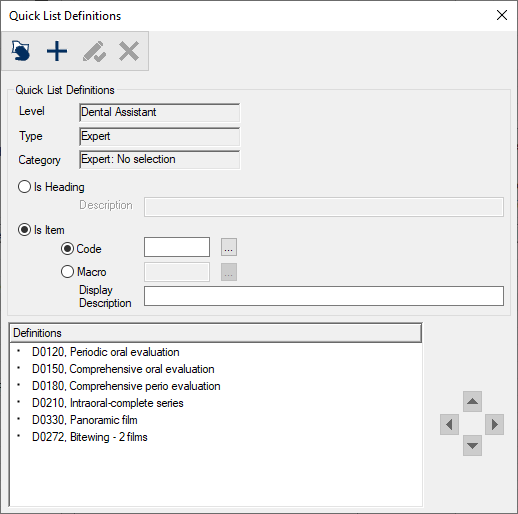
Quick List Definitions window
(Maintenance > EHR > EHR Display Options > Quick List Categories)
The Quick List Definitions window allows you to configure the contents of quick lists. This can include conditions, materials, ADA and CPT procedures, and procedure macros.
It displays when you open the Quick List Categories window and click the Quick List Definitions () icon.
Quick List Definitions - Field Definitions
| Level
|
A read-only field that indicates the selected security level for the quick list.
|
| Type
|
A read-only field that indicates the type of quick list category.
|
| Category
|
A read-only field that indicates the item name of the category list type.
|
| Is Heading
|
A radio button that, if selected, indicates that the item being added is a heading line and not a procedure code.
A heading line is used to create sections in the quick list.
Note: If selected, the Description field is enabled.
|
| Description
|
A text field that indicates the heading text.
Note: This is only enabled if the Is Heading radio button is selected.
|
| Is Item
|
A radio button that, if selected, indicates that the item being added is a selectable item in the quick list.
A heading line is used to create sections in the quick list.
Note: If selected, the Code, Macro, and Display Description fields are enabled.
|
| Code
|
A radio button that, if selected, indicates the ADA, CPT, condition, or material code used in the quick list.
The ellipsis is used to display the Procedure Codes List window and select a procedure code.
Note: This is only enabled if the Is Item radio button is selected.
|
| Macro
|
A radio button that, if selected, indicates the macro code used in the quick list.
Note: This is only enabled if the Is Item radio button is selected.
|
| Display Description
|
A text field that indicates the text to display for the item. This defaults to the description of the code selected from the Code or Macro field, but can be modified as free-form text.
Note: This is only enabled if the Is Item radio button is selected.
|
Quick List Definitions - Tasks
| Add Quick List Definitions
|
- Click the Clear Data () icon.
- Complete the fields as necessary and click the Add a new Record () icon.
|
| Edit Quick List Definitions
|
- Select a listed entry.
- Make any necessary changes and click the Modify Record () icon.
|
| Delete Quick List Definitions
|
- Select a listed entry and click the Delete Record () icon.
- When prompted, click Yes to confirm the deletion.
|
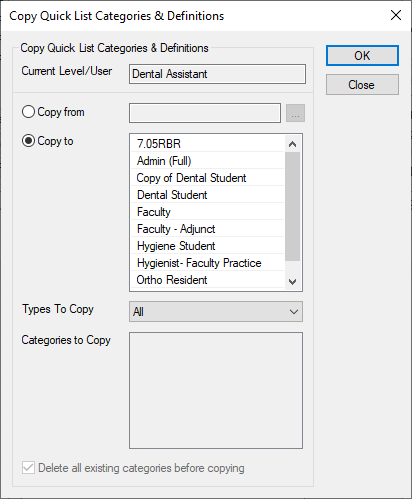
Copy Quick List Categories & Definitions window
(Maintenance > EHR > EHR Display Options > Quick List Categories)
The Copy Quick List Categories & Definitions window allows you to copy quick lists to the currently selected user level from another. It displays when you open the Quick List Categories window and click the Copy Quick List Categories & Definitions () icon.
Important: Copying a quick list must be done with care. The existing quick list will be deleted as the copy takes its place.
Copy Quick List Categories & Definitions - Field Definitions
| Current Level/User
|
A read-only field that indicates the selected security level you are copying to/from.
Note: If the Copy from radio button is selected below, this level/user will be copied to. If the Copy to radio button is selected below, this level/user will be copied from.
|
| Copy from
|
A radio button that, if selected, indicates that you want to copy from another user or user level.
The ellipsis is used to display the Select Level/User window and select a level/user.
Note: The ellipsis is only enabled if the Copy from radio button is selected.
|
| Copy to
|
A radio button that, if selected, indicates that you want to copy a quick list definition to another user or user level.
The list box is enabled if the radio button is selected.
The highlighted items in the list box indicate the users or user levels to which you are copying.
|
| Types to Copy
|
A drop-down list that indicates the type of category to copy from or to:
-
All: Copies all types of quick list categories.
-
Finding: Copies only the Finding type quick list category.
-
Dental Tx: Copies only the Dental Tx type quick list category.
-
Medical Tx: Copies only the Medical Tx type quick list category.
-
Expert: Copies only the Expert type quick list category.
-
Diagnosis: Copies only the Diagnosis type quick list category.
Note:Selecting any option except All enables the Delete all existing categories before copying checkbox.
|
| Categories to Copy
|
A list box that displays the quick list categories associated to the quick list type selected in the Types To Copy field. Highlighted items indicate which categories to copy.
The options in this list box are defined in the Quick List Categories window.
|
| Delete all existing
categories before
copying
|
A checkbox that, when selected, indicates to remove all currently existing categories in the destination record before copying to it.
Note: This field is only enabled if the Types to Copy field is set to an option other than All.
|
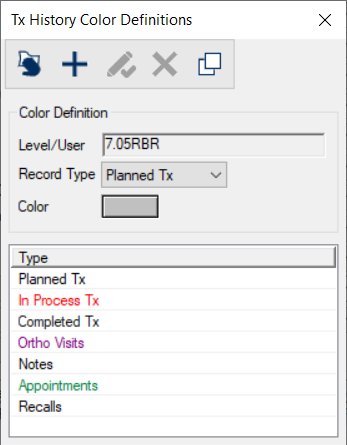
Tx History Color Definitions Window
(Maintenance > EHR > EHR Display Options)
The Tx History Color Definitions window allows you to assign display colors for Tx History items in the EHR module, such as planned, in process, completed, or preexisting treatments, conditions, ortho visits, notes, appointments, and recalls listings.
It displays when you open the EHR Display Options window and click the Tx History Color Definitions ( ) icon. ) icon.
Note: You can use duplicate colors.
Tx History Color Definitions - Field Definitions
| Level/User
|
A read-only field that indicates the selected security level for the color definition.
|
| Record Type
|
A drop-down list that indicates the type of treatment history record for the color definition:
-
Planned Tx
-
In Process Tx
-
Completed Tx
-
Pre-Existing Tx
-
Conditions
-
Ortho Visits
-
Notes
-
Appointments
-
Recalls
-
Forms
|
| Color
|
The text color used when displaying the treatment history for the selected record type.
|
Tx History Color Definitions - Tasks
| Add Color Definitions
|
- Click the Clear Data () icon.
- Complete the fields as necessary and click the Add a new Record () icon.
|
| Edit Color Definitions
|
- Select a listed entry.
- Make any necessary changes and click the Modify Record () icon.
|
| Copy Color Definitions
|
- Click the Copy EHR Color Definitions () icon to display the Copy Tx History Color Definitions window.
- Copy the EHR color definition as necessary and close the window.
|
| Delete Color Definitions
|
- Select a listed entry and click the Delete Record () icon.
- When prompted, click Yes to confirm the deletion.
|
Copy Tx History Color Definitions window
(Maintenance > EHR > EHR Display Options > Tx History Color Definitions)
The Copy Tx History Color Definitions window allows you to copy Tx History color definitions to the currently selected user level from another. It displays when you open the Tx History Color Definitions window and click the Copy Tx History Color Definitions () icon.
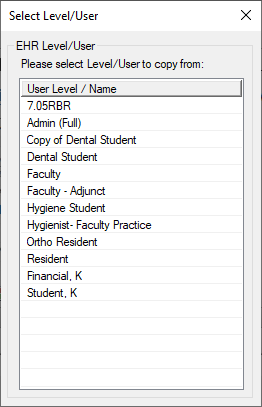
Select Level/User window
(Maintenance > EHR > EHR Display Options > Tx History Color Definitions > Copy Tx History Color Definitions) or (Maintenance > EHR > Quick List Categories > Copy Quick List Categories & Definitions)
The Select Level/User window allows you to select a level or user to copy level/user settings from. It displays when you open the Copy Quick List Categories & Definitions window and click the Copy from ellipsis or when you open the Copy Tx History Color Definitions window and click the Lever/User Copy From ellipsis.
|