|
Appointment requests are usually created by students, but they must be scheduled by another user (i.e., a scheduling clerk or group manager). When creating the appointment, students can look ahead at the schedule, specify information about the appointment, and request a certain date and/or time. The request is then received by the appropriate staff member and scheduled, turning it into an active appointment.
Example: A patient is seen by a student and a second visit is required. The student opens the Scheduler and looks for an available chair. They see one for the morning session in two weeks and submit an appointment request for that opening.
Important: When working in a clinic that uses Availability mode to schedule, providers can view the Chair or Active tab in a different mode to see available chairs and submit appointment requests. A staff member can see these requests in the Scheduler > Availability tab and determine if a chair is available in the requested clinic at that time. If available, the staff member can book the appointment and automatically create the chair reservation. Because Availability mode is typically used in undergraduate clinics, student providers often view the Chair or Active tab in Chair mode to see chairs and submit appointment requests. This is not considered mixing methods as the actual scheduling is all done by the staff through the Availability tab.
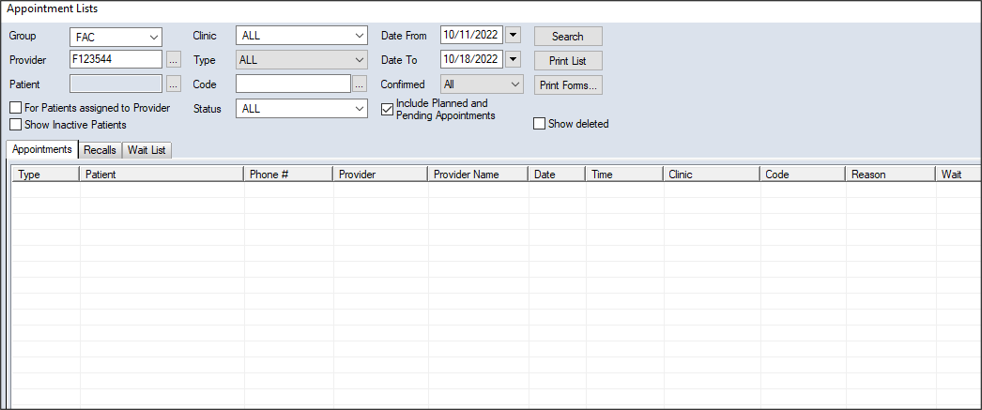
You can make appointment requests from the Scheduler > Chair, Active, or Weekly tab and the Appointment Lists window > Recalls tab. Depending on your institution’s workflow, you may be able to submit an appointment request from the Patients module and the EHR module.
To make an appointment request:
- Open one of the following modules to display the New Appointment Request window:
 Access from the Scheduler > Chair Tab Access from the Scheduler > Chair Tab
-
Click the Chair tab.
- Review the clinic layout.
- Right-click and select Make Appt Request… to display the Select Patient window.
Tip: Right-click a reserved chair cell to auto-populate the Provider field in the New Appointment Request window with the provider the reservation is for.
- Search for and select a patient.
Access from the Scheduler > Active Tab
-
Click the Active tab.
- Review the listed appointments.
- Right-click and select Make Appt Request… to display the Select Patient window.
- Search for and select a patient.
Access from the Scheduler > Weekly Tab
-
Click the Weekly tab.
- Review the listed appointments.
- Right-click and select Make Appt Request… to display the Select Patient window.
- Search for and select a patient.
Access from the Patients module
-
Open the Patients module.
- Locate the correct patient in the selection list or search results.
-
Right-click the patient name and select Appt Request.
Access from the EHR module
-
Select the correct patient and open the EHR module.
-
Right-click a planned treatment and select Add Appt Request….
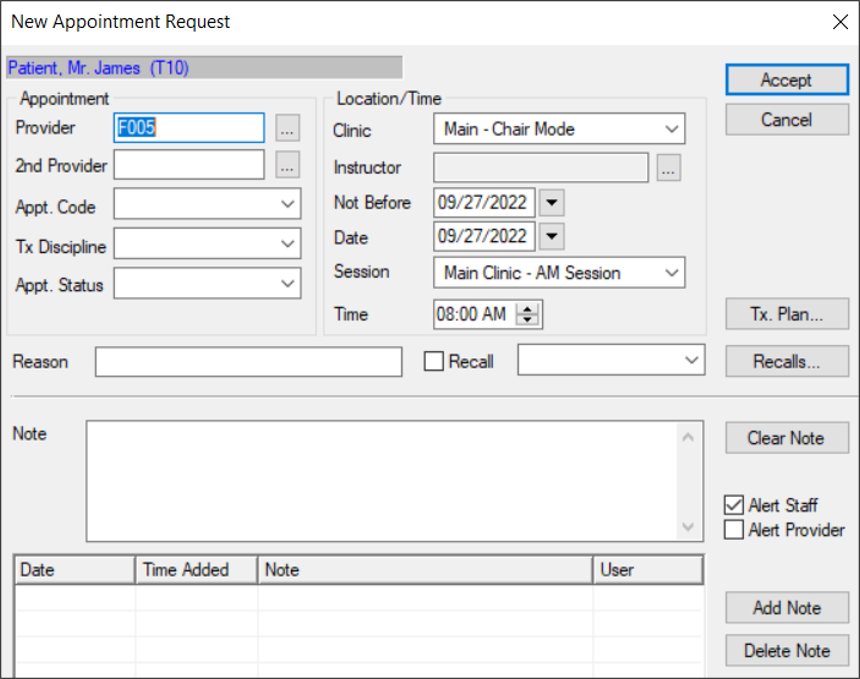
- Complete the fields as necessary and click Accept.
| Provider |
This indicates the provider assigned to the appointment.
If necessary, click the ellipsis to display the Providers List window and select another provider.
|
| 2nd Provider
|
This indicates the secondary provider assigned to the appointment.
If necessary, click the ellipsis to display the Providers List window and select a secondary provider.
|
| Appt. Code
|
Select the appointment code for the requested appointment from the drop-down list to indicate the appointment type and length.
|
|
Tx Discipline |
Select the discipline associated with the requested appointment from the drop-down list.
|
| Appt. Status |
Select the status of the requested appointment from the drop-down list.
|
| Clinic |
Select the clinic this appointment will be booked at from the drop-down list.
|
| Instructor |
Click the ellipsis to display the Instructor List window and select the instructor assigned to this appointment. |
| Not Before |
This defaults to the current date.
If necessary, select the earliest date this appointment can be booked from the calendar drop-down.
|
| Date |
This defaults to the current date.
If necessary, select another date for the requested appointment.
|
|
Session |
Select a session for the requested appointment from the drop-down list.
Note: The options available depend on the option set in the Clinic field.
|
| Time |
Click the arrow buttons to set the time for the requested appointment.
|
| Reason |
Enter the reason for the requested appointment.
|
| Recall |
Select the checkbox if the requested appointment is a recall appointment, then select the recall code and date of the recall from the drop-down list.
Tip: If the Appt. Code field is set to a recall code, the checkbox is selected automatically.
-
Select the checkbox if the requested appointment will be associated with a recall appointment reminder.
Tip: If the Appt. Code field is set to a recall code, the checkbox is selected automatically.
-
Click Recalls… to display the Patient Recalls window.
-
Double-click to select a listed recall appointment reminder.
|
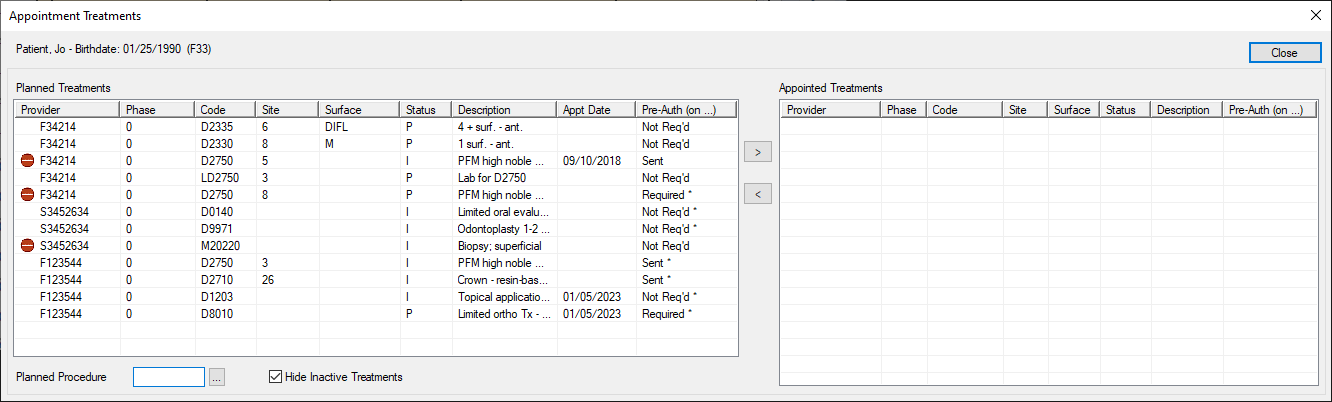
| Tx. Plan… |
-
Click the button to display the Appointment Treatments window and select planned treatment(s) for the appointment request.
Planned treatments for the patient display in the left pane and planned treatments that have been assigned to an appointment display in the right pane.
Note: Only approved planned treatments display.
Tip: If you want to display all planned treatments, deselect the Hide Inactive Treatments checkbox.
-
Complete any of the following:
-
To add a planned treatment to the appointment request, select the listed treatment and click the > button to move it to the Appointed Treatments pane.
-
To add a new planned treatment to the appointment request, click the Planned Procedure ellipsis to display the Procedure Codes List window and select a procedure.
Example: You need to make an unexpected appointment request for an emergency situation.
|
| Note |
Enter any additional information about the appointment request and click Add Note.
Tip: If necessary, you can click Clear Note to remove the text. If you want to remove an added note, click the listed note and click Delete Note.
|
| Alert Staff |
Select the checkbox to alert the staff of the appointment request.
Note: If alerted, the request displays in the staff member’s Personal Planner module > Lists tab > Appointments sub-tab and in the Scheduler module > Availability tab. For providers, the request displays in blue text. For non-providers, the request displays in black text.
|
| Alert Provider |
Select the checkbox to alert the provider and the secondary provider of the appointment request.
Note: If alerted, the request displays in the provider’s Personal Planner module > Lists tab > Appointments sub-tab and in the Scheduler module > Availability tab in red text.
|
|