|
Once you have added an evaluation form, you need to record the evaluation content.
Note: Multiple users, including the student provider and other instructors, may need to record the content in separate copies of the form. If multiple copies must be recorded, the next copy displays after the preceding one is done.
Recording an evaluation includes many or all of the following parts:
- Select the form and enter/confirm information such as form type and provider.
- (Optional) View previous evaluations from the open evaluation form.
Example: You might want to view evaluations completed by other instructors or the student in the last 30 days to compare with the work you are evaluating.
- Review the permitted grade increments in the grade scheme table to the right.
When you enter a value for a selected question, it must correspond to the grade scheme table.
Note: The grade scheme table changes depending on the question being answered. If you enter an invalid value, an Invalid Grade window displays.
- Answer general questions that concern the appointment and the day and focus on assessing how the student did overall.
Examples: Were they punctual, did they follow all the required infection control measures.
- Answer treatment-specific questions related to a procedure performed during the appointment.
If a procedure code is populated, its status, description, and relative value unit code (RVU) also display.
Important: Each treatment-specific question is to a listed procedure code, status, description, and RVU.
Note: The RVU code displays if your institution assigns points for completing procedures that are necessary for the curriculum. Some users may be able to edit the RVU for the completed procedure.
If necessary, instructors can hold an evaluation, and return to it later.
 Fill Out Evaluations Fill Out Evaluations
- Open the Add/Edit Evaluation or Periodic Evaluation window according to your usual workflow.
Note: If the evaluation includes a self evaluation, that copy displays first in blue.
- (Optional) Review previous evaluations.
- Click View Other to display the Select Evaluation to View window.
- (Optional) Set the filters as necessary and click Search to narrow the list of evaluations.
- Current instructor / All instructors / Self Evaluations: Select the appropriate radio button to search for evaluations by the current instructor, evaluations by all instructors, or evaluations by student providers.
- Current patient / All patients: Select the appropriate radio button to search for evaluations for the current patient or evaluations for all patients.
- Current treatments / All treatments: Select the appropriate radio button to search for evaluations that include the current treatment or evaluations that include all treatments.
- List for: Select an entry from the drop-down list to determine the date range.
- Discipline: Select a discipline from the drop-down list.
- Form: Select a form from the drop-down list.
- Select a listed evaluation and click View.
- Review the evaluation as necessary, then close the evaluation.
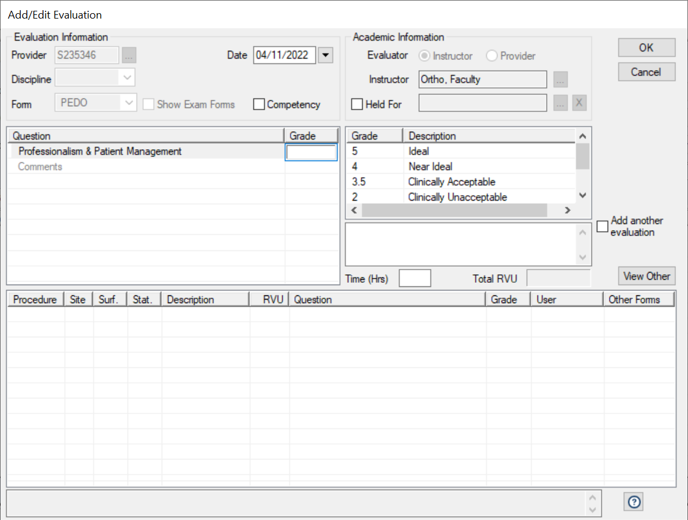
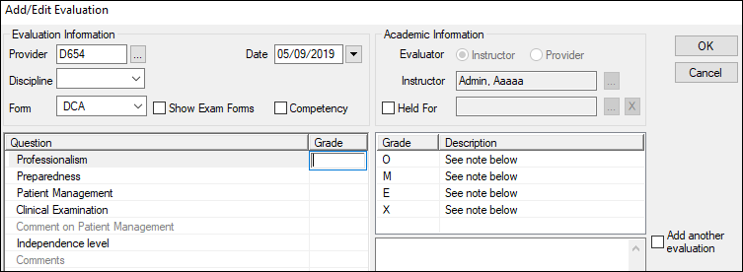
- Review and complete the form information fields as necessary.
Tip: Some questions may come with a long set of instructions. You can click the View Full Instructions ( ) icon to display the Evaluation Instructions window on the right. The window dynamically updates the content when you select another question, so you can keep the window open while you fill in the form. ) icon to display the Evaluation Instructions window on the right. The window dynamically updates the content when you select another question, so you can keep the window open while you fill in the form.
|
Provider
|
Confirm the selected provider is the correct provider.
Note: The field auto-populates with the logged-in student provider.
If necessary, click the ellipsis to select the correct provider.
|
|
Discipline
|
If required, select the discipline of the treatment being evaluated from the drop-down list.
Note: This is the evaluation discipline.
|
|
Form / Show Exam Forms
|
- If you want to select from only exam type forms in the Forms drop-down list, select the checkbox.
Note: The Show Exam Forms checkbox only displays if the exam/evaluation was added manually from the Evaluations Manager.
- Select which evaluation form you will use to grade the student provider from the drop-down list.
Notes:
- If the Show Exam Forms checkbox is selected, the Competency checkbox is disabled.
- The forms display in alphabetical order.
- Only forms that the treating provider has access to display in the list.
|
|
Competency
|
Competency exams are a formal type of student assessment that directly relates to coursework required to prove competency.
Note: If your institution uses exams to track student competency, they must have configured competency levels and obligations during setup.
Example: For each competency level, a specific number of grading forms designated as competency exams must be filled out and given a passing a grade before the student can progress to the next competency level.
Select the checkbox to mark the evaluation as a competency exam.
|
|
Period
|
The field defaults to the period defined in the clinic session that the appointment was created in.
Note: This field displays only if the Evaluations Setup window > Track time utilization checkbox is selected.
|
|
Date
|
The field defaults to today’s date.
If necessary, select the date the evaluation occurred.
|
|
Evaluator
|
Confirm the selected evaluator type is the correct type.
If necessary, select a radio button to select the correct evaluator type.
Note: For some users, this field may be disabled.
|
|
Instructor
|
Confirm the selected instructor is the correct instructor.
Note: The field auto-populates with the instructor set in the Evaluations Manager search field.
If necessary, click the ellipsis to select the correct instructor.
Note: For some users, this field may be disabled.
|
|
Held For
|
If you cannot fill out the evaluation at this time, or want to save the evaluation for another instructor, you can hold the evaluation. This allows you to close the Add/Edit Evaluation window without filling in the evaluation.
- Select the Held For checkbox.
- If necessary, click the Held For ellipsis to display the Instructor List window and select another user.
|
|
Time (Hrs)
|
Enter the length of time (in hours) that the provider spent performing the treatment you are evaluating.
|
|
Total RVU
|
A disabled field that displays the Relative Value Unit and Completed Point Value score associated with the procedure.
This score is given to providers when they successfully complete the treatment.
|
|
Add another evaluation
|
Select the checkbox to open another copy of the evaluation form when you close this one.
Note: When you close the filled-out evaluation, a prompt will display, asking you to select the Same Instructor or New Instructor radio button.
|
-
To answer a general question:
-
Under the Grade column, click in the cell.
If the question has specific permitted answers, they display to the right.
Tip: If a question is set up as a comment, double-click to display the Evaluation Comments window, enter your comment in the text field and click OK.
-
Double-click an answer from the list or enter an answer manually.
-
Repeat the steps as necessary for each question.
Tip: You can press the Tab key to jump quickly to the next question.
-
To answer a procedure-specific question.
Tip: If you do not want to grade a listed treatment, right-click the procedure and select Remove tx from form.
Example: If completing a cumulative evaluation for a multi-step treatment, both the parent treatment code and treatment step code display. You do not want to grade the parent treatment code yet because it is not complete.
Note: If you remove a treatment from an evaluation, it remains in the Evaluations module > Unevaluated Tx tab.
-
Under the Grade column, click in the cell.
If the question has specific permitted answers, they display to the right.
-
Double-click an answer from the list or enter an answer manually.
- (Optional) Click the RVU field to modify the points the student receives.
Note: You must be an instructor to modify the RVU field. If modified, the change is only applicable for this copy of the evaluation form.
-
Repeat the steps as necessary for each applicable procedure-specific question.
Note: If completing the first part of a cumulative evaluation for a multi-step treatment, grade only the questions that relate to the first treatment step code.
-
(Optional) To add a comment to a general question or a treatment-specific question, complete the following:
-
Double-click a listed question to display the Evaluation Comments for a specific grade window.
Tip: You can also right-click the question and select Add/Edit Comment.
-
Enter your comment in the text field and click OK.
-
When the form is complete, click OK.
-
If prompted to indicate if an overall passing grade was given, click Yes or No as necessary.
A prompt to authenticate the form displays.
Note: If you chose to add another copy manually, the prompt does not display. The new copy of the form displays immediately after you close the form and indicate if an overall passing grade was given.
-
When prompted, complete any of the following:
Note: The following options display according to the form’s setup requirements.
-
Swipe your card or enter your credentials and click OK to close the evaluation or continue to the next copy.
-
Swipe your card or enter your credentials and click Instructor to select an instructor for the next copy.
-
Swipe your card or enter your credentials and click Held For to select an instructor that the form copy will be held for.
-
If necessary, repeat the steps above for additional copies of the evaluation form.
Note: If you selected another instructor, the form displays with that instructor’s name.
Hold Evaluations
In certain situations, you may need to add and start an evaluation but cannot complete it. In these situations, you can hold the evaluation for yourself or another user to complete at a later time.
Examples: The current instructor does not have time to finish and wants to hold it for themselves, or part of the evaluation must be completed by a perio instructor.
To hold an evaluation form:
- Open the Add/Edit Evaluation window according to your usual workflow.
- Complete the Evaluation Information and Academic Information fields as necessary.
-
Select the Held For checkbox.
The field defaults to the current instructor’s name.
Note: If an evaluation is marked as Held For, any fields that are set as required are not enforced at this time.
-
If necessary, click the Held For ellipsis to display the Instructor List window and select another user.
- Click OK.
-
When prompted to authenticate, swipe your card or enter your credentials and click OK.
Continue Cumulative Evaluations
Most institutions include a cumulative evaluation form type. This is used for treatments with multiple steps that will be completed during different appointments.
Note: When the first part of a cumulative evaluation was filled out, the form displayed the treatment parent code and the first treatment step code. If continuing a cumulative evaluation, the form displays the next treatment step code as well as the grades assigned to the work associated with the previous treatment step code(s).
Example: A PFM high noble crown includes several treatment step codes under the parent treatment code. When a provider completes D2750.1 and has it approved, the evaluation form displays with D2750.1 listed in the treatment-specific section. When the provider completes D2750.2, the same evaluation form displays, but this time with D2750.2 listed in the treatment-specific section. Each time the provider completes a treatment step code under the D2740 parent code, the same evaluation form displays until the parent treatment code is complete.
Notes:
- In some cases, you may continue a cumulative evaluation that was started by another instructor. In this case, the first instructor’s username displays next to the answers they provided for the first treatment(s).
- Each time you continue a cumulative evaluation, you must answer the general questions because they relate to the treatment completed during that appointment.
To continue a cumulative evaluation:
- Open the Add/Edit Evaluation window according to your usual workflow.
Tip: This may require you to add an evaluation chairside or add an evaluation after the appointment.
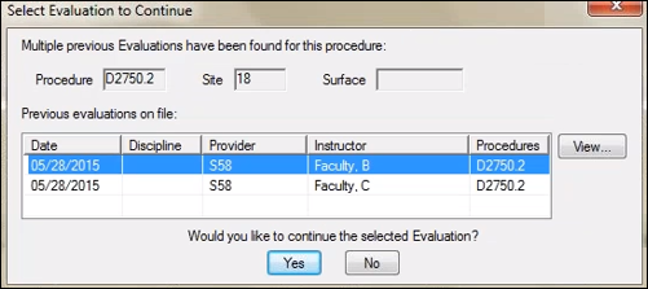
Note: If there are multiple previous evaluations for a specific procedure, the Select Evaluation to Continue window displays.
-
If the Select Evaluation to Continue window displays, confirm which evaluation you want to continue.
-
Select a listed evaluation and click View and review the form as necessary.
-
Click Next to review the next evaluation.
-
When ready, close the view-only form, select the appropriate listed form, and click Yes.
The Add/Edit Evaluation or Periodic Evaluation window displays.
Note: If the evaluation form requires a self evaluation, that copy opens first with a blue background.
- Fill out the form as necessary, including the Evaluation Information and Academic Information fields, as well as the general questions and procedure-specific questions.
|