Scheduler Options Window
[Accessed from Maintenance > Scheduler > Scheduler Options]
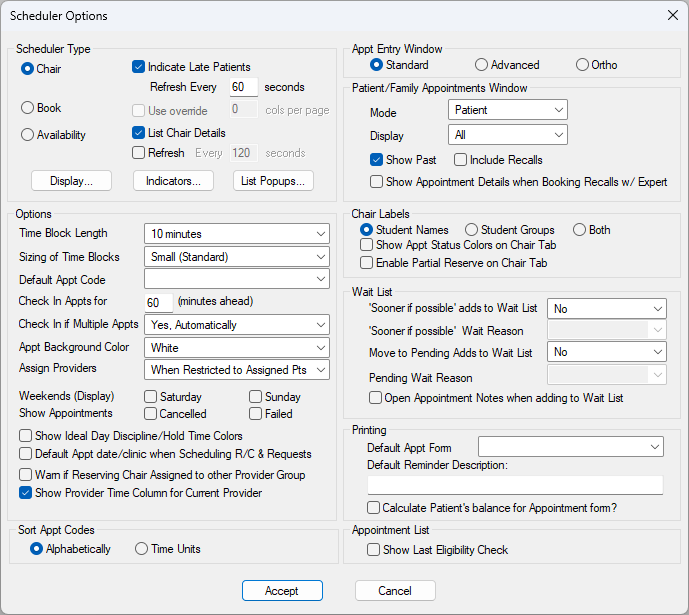
The Scheduler Options window allows you to specify workstation options related to the Scheduler module.
 Scheduler Options - Field Definitions Scheduler Options - Field Definitions
Scheduler Type Section
| Chair / Book / Availability |
A set of radio buttons that indicate whether this workstation will use the Chair, Book, or Availability scheduling mode.
Note: If a user configured to use a different mode logs in, the user setting overrides this setting.
|
| Indicate Late Patients
|
A checkbox that, when selected, indicates that if a patient whose appointment is due but has not yet checked in, axiUm displays the provider's name in red on the reserved chair in the Scheduler > Chair tab.
Note: This field is only enabled if the Chair radio button is selected.
|
| Refresh Every __ seconds
|
A text field that indicates how often the Scheduler > Chair tab view refreshes.
Note: This field is only enabled if the Chair radio button is selected.
|
| Use override
|
A checkbox that, when selected, indicates to override the book’s default for fixed number of columns.
Note: This field is only enabled if the Book radio button is selected.
|
| __ cols per page
|
A text field that indicates the number of columns to use when overriding the book’s default for fixed number of columns.
Note: This field is only enabled if the Chair radio button and the Use Override checkbox are selected.
|
| List Chair Details
|
A checkbox that, when selected, indicates to list chair details in the Availability window to allow the user to see the available chairs, coverage discipline, and covering instructor.
|
| Refresh |
A checkbox that, when selected, indicates whether the Availability tab refreshes after a set number of seconds.
|
| Every __ seconds |
A text field that indicates how often the Availability tab refreshes in seconds.
Note: This field is only enabled if the Refresh checkbox is selected.
|
|
Display…
|
A button that displays the Appointment Display Options window and allows you to specify appointment display options.
|
|
Indicators…
|
A button that displays the Appointment Indicators to Display window and allows you to specify appointment indicator display options.
|
|
List Popups…
|
A button that displays the Appointment Popup Options window and allows you to specify which appointment details axiUm displays in a popup window when users select a record in the Patient Appointments or Family Appointments window.
|
Options Section
| Time Block Length |
A drop-down list that indicate the time block length to use for the Scheduler > Active tab when a user is working in Availability mode. |
| Sizing of Time Blocks |
A drop-down list that indicates how to size the appointment time blocks vertically in the Scheduler > Active tab. |
| Default Appt Code |
A drop-down list that indicates the default appointment code to be used for all appointments booked. |
| Check In Appts for __ (minutes ahead) |
A text field that indicates the number of minutes ahead of appointment time that a patient can be checked in. This field also controls the following:
-
It limits how far in advance axiUm looks for appointments when using the Patient Check In right-click option to check in a patient from the Patients module.
Example: If set to 60, all appointments for that patient within the next 60 minutes will be checked in. Any patient appointments after 60 minutes do not show as checked in.
-
It limits how far in advance axiUm looks for appointments when using the Patient Sign In right-click option to sign in a patient from the Patients or Scheduler module and indicate they have arrived.
Example: If set to 60, axiUm finds the earliest patient appointment for the day that has not yet been checked in and signs in the patient on all appointments in that clinic within the time limit. Any patient appointments after 60 minutes do not show as signed in.
Note: Depending on your configuration, the patient sign in may also perform a check in for each appointment and print a Sign In slip for the appointment. This is managed from the Patients module > Patient Options window > Print Sign In slip on Patient Sign In field. Patient sign in also turns the username blue in the status bar to indicate the patient has arrived.
Tip: The Patient Sign In right-click option is only enabled if your clinic is set up to allow patients to sign in (indicating they have arrived) before they are checked in. This is managed from the Patients module > Patient Options window > Use Patient Sign In field.
|
| Check In if Multiple Appts |
A drop-down list that indicates the behavior of patient check ins:
-
Yes, Automatically: When users check in a patient, axiUm automatically checks in any additional appointments with start times that fall within the time range specified by the Check In Appts for __ (minutes ahead) field.
-
Prompt: When users check in a patient, axiUm displays the Patient Check Ins window for any additional appointments with start times that fall within the time range specified by the Check In Appts for __ (minutes ahead) field.
|
| Appt Background Color |
A drop-down list that indicates the appointment background colors to display in the Scheduler > Active tab:
-
White: No colors will display in appointment backgrounds.
-
Status Colors: The color is based on the Appt. Status field in the appointment, and the color associated with the appointment status will display as the background color.
Status setup including appointment color is managed from Maintenance > Basic > Status Codes.
-
Discipline Colors: The color is based on the Tx Discipline field in the appointment, and the color associated with the treatment discipline will display as the background color.
Treatment discipline setup including appointment color is managed from Maintenance > Clinical > Tx Disciplines.
-
Ortho Stage Colors: The color is based on the Stage field in the appointment, and the color associated with the stage code will display as the background color.
Note: Ortho specific information may only display on the appointment and ortho stage colors will only display in the Scheduler > Active tab if the Scheduler Options > Appt Entry Window section > Ortho radio button is selected.
Ortho stage code setup including appointment color is managed from Maintenance > Ortho > Stage Codes.
|
| Assign providers |
A drop-down list that indicates the rules for assigning providers:
-
Always: axiUm always assigns providers based on the appointment code definition, regardless of whether the appointment provider is restricted.
-
When Restricted to Assigned Pts: If the appointment provider is restricted in PowerAdmin, axiUm assigns the provider based on the appointment code. If the appointment provider is unrestricted, axiUm does not assign providers.
|
| Weekends (Display) |
Checkboxes that, when selected, indicate whether Saturday and Sunday columns display in the Scheduler > Weekly tab.
These fields also control the following:
-
If deselected, when users browse the calendar in the Active tab, daily increments skip the corresponding weekend day.
-
If deselected, the Appointment Expert window deselects the corresponding checkboxes by default so that they are excluded from the search process.
|
| Show Appointments |
Checkboxes that, when selected, indicate to display failed and cancelled appointments in the Scheduler > Active and Weekly tabs. If selected, cancelled appointments display with an X and failed appointments with an X.
Note: These appointments also display smaller so that other appointments can be booked in the time slots.
|
| Show Ideal Day Discipline / Hold Time Colors |
A checkbox that, when selected, indicates to display ideal day colors in the Scheduler > Active tab.
|
| Default Appt date/clinic when Scheduling R/C & Requests |
A checkbox that, when selected, indicates that when a recall or appointment request is processed, the date and clinic settings for the recall or request are used in the appointment booking.
If deselected, the current date and clinic are used when booking recalls or appointment requests.
|
| Warn if Reserving Chair Assigned to other Provider Group |
A checkbox that, when selected, indicates to generate a message if a user attempts to reserve a chair for a provider who does not belong to the provider group that the chair should be used for. |
| Show Provider Time Column for Current Provider |
A checkbox that, when selected, indicates to display an additional fixed time column in the Scheduler > Active tab for the selected provider.
Note: Selecting a different provider or a different date automatically refreshes the window to display the selected provider or date.
If selected, additional columns also display beside each weekday column in the Scheduler > Weekly tab to show multi-chair booking for the appropriate weekday.
Note: Even if a provider is an assistant for a portion of an appointment, their column shows them as booked.
|
Sort Appt Codes Section
| Alphabetically / Time Units |
A set of radio buttons that indicates whether the appointment code list is sorted alphabetically or by time units.
|
Appt Entry Window Section
| Standard / Advanced / Ortho |
A set of radio buttons that indicates how patient and appointment information displays in the New Appointment and Edit Appointment windows:
-
Standard: General patient and appointment information displays in the New Appointment and Edit Appointment windows.
Tip: This mode is used for booking appointments that require a single provider.
-
Advanced: General patient information and advanced appointment information (fields regarding the status, provider, estimated revenue, and allowing the adjustment of doctor time and assistant time) displays in the New Appointment and Edit Appointment windows.
Tip: This mode is used for booking appointments that require multiple providers.
-
Ortho: General patient and appointment information displays in the New Appointment and Edit Appointment windows and some appointment information including the Ortho field displaying the ortho stage are defaulted.
Tip: This mode is only used for booking ortho appointments.
|
Patient/Family Appointments Window Section
| Mode |
A drop-down list that indicates the mode you want to use for viewing the appointment window:
-
Patient: The Patient Appointments window displays and users can view only appointments for the selected patient.
-
Family: The Family Appointments window displays and users can view appointments for all family members of a patient.
|
| Display |
A drop-down list that indicates the default display option for the Patient Appointments or Family Appointments window:
-
All: If selected, both scheduled and non-scheduled appointments display.
-
Not Scheduled: If selected, only non-scheduled appointments (e.g., planned appointments) display.
-
Scheduled: If selected, only scheduled appointments display.
|
| Show Past |
A checkbox that, when selected, indicates that past appointments display by default in the Patient Appointments or Family Appointments window.
|
| Include Recalls |
A checkbox that, when selected, indicates that recalls display in the Patient Appointments or Family Appointments window.
|
| Show Appointment Details when Booking Recalls w/ Expert |
A checkbox that, when selected, indicates that when booking recall appointments, the Patient Appointments or Family Appointments window displays.
If deselected, the Patient Recalls window displays when users book recall appointments.
|
Chair Labels Section
| Student Names / Student Groups / Both |
A set of radio buttons that indicates how chair cells are labeled:
-
Student Names: Reserved chair cells display the student's name.
-
Student Groups: Reserved chair cells display the group name of the student.
-
Both: Reserved chair cells display both the group name and the student’s name.
|
| Show Appt Status Colors on Chair Tab |
A checkbox that, when selected, indicates to display a colored bar on the chair cell to indicate the appointment status.
|
| Enable Partial Reserve on Chair Tab |
A checkbox that, when selected, indicates that partial reservations are enabled so that a provider can reserve a chair cell for a portion of the clinic session. The Reserve Partial Session for and Edit Partial Clinic Times right-click options are also enabled in the Scheduler > Chair tab.
Note: If this workstation will use Availability mode, this field is not applicable and should be deselected.
|
Wait List Section
| ‘Sooner if Possible’ adds to Wait List |
A drop-down list that indicates the rules when placing patients on the wait list for sooner-if-possible appointment dates:
-
No: The appointment is not placed on the wait list when users select the Sooner if possible checkbox in the Add Appointment or Edit Appointment window.
-
Yes (Prompt): The Add to Wait List Question window displays when users select the Sooner if possible checkbox in the Add Appointment or Edit Appointment window.
-
Yes (Automatic): The appointment is automatically added to the wait list when users select the Sooner if possible checkbox in the Add Appointment or Edit Appointment window.
|
| ‘Sooner if Possible’ Wait Reason |
Note: This field is only enabled if the ‘Sooner if Possible’ adds to Wait List field is set to Yes (Prompt) or Yes (Automatic).
A drop-down list that indicates the default wait reason to be used for the sooner-if-possible wait list.
Note: The options available in this drop-down field are defined in the Wait List Reasons window.
|
| Move to Pending Adds to Wait List |
A drop-down list that indicates the rules when placing patients on the wait list for appointments moved to a pending status:
-
No: The appointment is not placed on the wait list when users cancel an appointment and click the Move to Pending button on the Reschedule Now Question window.
-
Yes (Prompt): The Add to Wait List Question window displays when users cancel an appointment and click the Move to Pending button on the Reschedule Now Question window.
-
Yes (Automatic): The appointment is automatically added to the wait list when users cancel an appointment and click the Move to Pending button on the Reschedule Now Question window.
|
| Pending Wait Reason |
Note: This field is only enabled if the Move to Pending Add to Wait List field is set to Yes (Prompt) or Yes (Automatic).
A drop-down list that indicates the default pending wait reason to be used for the wait list.
Note: The options available in this drop-down field are defined in the Wait List Reasons window.
|
| Open Appointment Notes when adding to Wait List |
A checkbox that, when selected, indicates that the Appointment Notes window displays when users add patients to the wait list.
|
Printing Section
| Default Appt Form |
A drop-down list that indicates the default appointment form to display in the Print Appointment Options window:
-
Clinical Form: If selected, the list of treatments for that day prints by default.
-
Appointment Card: If selected, an appointment reminder card prints by default.
|
| Default Reminder Description |
A text field that indicates default text to print at the bottom of the appointment reminder card.
|
| Calculate Patient’s Balance for Appointment form? |
A checkbox that, when selected, indicates that the patient balance is calculated and displays on the appointment form.
|
Appointment List Section
| Show Last Eligibility Check |
A checkbox that, when selected, indicates that the last eligibility date and result display for patients in the Appointment Lists window.
|
Scheduler Options - Tasks
| Configure Scheduler Options
|
- Complete/modify the fields as necessary.
- Click Accept.
|
| Specify Appointment Display Options
|
-
Click the Display... button to display the Appointment Display Options window.
-
Complete/modify the fields as necessary and click Accept.
|
| Specify Appointment Indicator Display Options
|
-
Click the Indicators... button to display the Appointment Indicators to Display window.
-
Complete/modify the fields as necessary and click Accept.
|
| Specify Appointment Popup Options
|
-
Click the List Popups... button to display the Appointment Popup Options window.
-
Complete/modify the fields as necessary and click Accept.
|
Appointment Display Options Window
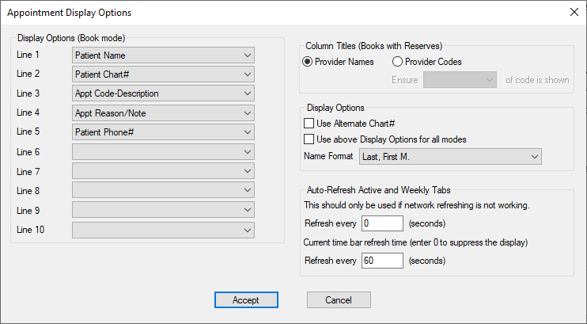
The Appointment Display Options window allows you to control which information displays on appointments accessed from the Scheduler > Active tab when using Book mode. It displays when you open the Scheduler Options window and click the Display... button.
Appointment Display Options - Field Definitions
| Line 1-10
|
A series of drop-down lists that define up to ten optional display lines to show in the appointment block for patient appointments in the Scheduler > Active tab.
Note: The options in these drop-down fields are hard-coded and cannot be changed.
|
| Provider Names / Provider Codes |
A set of radio buttons that indicates how providers display on the Scheduler > Active tab column headings for books that use reservations.
|
| Ensure ___ of code is shown
|
Note: This field is only enabled if the Provider Codes radio button is selected.
A drop-down list that indicates how provider codes display in the Scheduler > Active tab:
-
beginning: Provider codes are right-justified in the Scheduler > Active tab. If the code is too long, any excess characters are hidden at the end.
-
end: Provider codes are left-justified in the Scheduler > Active tab. If the code is too long, any excess characters are hidden at the beginning.
|
| Use Alternate Chart#
|
A checkbox that, when selected, indicates that the alternate chart number displays in the appointment box instead of the regular chart number.
|
| Use above Display Options for all modes
|
A checkbox that, when selected, indicates that the display options in the Appointment Display Options window applies to all scheduling modes (Chair, Book, and Availability).
|
| Name Format
|
A drop-down list that indicates the format used to display patient names:
-
Last, First M.: Display last and first name, then middle initial (e.g., Doe, Jane S.).
-
First M. Last: Display first name, middle initial, then last name (e.g., Jane S. Doe.).
-
First L.: Display first name and last initial (e.g., Jane D.).
|
| Refresh every __ seconds
|
A text field that indicates how often in seconds the Scheduler > Active and Weekly tabs refresh.
|
Appointment Indicators to Display Window
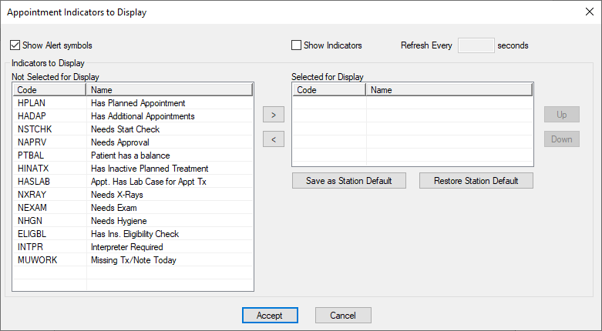
The Appointment Indicators to Display window allows you to manage the appointment indicator display options as necessary to suit your role. It displays when you open the Scheduler Options window and click the Indicators... button.
Display settings for appointment indicators are workstation-specific. You can display a maximum of six indicators at a time.
Appointment Indicators to Display - Field Definitions
| Show Alert symbols
|
A checkbox that, when selected, indicates that an indicator displays on appointments if the patient has a patient or medical alert.
|
| Show Indicators
|
A checkbox that, when selected, indicates that an indicator symbol displays for each selected indicator on appointment blocks in the Scheduler.
|
| Refresh every __ seconds
|
A text field that indicates how often in seconds axiUm refreshes the display of appointment indicators in the Scheduler.
|
Appointment Indicators to Display - Tasks
| Display Appointment Indicators
|
- Select one or multiple indicators in the Not Selected for Display list and click the > button to move to the Selected for Display list.
- When ready, click Accept.
|
| Remove Appointment Indicators
|
- Select one or multiple indicators in the Selected for Display list and click the < button to move to the Not Selected for Display list.
- When ready, click Accept.
|
| Reorder Appointment Indicators
|
- Select a listed entry.
- Click the Up and Down buttons to move the selected entry within the list.
- When ready, click Accept.
|
| Save Station Defaults
|
-
Click the Save as Station Default button to save the items displayed in the Selected for Display list as the default appointment indicators for your workstation.
|
| Restore Station Defaults
|
-
Click Restore Station Default to restore the default appointment indicators for your workstation.
Tip: This is often used if you must temporarily change your default appointment indicators and want to restore your defaults afterward.
|
List Popup Options (Appointments) Window
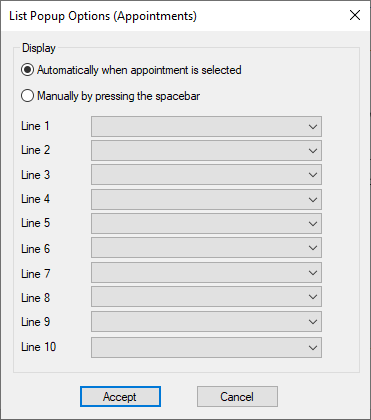
The List Popup Options (Appointments) window allows you to manage which appointment details axiUm displays in a popup window when users select a record in the Patient Appointments or Family Appointments window. It displays when you open the Scheduler Options window and click the List Popups… button.
List Popup Options (Appointments) - Field Definitions
| Automatically when appointment is selected / Manually by pressing the spacebar |
A set of radio buttons that indicates how a popup window displays:
-
Automatically when appointment is selected: The popup window displays automatically when users select a record in the Patient Appointments or Family Appointments window.
-
Manually by pressing the spacebar: Users must select a record in the Patient Appointments or Family Appointments window and press the spacebar or right-click and select Additional Info (Spacebar) to display a popup window.
|
| Line 1 -10
|
A series of drop-down lists that define up to ten optional display lines to show in the popup window.
Note: The options in these drop-down fields are hard-coded and cannot be changed.
|
|