| Provider |
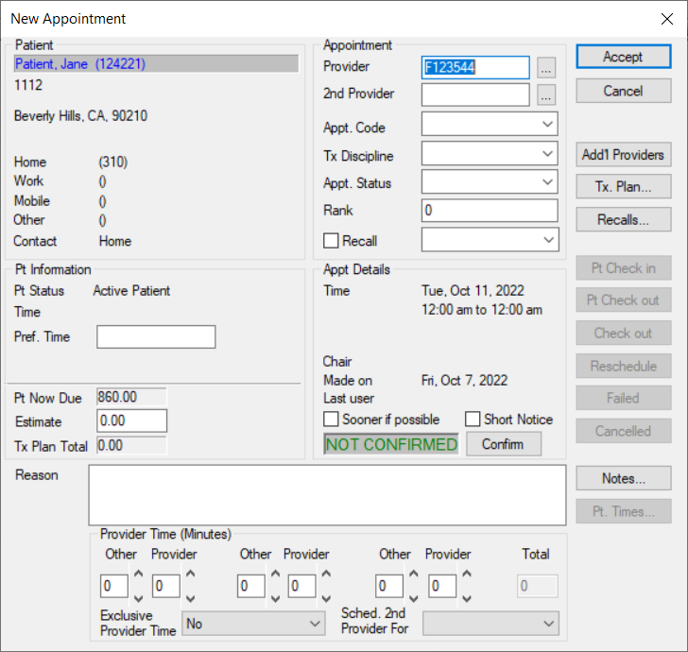
If necessary, click the ellipsis to display the Providers List window and select another provider to assign to the appointment.
|
| 2nd Provider
|
If necessary, click the ellipsis to display the Providers List window and select a secondary provider to assign to the appointment.
|
| Appt. Code
|
Select the appointment code for the appointment from the drop-down list to indicate the appointment type and length.
|
|
Tx Discipline |
Select the discipline associated with the appointment from the drop-down list.
|
| Appt. Status |
Select the status of the appointment from the drop-down list.
|
| Rank |
Note: This field only displays if the Scheduler Options window > Appt Entry Window field is set to Advanced.
This field is for internal purposes and indicates a numeric ranking of an appointment’s importance that can be used to make cancellation decisions when chairs are limited.
If necessary, enter a value to indicate the numeric ranking.
|
| Recall |
-
Select the checkbox if the appointment will be associated with a recall appointment reminder.
Tip: If the Appt. Code field is set to a recall code, the checkbox is selected automatically.
-
Click Recalls… to display the Patient Recalls window.
-
Double-click to select a listed recall appointment reminder.
|
| Pref. Time |
Enter the best time to schedule an appointment for this patient.
Tip: This value can be found in the Patient Info window > Codes tab > Additional section > Pref. Appt field.
|
| Estimate |
Note: This field only displays if the Scheduler Options window > Appt Entry Window field is set to Advanced or Ortho.
A field that indicates the estimate for treatment attached to the appointment.
|
|
Sooner if possible |
Select the checkbox to indicate that the patient wants to come in sooner if an earlier opening becomes available.
Tip: You can generate a report of patients that are willing to come in earlier using this field, and then create short notice appointments.
|
| Short Notice |
Select the checkbox to indicate that the patient can be bumped up if an earlier opening becomes available.
|
| Confirm |
Note: This button only displays if the Scheduler Options window > Appt Entry Window field is set to Advanced.
If a patient has confirmed the appointment, click the button to confirm the appointment and change the text from NOT CONFIRMED to CONFIRMED.
The appointment text also displays in blue in the Scheduler to indicate that the appointment is confirmed.
|
| Reason |
Enter the reason for the appointment.
|
| Provider Time (Minutes) |
Note: This field only displays if the Scheduler Options window > Appt Entry Window field is set to Advanced or Ortho.
The Other and Provider fields represent the time in minutes that will be used by the secondary and primary providers for this appointment. The minutes entered will display in the Provider, Other, and Total fields of the Scheduler > Add Appointment or Edit Appointment windows.
Enter values to indicate how many minutes each provider is required for the appointment. You can define up to three sets of secondary and primary provider time.
Tips:
Example: If the Minutes fields display 30-10-20 for a hygiene recall, the hygienist/CDA (the secondary provider) is required for the first 30 and final 20 minutes of an appointment. The dentist (the primary provider) is only required for the 10 minutes in between.
Note: You cannot indicate there is a time where both providers are exclusively required unless you do so for the whole appointment.
|
| Exclusive Provider Time |
Note: This field only displays if the Scheduler Options window > Appt Entry Window field is set to Advanced or Ortho.
This field displays the exclusivity rule used for this appointment code for the primary provider.
Tip: The option that displays by default is managed from the Appointment Code window > Primary Exclusive Time field.
If necessary, select another option from the drop-down list:
-
No: This indicates that when this appointment code is selected, the provider can be double-booked for other appointments, assuming this breaks no other rules.
-
Yes (Appt. Time): This indicates that when this appointment code is used, the entire duration of the appointment is exclusive. This total time includes minutes indicated in the Provider and Other fields.
-
Yes (Prov. Time): This indicates that when this appointment code is used, only the provider portion of the time is exclusive. This time refers to the minutes indicated in the Provider fields only.
|
| Sched. 2nd Provider For |
Note: This field only displays if the Scheduler Options window > Appt Entry Window field is set to Advanced or Ortho.
Select how doctor/assistant time will be treated when there is a secondary provider for the appointment set in the 2nd Provider field:
-
<blank>: This indicates there is no secondary provider.
-
Other Time: This indicates the secondary provider will default to an assistant’s time.
-
Provider Time: This indicates the secondary provider will default to a provider’s time.
-
Total Time: This indicates if the secondary provider will default to be present during the entire duration of the appointment.
|
| Add’l Providers |
If a primary provider has additional assistants/providers attending the appointment, you can assign them to the appointment. This prevents them from being booked into appointments at the same time but does not book them into a chair.
Tip: This is useful in clinics when there is one treating provider and multiple observing providers.
-
Click the button to display the Appointment Additional Providers window and select any additional providers beyond the primary and secondary that will be part of the appointment.
-
To add a provider, search for and select a listed provider and click the > button to move it to the Selected Providers pane.
Tip: To remove a provider, select a listed provider and click the < button.
-
Click OK.
In the Scheduler > Active tab, the additional providers/assistants have horizontal lines display down the left side of the appointment block and they are indicated in the appointment with a + icon.
|
| Tx. Plan… |
-
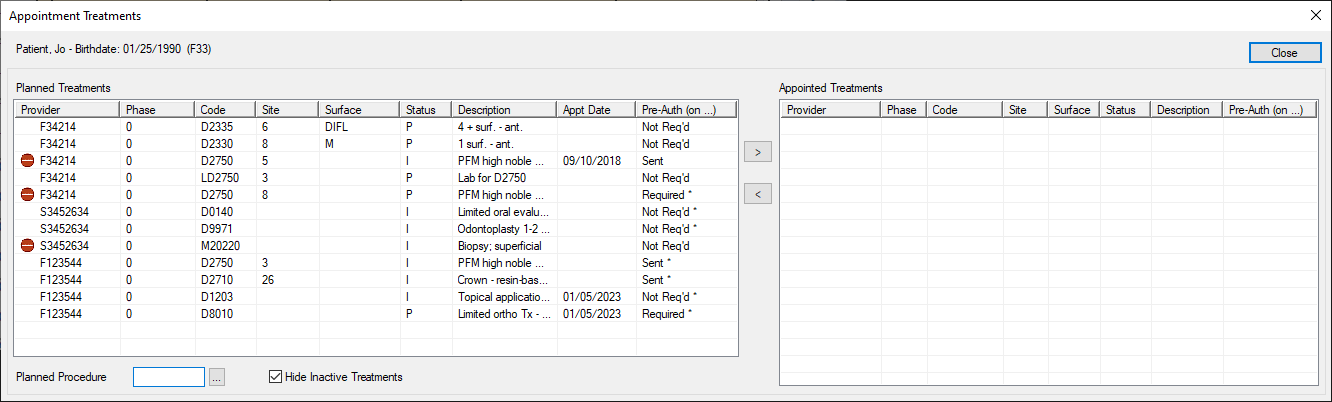
Click the button to display the Appointment Treatments window and select planned treatment(s) for the appointment.
Planned treatments for the patient display in the left pane and planned treatments that have been assigned to an appointment display in the right pane.
Note: Only approved planned treatments display.
Tip: If you want to display all planned treatments, deselect the Hide Inactive Treatments checkbox.
-
Complete any of the following:
-
To add a planned treatment to the appointment request, select the listed treatment and click the > button to move it to the Appointed Treatments pane.
-
To add a new planned treatment to the appointment request, click the Planned Procedure ellipsis to display the Procedure Codes List window and select a procedure.
Example: You need to make an unexpected appointment request for an emergency situation.
|
| Recalls… |
Click the button to display the Patient Recalls window and select a recall.
|
| Notes… |
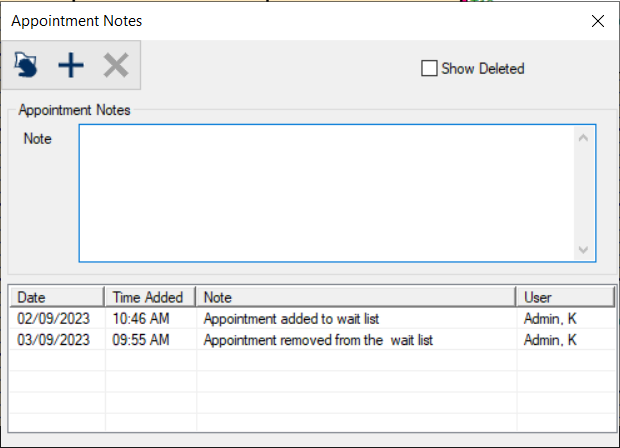
Click the button to display the Appointment Notes window.
-
To add a note, enter the note text and click the Add a new Record ( ) icon. ) icon.
-
To delete a note, select a listed note and click the Delete Record ( ) icon. ) icon.
|
| Pt. Times… |
This button is disabled at this point in time. |
| Note: The following buttons only display if the Scheduler Options window > Appt Entry Window field is set to Advanced.
|
| Pt Check in |
This button is disabled at this point in time. |
| Pt Check out |
This button is disabled at this point in time. |
| Check out |
This button is disabled at this point in time. |
| Reschedule |
This button is disabled at this point in time. |
| Failed |
This button is disabled at this point in time. |
| Cancelled |
This button is disabled at this point in time. |