|
A critical part of a patient’s electronic health record is managing and tracking their medications and prescriptions.
-
Medications: Include all the substances that the patient is currently taking, including over-the-counter medicines and any drugs prescribed through axiUm or another institution.
-
Prescriptions: Include all the medications and/or drugs that have been prescribed through axiUm.
axiUm can integrate with eRx, allowing prescriptions to be completed electronically and sent to the appropriate pharmacy. Prescription information is then centralized, increasing accuracy of the patient’s record.
Important: The following sections cover use of the Medications tab without eRx.
From the Medications tab, you can complete a variety of tasks, including:
- Add medications and create prescriptions.
- Review, edit, and stop medications.
- Void prescriptions.
 Manage Medications Manage Medications
Managing existing medications is an important task for patient care that ensures the patient’s information on file is kept current. This includes reviewing a patient's medications, editing, stopping, or deleting medications as necessary, and adding new medications.
Important: If the patient has no medications on file, you should still indicate that you have reviewed and confirmed that the patient has no medications.
To manage a patient’s medications:
- Select a patient and open the EHR module.
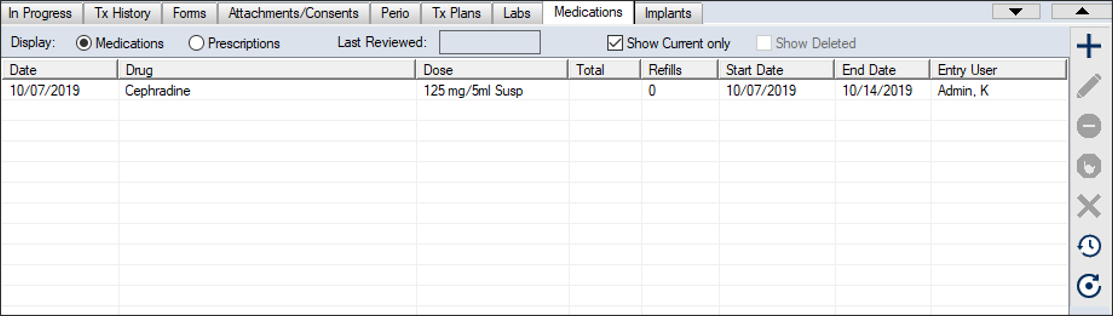
- Click the Medications tab.
Tip: If Carequality is enabled, any records that are reconciled from outside axiUm display a Reconciled ( ) icon. Additionally, a Recon Date column displays the date of reconciliation and a Source column displays the source of the data for reconciled records. ) icon. Additionally, a Recon Date column displays the date of reconciliation and a Source column displays the source of the data for reconciled records.
- (Optional) Filter the listed results using the following fields:
Note: The default settings are configured by your institution.
| Medications / Prescriptions
|
Select the Medications radio button to display all medications that the patient has been prescribed/is taking.
|
| Show Current only
|
Select this checkbox to display medications that have not been end dated and are still active.
|
| Show Deleted
|
Select this checkbox to include deleted medications.
Note: This is disabled if the Show Current only checkbox is selected.
|
| Show Reconciled
|
Select this checkbox to include reconciled medications.
Note: This checkbox only displays if Carequality is enabled.
|
- Review the listed entries.
- To perform another task, complete any of the following:
Review Medications List
You should periodically review the patient’s medications and confirm that their medication list is correct and up-to-date.
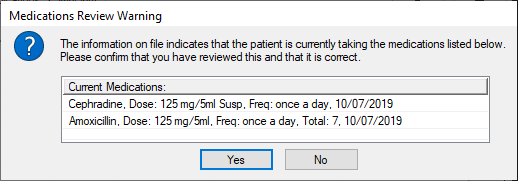
- Click the Review Medications (
 ) icon to display the Medications Review Warning window. ) icon to display the Medications Review Warning window.
Note: This icon is only enabled if the Medications radio button is selected.
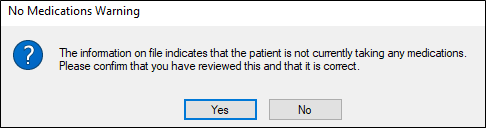
Note: If the patient has no medications on file, a No Medications Warning window displays.
-
Click Yes or No as necessary to confirm the medication list or to indicate the list is incorrect.
The Last Reviewed field updates with the current date.
Note: If no medications are on file, a Reviewed: No current medications entry is added to the list.
Add Existing Medications
- Click the Create a new Record (
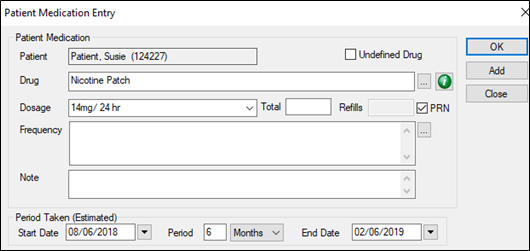
 ) icon and select Existing Medications to display the Patient Medication Entry window. ) icon and select Existing Medications to display the Patient Medication Entry window.
- Complete the fields as necessary.
| Patient
|
A read-only field that displays the currently selected patient.
|
| Undefined Drug
|
Select this checkbox if this medication is not defined in axiUm.
|
| Drug
|
Enter a medication manually or click the ellipsis and select from the Drug Definition List window.
Note: If the Undefined Drug checkbox is deselected, this field must match an entry in the Drug Definition List window.
(Optional) Click the Info ( ) icon to display the Medline Plus site and review additional details. ) icon to display the Medline Plus site and review additional details.
|
| Dosage
|
Enter the amount of medication that must be taken each time.
Note: You can select a value from the drop-down list or enter manually.
|
| Total
|
If known, enter the number of units or doses of the medication.
|
| Refills/PRN
|
Enter the number of remaining refills for the medication in the Refills field or select the PRN (pro re nata) checkbox to indicate that there is no set number and can be refilled as necessary.
Note: When the PRN checkbox is selected, the Refills field is disabled.
|
| Frequency
|
The frequency is how often the medication is taken.
Enter the information manually or click the ellipsis to select from the Drug Dose Frequencies window.
|
| Note
|
Enter any additional details about this medication.
|
| Start Date
|
Enter the approximate date that the medication was started.
|
| Period
|
If known, enter the period and time measurement that the medication was/will be taken for.
|
| End Date
|
This field is the estimated completion date of the medication. It can auto-calculate based on Start Date and Period fields.
If necessary, enter the medication end date manually.
|
- When ready, complete any of the following:
- Click OK to add the medication and close the window
- Click Add to add the medication and clear all the fields in this window to add another medication.
- Click Close to close the window.
- If you clicked Add, repeat Steps b and c until all patient medications have been entered.
Edit Medications
-
Select a listed entry and click the Edit Record ( ) icon to display the Edit Patient Medication window. ) icon to display the Edit Patient Medication window.
-
Make any necessary changes and click OK.
Stop Medications
-
Select a listed entry and click the Stop ( ) icon. ) icon.
-
Confirm that the patient has stopped taking the medication.
Note: This will end date the medication with the current date. To add a different end date, edit the medication and complete the End Date field as necessary.
Delete Medications
If necessary, you can delete medications from the patient record.
Tip: You can delete reconciled medications that are inaccurate or no longer relevant.
-
Select a listed entry and click the Delete ( ) icon. ) icon.
-
When prompted, click Yes to confirm the deletion.
View Source C-CDA File
When necessary, you can view the source C-CDA file for a medication that was reconciled into a patient record.
Note: This is only applicable for institutions that use Carequality.
- Right-click a listed entry and select View Source C-CDA... to display the Select Sections window.
- Next to each section you want to view, select the checkbox and click OK.
The C-CDA file opens as an Export Summary in a new tab in your default browser.
Show Medication History
-
Select a listed entry and click the Show History ( ) icon to display the Patient Medication History window. ) icon to display the Patient Medication History window.
-
Review the history of the selected medication.
Tip: A Clinical Reconciliation section displays Reconciliation Date and Source fields for institutions that use Carequality. If the record was reconciled into the EHR, the fields will be populated with the date of reconciliation and the source of the data.
Verify Drug Interactions and Side Effects
- Right-click a listed entry and select Interactions and Side Effect to display the Drug Interactions and Side Effects window.
- (Optional) For additional information about the drug, click the Info (
 ) icon to open the Medline Plus Connect website. ) icon to open the Medline Plus Connect website.
Manage Prescriptions
Managing prescriptions is another important task for patient care that ensures the patient’s information on file is kept current. This includes creating new prescriptions, but also voiding outdated prescriptions, when necessary.
To manage a patient's prescriptions:
- Select a patient and open the EHR module.
- Click the Medications tab.
- (Optional) Filter the listed results using the following fields:
Note: The default settings are configured by your institution.
| Medications / Prescriptions
|
Select the Prescriptions radio button to display medications/drugs that have been prescribed through axiUm.
|
| Show Current only
|
Select this checkbox to display medications that have not been end dated and are still active.
|
| Show Deleted
|
Select this checkbox to include deleted medications.
Note: This is disabled if the Show Current only checkbox is selected.
|
- Review the listed entries.
- To perform another task, complete any of the following:
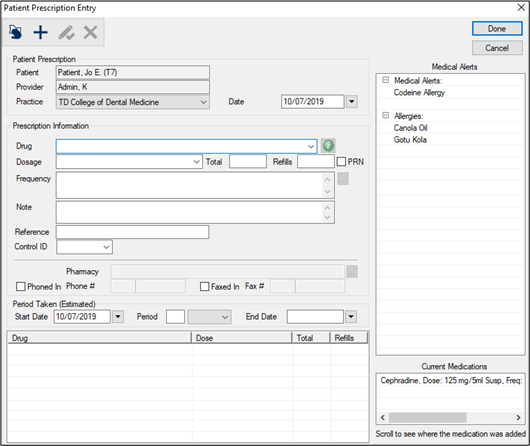
Create Prescriptions
- Click the Create a new Record () icon and select New Prescription to display the Patient Medication Entry window.
- Complete the fields as necessary and click the Add a new Record () icon.
| Patient
|
A read-only field that displays the currently selected patient.
|
| Provider
|
A read-only field that displays the provider that is writing the prescription.
|
| Practice
|
Select the practice from the drop-down list.
|
| Date
|
This defaults to the current date and indicates the date of the prescription.
If necessary, select another date from the calendar drop-down.
|
| Drug
|
Enter a medication manually or select from the drop-down list.
(Optional) Click the Info () icon to display the Medline Plus site and review additional details.
|
| Dosage
|
Enter the amount of medication that must be taken each time.
Note: You can select a value from the drop-down list or enter manually.
|
| Total
|
Enter the number of units or doses of the medication.
|
| Refills/PRN
|
Enter the number of refills allowed for the prescription or select the PRN (pro re nata) checkbox to indicate that there is no set number and can be refilled as necessary.
Note: When the PRN checkbox is selected, the Refills field is disabled.
|
| Frequency
|
The frequency is how often the medication is taken.
Enter the information manually or click the ellipsis to select from the Drug Dose Frequencies window.
|
| Note
|
Enter any additional details about this prescription.
|
| Reference
|
If applicable, enter a reference code/identifier for the prescription.
Example: Enter the lot # or sequence number of the prescription security pad.
|
| Custom Field Prescription1 / Prescription2
|
If configured, enter the appropriate information into the fields.
Note: These fields are configured by your institution and may be drop-down lists or free text entry.
|
| Pharmacy
|
This field is disabled unless either the Phoned In or Faxed In checkbox is selected.
Click the ellipsis to search for and select the pharmacy that the prescription is being called/faxed to.
|
| Phoned In / Phone #
|
Select this checkbox to indicate that you have called the pharmacy and sent the prescription to them via telephone.
When selected, the Pharmacy and Phone # fields are enabled.
Tip: Use the ellipsis to identify enter the Pharmacy first and it auto-populate the Phone # field.
|
| Faxed In / Fax #
|
Select this checkbox to indicate that you have sent the prescription to a pharmacy via fax.
When selected, the Pharmacy and Fax # fields are enabled.
Tip: Use the ellipsis to enter the Pharmacy first and auto- populate the Fax # field.
|
| Start Date
|
Enter the date that the patient will begin taking the prescription.
|
| Period
|
Enter the period and time measurement that the prescription will be taken for.
|
| End Date
|
This field is the estimated completion date of the medication. It can auto-calculate based on Start Date and Period fields.
If necessary, enter the medication end date manually.
|
-
Approve and print as necessary.
-
Repeat Steps b and c as necessary until all prescriptions have been entered.
-
Click Done to close the Patient Prescription Entry window.
Void Prescriptions
Once a prescription has been created, you cannot modify or delete the record. However, you can void a prescription to mark it as invalid.
-
Select a listed medication and click the Void ( ) icon to display the Void Patient Prescription window. ) icon to display the Void Patient Prescription window.
-
Complete the Reason field and click OK.
Verify Drug Interactions and Side Effects
- Select a listed medication or prescription, right-click and select Interactions and Side Effect to display the Drug Interactions and Side Effects window.
- (Optional) For additional information about the drug, click the Info () icon to open the Medline Plus Connect website.
|