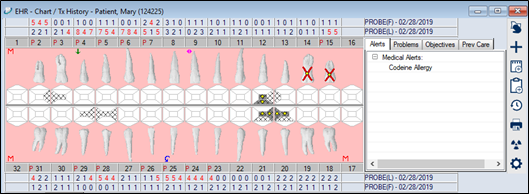
The odontogram area in the EHR usually displays in the upper pane of the EHR module.
Important: When the odontogram displays as a tab in the EHR’s lower pane, it is called the Chart tab. Because this is easily confused with the Chart Add tab, we refer to it as the odontogram tab.
Manage the Odontogram
Within the EHR, you can use the odontogram to perform a variety of tasks.
View the Odontogram
The odontogram provides a visual representation of a patient’s mouth and displays planned, in process, and completed treatments, as well as conditions and findings, graphically on the teeth.
In addition to displaying teeth, previously charted periodontal values can display above and below the odontogram, and a set of tabs displays on the side, providing information about medical alerts, problems, and other information related to the patient.
Select Teeth and Surfaces
When working with the odontogram, you can select surface(s) on a tooth, multiple teeth, or even the entire mouth. This can save you time, allowing you to perform activities on multiple teeth at once. It can also allow you to filter activities based on your selection.
Tooth numbers display as follows:
Tooth surfaces are identified as follows:
To select teeth and surfaces:
- Select a patient and open the EHR module.
- Complete any of the following:
Select the Root of a Tooth
- Click the triangle of the appropriate tooth.
Note: The root can only be selected when no other tooth surfaces are selected. If you attempt to select an additional surface, the root selection is removed.
Select a Tooth
- Click the tooth to select it.
Note: If you click the tooth number, the tooth is selected but the surfaces do not display in blue.
Select All Teeth
- Right-click in the odontogram and choose Select Teeth > All Teeth.
Clear Selection
- Right-click in the odontogram and choose Select Teeth > Clear All.
Specify Dentition
Dentition is the arrangement or condition of the teeth in a patient. This includes whether the patient has primary or permanent teeth, missing teeth, etc.
When a new patient record is created, axiUm uses the patient’s age to determine whether to display primary or permanent teeth on the odontogram.
Later, when you assess the patient’s mouth, you may need to modify the dentition to display a different tooth, as well as indicate missing teeth.
To specify dentition:
- Select a patient and open the EHR module.
- Complete any of the following:
Mark Teeth as Missing
- Select any teeth that are not present in the patient’s mouth, right-click in the odontogram and select Missing.
Revert Missing Teeth
- Select any teeth that are marked as missing in the patient’s mouth, right-click in the odontogram and select Undo Missing.
Note: This can only be performed on teeth previously marked as missing, and not on teeth that have been removed from the odontogram through an extraction procedure.
Manage Tooth Notes/Conditions
When necessary, you can associate notes with specific teeth and record various conditions for teeth. If a condition is added, a symbol displays on the tooth to visually represent the condition.
Note: Conditions can be associated with the tooth itself or with surfaces on a tooth.
Examples:
Tooth 8 is marked as Partially Erupted, and Tooth 9 is Rotated Distally.
Teeth 1 and 2 are marked with Slight Caries on the selected surfaces of the teeth.
Tip: The symbols used to represent conditions on the teeth/surfaces are configured by your institution and may vary from the configuration shown here.
Tooth conditions can be entered from the odontogram or through the Chart Add tab.
Tip: You can only add conditions on a single tooth from the odontogram. To add the same condition on multiple teeth or tooth sites, use the Chart Add tab.
To manage tooth conditions from the odontogram:
- Select a patient and open the EHR module.
- Select a tooth in the odontogram, right-click in the odontogram, and select Tooth Notes/Conditions… to display the Tooth Notes/Conditions window.
- Review the listed entries.
Tip: If any primary or permanent teeth have an associated note, a tooth number displays under the Tooth column.
-
To perform another task, complete any of the following:
Add Conditions
- Click the Add a new Condition (
) icon to display the Tooth Conditions window.
-
Select the condition from the list and click the Add a new Record ( ) icon.
Note: You can also delete conditions or mark as resolved from this window by clicking the Delete Record ( ) or Resolve Condition ( ) icons respectively.
-
Repeat Step b for all conditions for that tooth and close the Tooth Conditions window.
Add Notes
-
Click the Add a new Note (
) icon.
- If prompted, select the type of note to add and click OK.
- Enter the note as necessary.
Note: When you enter a note that pertains to a specific tooth, the tooth number displays with an N on the odontogram.
Edit Notes
-
Select a listed note and click the Edit Record (
) icon to display the General Note window.
- Make any necessary changes and click Modify.
Delete Notes/Conditions
-
Select a listed note or condition and click the Delete Record (
) icon.
- When prompted, click Yes to confirm the deletion.
Resolve Conditions
-
Select a listed condition and click the Resolve Condition (
) icon.
- When prompted, click Yes to confirm the condition has been resolved.
The record now displays as struck out.
Manage Tooth Details
When needed, you can display additional details for a tooth using the odontogram. This may include rotating the tooth or adding color to areas of a tooth.
Note: These customizations must be done manually.
Example: Indicating that a tooth is rotated distally using tooth conditions does not rotate the image of the tooth on the odontogram; you must physically rotate the tooth on the odontogram.
To manage tooth details:
- Select a patient and open the EHR module.
- Complete any of the following:
View Teeth
When necessary, you can view a tooth’s colors and position.
Note: You cannot make changes from this window.
- Select one or more teeth on the odontogram.
- Right-click and select View Tooth… to display a <tooth number> window with the selected teeth.
-
Click and drag in the area to move and view as necessary.
Note: Your changes will not be saved.
-
When ready, click the X button.
Draw Color on a Tooth
-
Select a tooth in the odontogram.
- Right-click and select Tooth Details… to display the Detail Tooth: <tooth number> window.
-
Select a color from the Colors drop-down list.
-
Under Draw, select the Enabled checkbox and select the Paint radio button.
Tips:
- Select the Erase radio button to remove color(s) previously added.
- To view another tooth area, deselect the Enabled checkbox, then click and drag the tooth to move as needed.
Note: Moving the tooth in this window does not move the tooth on the odontogram.
-
Under Method, select one of the following:
- Select Single to draw on the tooth with your mouse.
- Select Selection to use the mouse to create a rectangular area that will be filled with color.
-
Draw on the tooth as necessary.
Manage Patient Medical Alerts
Patient medical alerts identify a patient's medical problems. If the selected patient has one or more medical alerts, problems, or allergies, the alert displays in the EHR module > odontogram > Alerts tab. From there, they can be viewed and managed.
Tip: A red Alert indicator also displays on the status bar.
To manage patient medical alerts:
- Select a patient and open the EHR module.
- From the odontogram, click the Alerts tab and review the listed alerts for the patient.
Tip: If Carequality is enabled, any records that are reconciled from outside axiUm display a Reconciled ( ) icon. If a record also has a note attached to it, the icons display side-by-side ( ).
- Right-click in the Alerts tab and select Update/Review Medical Alerts to display the Patient Medical Alerts window.
Note: If your institution uses Carequality, a Recon Date column displays the date of reconciliation and a Source column displays the source of the data for reconciled records.
-
Select and/or deselect the following checkboxes to filter the displayed alerts.
-
Select and review a listed alert.
- (Optional) Next to the Alert field, click the Info (
) icon to display the Medline Plus site open to the correct alert.
Note: If the patient’s language is set to Spanish, the site displays in Spanish.
-
To perform another task, complete any of the following:
Add Alerts
- Click the Clear Data (
) icon.
- Complete the fields as necessary and click the Add a new Record (
) icon.
Type
|
Select Alert from the drop-down list.
|
Alert
|
Enter an Alert code and select from the intelli-sense list or click the ellipsis and select from the Medical Alert Codes window.
|
Status
|
Select an entry from the drop-down list.
- Active: The selected medical alert is active for the patient.
- Inactive: The selected medical alert is inactive for the patient. The record is still available to view and report on.
|
Onset
|
Enter the date the patient alert began.
|
Note
|
Enter any additional information.
|
Add Allergies
- Click the Clear Data (
) icon.
- Complete the fields as necessary and click the Add a new Record (
) icon.
Type
|
Select Allergy from the drop-down list.
|
Alert
|
-
Enter an Alert code and select from the intelli-sense list or click the ellipsis and select from the Search Allergies window.
-
(Optional) Click the ( ) icon to launch a web browser and display additional details about the selected item.
|
Status
|
Select an entry from the drop-down list.
- Active: The selected medical alert is active for the patient.
- Inactive: The selected medical alert is inactive for the patient. The record is still available to view and report on.
|
Onset
|
Enter the date the patient allergy began.
|
Note
|
Enter any additional information.
|
Reaction
|
Enter the details of the patient's allergic reaction. |
Add Medical Problems
- Click the Clear Data (
) icon.
- Complete the fields as necessary and click the Add a new Record (
) icon.
Type
|
Select Medical Problem from the drop-down list.
|
Alert
|
- Enter an Alert code and select from the intelli-sense list or click the ellipsis and select from the Search Medical Problems window.
- (Optional) Click the (
) icon to launch a web browser and display additional details about the selected item.
|
Status
|
Select an entry from the drop-down list.
- Active: The selected medical alert is active for the patient.
- Inactive: The selected medical alert is inactive for the patient. The record is still available to view and report on.
- Resolved: The selected medical problem has been resolved for the patient. The record is still available to view and report on.
|
Onset
|
Enter the date the medical problem began.
|
Note
|
Enter any additional information. |
Delete Patient Medical Alerts
If necessary, you can delete patient alerts from the patient record.
Tip: You can delete reconciled alerts that are inaccurate or no longer relevant.
- Select a listed entry and click the Delete Record (
) icon.
- When prompted, click Yes to confirm the deletion.
Preview/Print Report
- (Optional) To preview the Patient Medical Alerts report, click the Preview Report (
) icon.
- To print the Patient Medical Alerts report, click the Print Report (
) icon.
Show Patient Alert History
- Select a listed entry and click the Show History (
) icon to display the Patient Medical Alert History window.
- Select a listed entry to view the values in the fields above.
Tip: A Clinical Reconciliation section displays Reconciliation Date and Source fields for institutions that use Carequality. If the record was reconciled into the EHR, the fields will be populated with the date of reconciliation and the source of the data.
View Source C-CDA
When necessary, you can view the source C-CDA file for an alert that was reconciled into a patient record.
Note: This is only applicable for institutions that use Carequality.
- Right-click a listed entry and select View Source C-CDA... to display the Select Sections window.
- Next to each section you want to view, select the checkbox and click OK.
The C-CDA file opens as an Export Summary in a new tab in your default browser.
Review Allergies/Medical Problems
- Click the Review Allergies/Medical Problems (
) icon and select one of the following:
- Review Allergies to display the Allergies Review Warning window and review the patient’s allergies on file.
- Click Yes to confirm the information is correct.
- Click No to indicate the information is incorrect.
- Review Medical Problems to review the patient’s medical problems on file.
- Click Yes to confirm the information is correct.
- Click No to indicate the information is incorrect.
Note: If the patient has no allergies or medical problems, click Yes to confirm you reviewed the message.
Manage Problems and Objectives
Problems are used to indicate general issues for the patient and their mouth. Objectives are used to describe the desired outcome.
Both problems and objectives can be viewed and entered from the odontogram.
Note: Both can also be entered from the Treatment Planning module.
Manage Problems
Problems can be viewed in the Problems tab in the odontogram area of the EHR.
- Select a patient and open the EHR module.
- Next to the odontogram, click the Problems tab and review the listed problems for the selected patient.
-
Right-click in the Problems tab and select Update Problems to display the Update Problems window.
- Complete any of the following:
Add Problems
- Click the Clear Data (
) icon.
- Complete the fields as necessary and click the Add a new Record (
) icon.
Date
|
This defaults to the current date and is the date the problem was identified.
If necessary, select another date from the calendar drop-down.
|
Area Found
|
Select the area in axiUm where this problem was identified (e.g., in Treatment Plan) from the drop-down list.
|
Problem
|
Enter the problem and select from the intelli-sense list or click the ellipsis to select the problem from the list of available options.
|
Site/Surface
|
If applicable, enter Site and Surface information. |
Note
|
Enter any relevant information about this problem. |
Status
|
Select the appropriate status for this problem.
Note: This list is configured by your institution.
|
Edit Problems
- Select a listed entry.
- Make any necessary changes and click the Modify Record (
) icon.
Delete Problems
- Select a listed entry and click the Delete Record (
) icon.
- When prompted, click Yes to confirm the deletion.
Approve Problems
- Select a listed entry that requires approval.
- Click Approve.
Note: If no entries are selected, all items will be approved.
Show Problem History
-
Select a listed entry.
- Click the Show History (
) icon to display the Problem History window.
Tip: You can also right-click the problem in the Problems tab and select Show History to display the Problem History window.
Manage Objectives
Objectives can be viewed in the Objectives tab in the odontogram area of the EHR.
- Select a patient and open the EHR module.
- Next to the odontogram, click the Objectives tab and review the listed objectives for the selected patient.
-
Right-click in the Objectives tab and select Update Objectives to display the Update Objectives window.
- Complete any of the following:
Add Objectives
- Click the Clear Data (
) icon.
- Complete the fields as necessary and click the Add a new Record (
) icon.
Objective Type
|
Select whether this objective applies to a treatment plan or is just a general objective from the drop-down list.
- G – General Objective
- T - <name/description of Tx Plan>
Note: If the patient has multiple tx plans, multiple records display in the drop-down list.
|
Description
|
Enter a description for this objective.
|
Status
|
Select the appropriate status for this objective.
Note: This list is configured by your institution.
|
Edit Objectives
- Select a listed entry.
- Make any necessary changes and click the Modify Record (
) icon.
Delete Objectives
- Select a listed entry and click the Delete Record (
) icon.
- When prompted, click Yes to confirm the deletion.
Show Objective History
-
Select a listed entry.
- Click the Show History (
) icon to display the Problem History window.
Tip: You can also right-click the objective in the Objectives tab and select Show History to display the Objective History window.
Manage Preventative Care
If used by your institution, Preventive Care is a way of managing patient recalls, especially when there are multiple recalls due at different times. It is most commonly used in faculty practices and perio resident practices where hygienists work.
Preventive Care information can be displayed and managed in the Prev Care tab in the odontogram area of the EHR.
To manage preventive care information:
- Select a patient and open the EHR module.
- Next to the odontogram, click the Prev Care tab.
The current details of the patient’s upcoming due dates for exams display.
- Complete any of the following:
Add/Update Preventative Care Details
- Right-click in the Prev Care tab and select Update Preventive Care Cycle to display the Preventive Care Details window.
Note: If preventive care information has already been entered for the patient, the Update Preventive Care window displays. Select the Edit Preventive Care Details radio button and click OK to display the Preventive Care Details window.
- Complete the fields as necessary and click OK.
Show Preventive Care Dates
- Right-click in the Prev Care tab and select Preventive Care Dates to display the Preventive Care Dates window.
- Select or deselect the Hygiene, Exam, X-Ray, and Show Deleted checkboxes as necessary to filter results.
- (Optional) Select an entry and click History to view its history.
Perform Other Odontogram Tasks
You can perform a variety of other tasks from the odontogram (Chart tab).
- Select a patient and open the EHR module.
- Complete any of the following:
View History
- Click the Show History (
) icon to display the Chart History Settings window.
-
Select the date and the information to include in the view and click OK.
The View History window displays with the odontogram and treatment status as of the selected date.
Print Odontogram
- Click the Print Report (
) icon to display the EHR Chart Print Options window.
-
Select the Print with Patient Name and Print with Patient chart # checkboxes as necessary and click OK.
-
If prompted, select the appropriate printer.
Manage Patient Exposures
- Click the Patient Exposures (
) icon to display the Patient Exposures window.
Note: If the workstation is integrated to imaging software, this button is used to send orders.
Review Tooth History
- Select a tooth on the odontogram, right-click in the area, and select Tooth History… to display the Show Tooth History window.
- Review the entries as necessary.
|