Surgery
|
In addition to managing information with the use of cases, the Case Management module also supports features for use when performing oral surgeries. While the day-of-surgery workflow varies from one institution to another, most follow a similar series of steps:
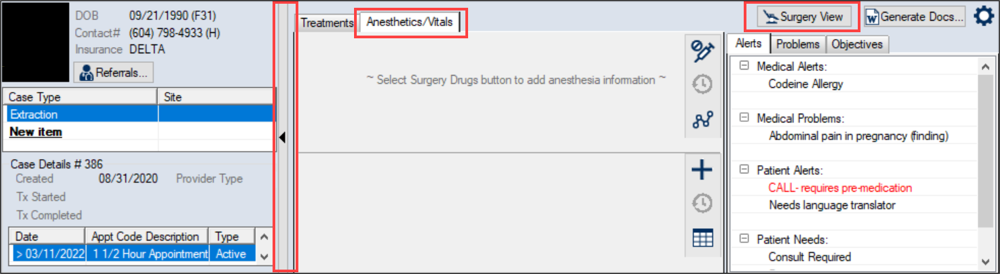
The following sections walk you through recording surgical information including vitals and anesthetics and progressing through the various surgery stages. You will be work mainly in the Case Management tab > Anesthetic/Vitals tab during surgery. Tip: If you update forms such as the Day of Surgery form or BMI form, you will also work in the Forms tab. Surgery View allows you to maximize the space in the Case Management tab and better manage the patient’s BMI, Adult/Pediatric status, and anesthetics and vitals as you progress through the surgery stages. It is accessed through the Surgery View button. Note: You must select a case and appointment before you can access and use the Surgery View button. To use Surgery view:
Tip: If the tab does not display, right-click the appointment and select Enable Anesthetics/Vitals tab. Note: You can also click the (
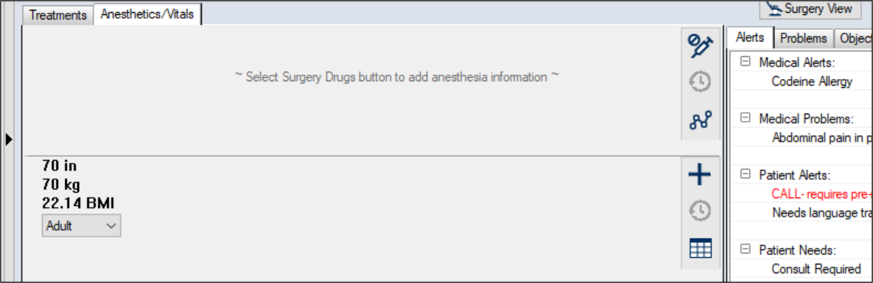
If a Day of Surgery (DOS) form has been defined for this case type, it opens and displays in the Forms tab. The patient’s height, weight, and BMI display on the left side of the Anesthetics/Vitals tab. This information is pulled from the form specified by your institution and must be entered before the surgery can begin. Tips:
If the BMI information is not displayed, you must add and complete a form that holds the patient’s most recent BMI information using your usual workflow. Note: An error displays if you attempt to start the surgery before the patient’s height and weight have been entered. The patient setting also displays in this area. The patient’s age determines whether the setting defaults to Adult or Pediatric. Note: While the BMI information cannot be changed (outside of the form), the Adult/Pediatric option can be manually adjusted as necessary. To manage patient information:
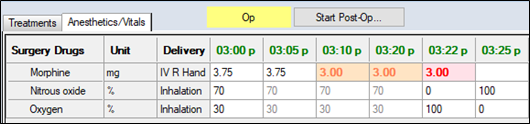
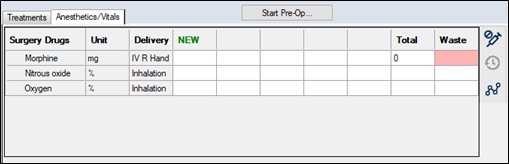
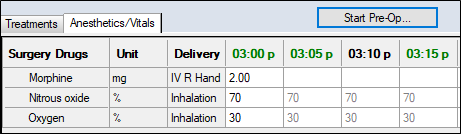
Tip: If not listed, add and complete a form with the patient’s BMI information using your usual workflow. The anesthetics used in surgery display in the Anesthetics/Vitals tab once you have selected a case and appointment. Tip: If the tab does not display, right-click the appointment and select Enable Anesthetics/Vitals tab. You can click the Toggle Text/Graphic View ( Note: If vitals and anesthetics are set to the same view (both text or both graphic), they are time-synched. This view displays the list of surgery drugs, the units (measuring systems, percentages, weights, or volumes), the methods of drug delivery to the patient, the total units of anesthesia administered from start to present, and the units of anesthesia considered unused or wasted (if applicable). Note: Drug types that require entered waste display with a pink background. It also displays the values for those drugs as numbers and percentages in horizontal rows, measuring time incrementally from left to right. Values in black text indicate that the entries are in a normal range, values in orange text indicate that the dosage value or total dosage is approaching a maximum, and values in red text indicate that the maximum dosage value or total dosage has been reached.
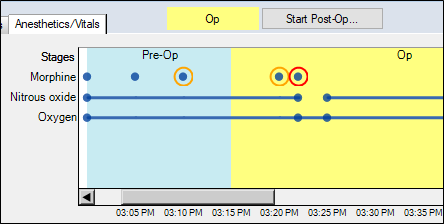
This view displays the surgery drugs list and plots the values for those drugs, as entered, from left to right. It also displays each surgery stage with a different colored background.
A blue dot (●) indicates that a drug entry value has been entered and is in a normal range, while an orange circle (Ο) indicates that the dosage entry value or total dosage is nearing the maximum level, and a red circle (Ο) indicates that the maximum dosage value or total dosage has been reached. A line between dots indicates continuous values (usually displays for gases inhaled or liquids with continuous flow). To manage anesthetics:
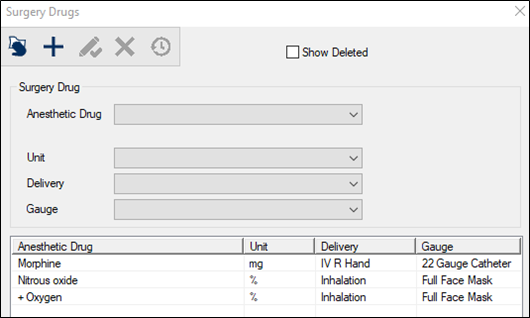
Depending on your institution's setup, common anesthetics may be added by default to your surgery drugs list. When necessary, you can adjust the surgery drugs before or during surgery.
The updated drug list displays in the Anesthetics/Vitals tab.
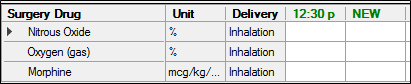
As drugs are administered to the patient, data is entered manually into axiUm. Columns (representing times) are added throughout the surgery at specified intervals (usually 5 minutes). Data can be entered into these columns, or if a drug is administered outside of one of these times, a manual entry (and column) can be added. Certain surgery drugs follow specific entry guidelines: To enter anesthetic values: Note: If the time is not displayed in a column, click NEW to display the column and specify the time of the entry, then press Enter to create the column. Tip: Use keyboard shortcuts. You can press Ctrl + N to open a new column or press Ctrl + T to edit an entered time.
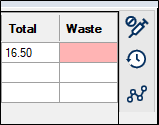
Note: If the drug is a percentage mixture of another drug, entering the value for one of the drugs auto-calculates the other drug's value. In some cases, it is necessary to clear column data from the Anesthetics/Vitals tab. Note: Removed column data still displays in the Anesthetic History window. To clear a column: The anesthetics column clears. In some cases, it is necessary to remove a column from the Anesthetics/Vitals tab. Note: Removed column data still displays in the Anesthetic History window. To a delete column: The entire column is removed from the tab. Important: This clears the associated vitals column as well. Waste is the quantity of an anesthetic drug remaining at the surgery’s end or wasted during the surgery. The quantity appears in the Waste column on the right side of the anesthetics pane. Note: If required, the column cell displays in pink until a value has been entered.
To enter the anesthetic waste: The cell color turns white. Note: The entry auto-saves when you click away from the cell. Tip: If you remove the waste entry, the background color reverts to pink. When data is entered for a drug that requires waste approval, axiUm displays a teal Approve Waste indicator and an Approve button beside the indicator becomes active.
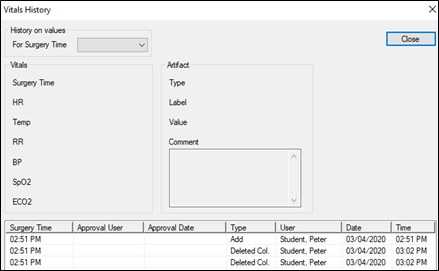
Waste approvals must be completed: Note: Once the waste is approved, users who require approval can no longer enter waste values. Users who can approve waste can modify waste values after approval to make corrections. To approve waste: The waste is approved, and the indicator beside the Approve button changes to one of the following: axiUm records all anesthetic data entered during a surgery with full audit information. This includes any deleted anesthetic and vitals columns. You can view the history of any drug used in the surgery, including the time it was added or updated, along with the associated unit and value. To view anesthetic history:
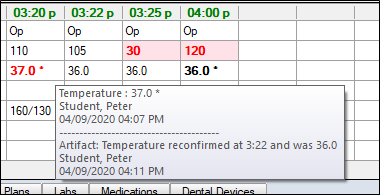
You can enter and track vital sign data in the Anesthetics/Vitals tab once you have selected a case and appointment. Tip: If the tab does not display, right-click the appointment and select Enable Anesthetics/Vitals tab. You can click the Toggle Text/Graphic View ( Note: If set to the same view (both text or both graphic), the vitals and anesthetics are time-synched. This view displays vitals data as numbers in vertical columns. Values in black text indicate that the entries are in a normal range, values in red text indicate that the value outside the normal range (or a significant change in values has occurred), and an asterisk (*) indicates the data has an artifact (a note about the data).
Tip: You can hover over a specific data point to see a tooltip with the actual value and any audit information (and any artifact information).
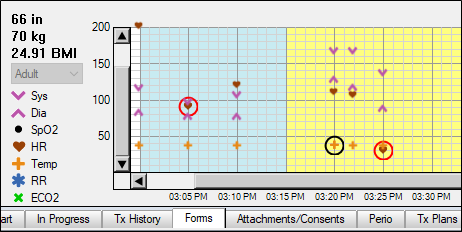
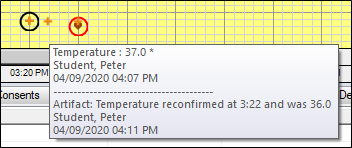
This view displays vitals data as data points on an X Y axis. Values on the Y axis are scaled from 0 at the bottom to 300 at the top. Values on the X axis are time increments of one minute. It displays each stage of the surgery with a different colored background and each vital sign has a color and shape, as defined in the legend on the left side. A black circle (Ο) indicates that an artifact has been entered, and a red circle (Ο) indicates that the value is outside the normal range or a significant change in values has occurred.
Tip: You can hover over a specific data point to see a tooltip with the actual value and audit information (and an artifact information).
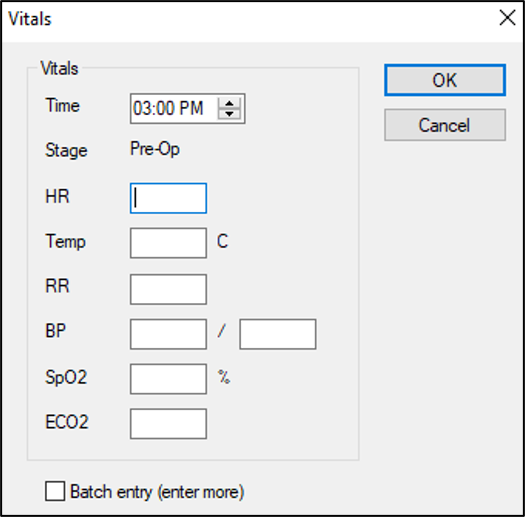
Data points display as discrete by default, but can be configured to display as connected. To manage vitals:
Note: This checkbox keeps the Vitals window stays open after you click OK, and automatically increments the Time field by 5 minutes. In Text view, a new column(s) displays with the values inserted. In Graphic view, a new set(s) of dots displays. Artifacts are text entries in the vitals section attached to specific data points. The text, creation date, and time display when you hover over an artifact. Examples: Monitor cable disconnected, patient stopped breathing, or sensor fell off patient’s right hand.
In Text view, an asterisk (*) displays after the vitals value. In Graphic view, a black circle (Ο displays around the vitals value. After entering vital signs data, you can go back and edit, provided you do not require approval for entry. Tip: To remove the artifact, click Clear. In some cases, it is necessary to clear column data from the Anesthetics/Vitals tab. The column clears. In some cases, it is necessary to remove a column from the Anesthetics/Vitals tab. Note: Removed column data still displays in the Vitals History window. The column clears. Important: This clears the associated anesthetics column as well. axiUm records all the vitals data entered during a surgery with full audit information. This includes any deleted anesthetic and vitals columns.
Surgery stages subdivide a surgery chronologically, functionally, and visually. They display in the Anesthetic/Vitals pane.
The current stage and color display at the top of the Case Management tab. The button beside the current stage allows you to move to the next surgery stage.
If the no stage has been set, the button allows you to start the first stage of the surgery.
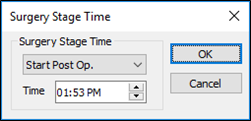
To start a surgery stage:
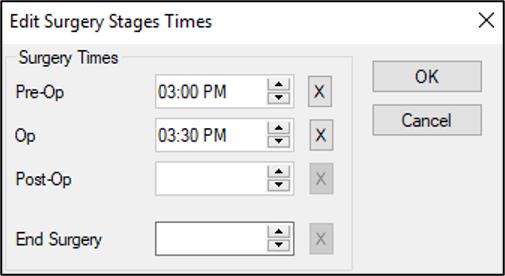
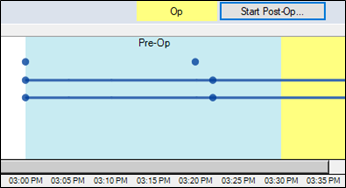
Note: Only optional stages can be skipped. Note: The time must be equal to or earlier than the current time. The name of the current stage displays at the top of the Anesthetics/Vitals tab according to its color code, and the Start button for the next stage displays to the right. Tip: When working with anesthetics and vitals in Graphic mode, the background displays the stage color. Surgery stage times can be edited after entry or can be entered all at once at the end of the surgery.
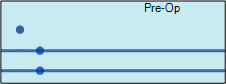
Note: The End of Surgery stage refers to the time the patient leaves the hospital or clinic, not the time the operation ends. Tip: When working with stages in Graphic view, each stage is assigned a different color, making it easier to see the subdivisions of time and function on the screen. Example: The first two stages of an operation: Pre-Op and Op.
Surgery approval should be done after the last surgery stage is over and the vitals and anesthetic data has been entered. Once the surgery is approved, users requiring approval can no longer enter additional surgery data. Typically, this doesn’t happen until the surgery has ended and the patient is discharged. Users who do not require approval, such as a nurse in recovery, can continue entering surgery data after approval. In this case, while another such user records recovery vitals, the approval can be completed. If the person entering data into the Anesthetics/Vitals tab (or the appointment’s primary provider) requires approval, axiUm displays a teal Approve Surgery indicator and an Approve button beside the indicator becomes active.
If one or more drugs selected for the surgery require waste approval:
To approve a surgery:
The surgery is approved, and the indicator beside the Approve button changes to Approved. |