|
Microsoft Word can integrate with axiUm to create, manage, and use customizable letter templates.
Note: You must run Office 2016, 2019, or 365 to integrate Microsoft Word with axiUm.
Once configured, you can open a letter template in the Attachments/Consents module.
Tip: Letter templates are also available from the Info Manager and EHR modules.
There are two letter template types available in axiUm:
- Info Manager letter templates: These use pre-defined letter template fields to pull patient information from Info Manager reports into letters that are available in both the Attachments/Consents and Info Manager modules.
- Surgery document templates: These pull patient and surgery information and generate letters and reports for a surgery that has been performed. You can then modify the Word document prior to saving it into the Attachments/Consents module and/or printing and sending as necessary.
Example: To patients, referring doctors, etc.
You can also add and store scanned letters that were created outside of axiUm.
Once a letter has been saved to axiUm, it can be viewed and printed.
 Add Letters Add Letters
Add Letters from Attachments/Consents
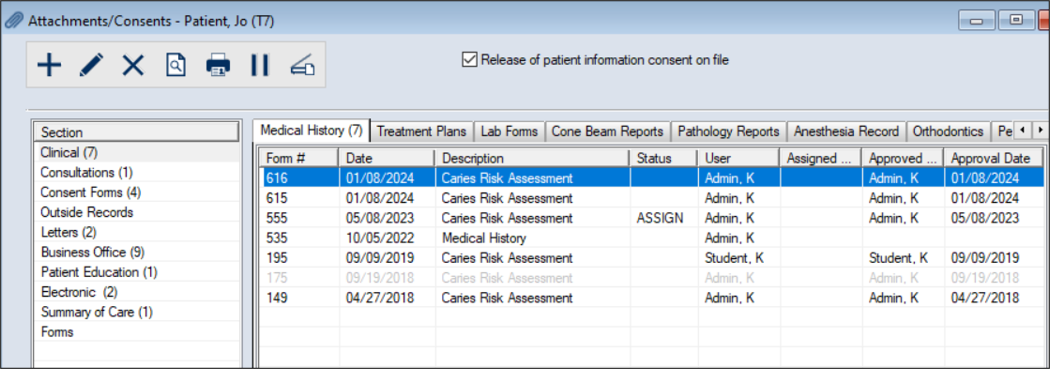
- Select a patient and open the Attachments/Consents module.
- Under Section, select an option and click a sub-tab to display all listed letter attachments.
- Click the Create a new Record (
 ) icon to display the Select Patient Letter window. ) icon to display the Select Patient Letter window.
-
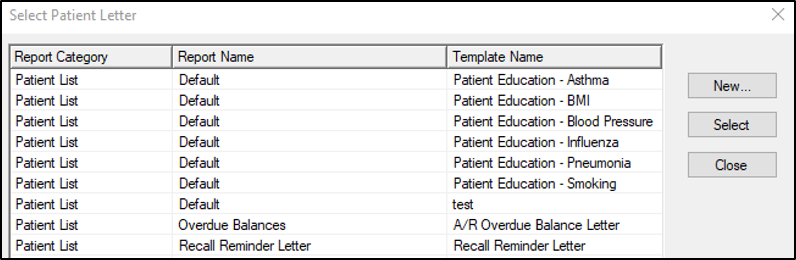
Select a template and click Select to display the Add Letter window.
Note: If prompted, select a printer to send this letter to or save as a file.
- Complete the fields as necessary and click OK.
| Date
|
This defaults to the current date and cannot be changed.
|
| Name
|
Enter a name for the letter being created.
Note: This defaults to the template name.
|
| Create Audit for Letter Generated
|
This field is selected and disabled, indicating that the letter will be saved in the Attachments/Consents module.
|
| Add to Contact Notes
|
Select the checkbox to add a contact note automatically to the patient’s record that indicates the letter was generated.
Tip: You can open the Patients or Transactions modules and click the Contact Notes ( ) icon to access notes. ) icon to access notes.
|
| Section / Sub-tab
|
These fields default to the Section and Sub-tab currently selected but can be changed as necessary.
Note: Only sections/sub-tabs that are configured to store letter attachments display in the drop-down lists.
|
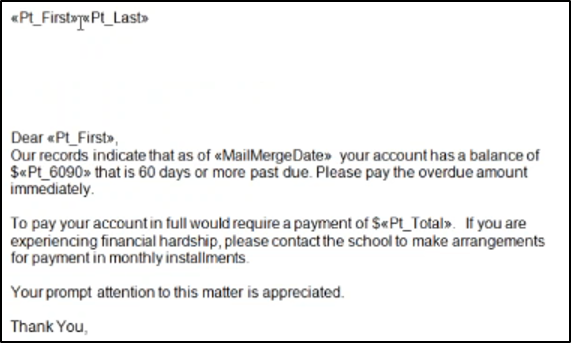
Microsoft Word opens with the selected template. Tags display with << and >> to indicate fields that will populate with the patient’s information automatically when the letter is saved/generated.
- Make changes to the letter as required.
- (Optional) Click axiUm Save as Draft/Print if you need to return to the letter later.
- Click axiUm Save as Final/Print to save the letter.
- When prompted, choose whether you want to print the document.
The letter is created and saved in the Attachments/Consents module.
Add Scanned Letters
If a letter was created/received outside of axiUm, you can still save it to the Attachments/Consents module in the same sub-tab as axiUm generated letters.
- Select a patient and open the Attachments/Consents module.
- Under Section, select an option and click a sub-tab to display all listed letter attachments.
- Click the Add Scanned Record (
 ) icon to display the Select Patient Letter window. ) icon to display the Select Patient Letter window.
- Complete the fields as necessary and click OK.
Note: The Add Scanned Record () icon behaves the same as adding a new file attachment.
Add Letters from Info Manager
You can generate and add letters from within the Info Manager module.
Tip: This is helpful if you need to send the same letter to several patients. You can run an Info Manager report to return your patient list, then select the letter you want to create for each patient.
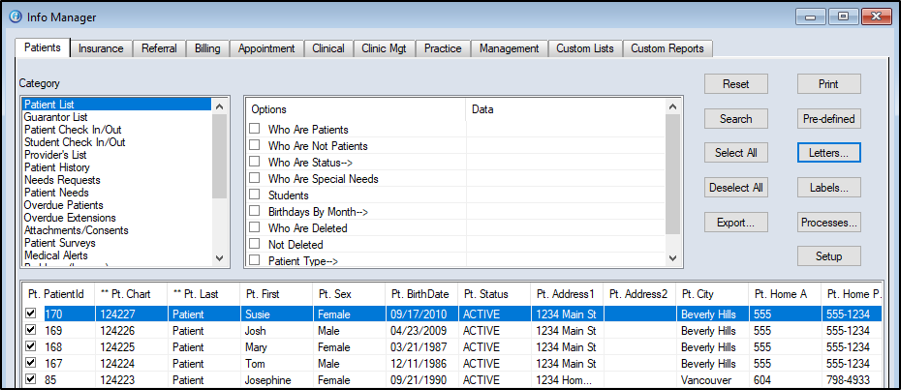
- Open Info Manager and select/run a report to obtain the list of patients.
Tips:
- Use a pre-defined report to ensure that all appropriate fields are included.
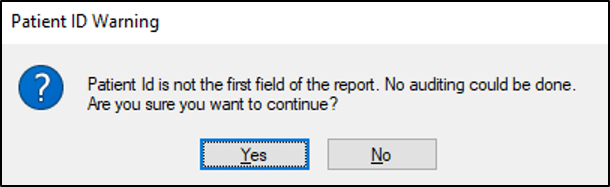
- The first field in the report must be the Patient’s ID. If not, a warning message displays, as the letters will not be saved to the patient’s record.
- Select the checkbox for each patient that the letter will be created for.
Tip: Click Select All to quickly select all patients in the list.
- Click Letters… to display the Select Letter Template window.
- Select a template and click Select.
Microsoft Word opens with the selected template. Tags display with << and >> to indicate fields that will populate with the patient’s information automatically when the letter is saved/generated.
- Make changes to the letter as required.
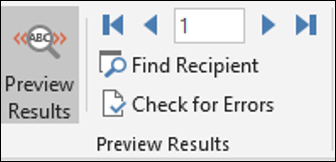
- (Optional) Click the Preview Results icon to preview the letter with the merged fields and use the arrow icons to preview the letter for each patient selected.
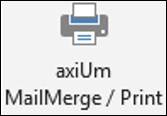
- Click axiUm MailMerge / Print to have axiUm generate the letters and print/save the files.
The letter is created and saved in the Attachments/Consents module for each of the selected patients.
Add Documents from Case Management
You can add documents such as surgery letters and reports from the Case Management module. Once a letter is added, it is automatically saved to the patient’s file and is accessible in the Attachments/Consents module in the applicable section/sub-tab.
- Select a patient and open the EHR module > Case Management tab.
- Select the case and appointment as necessary.
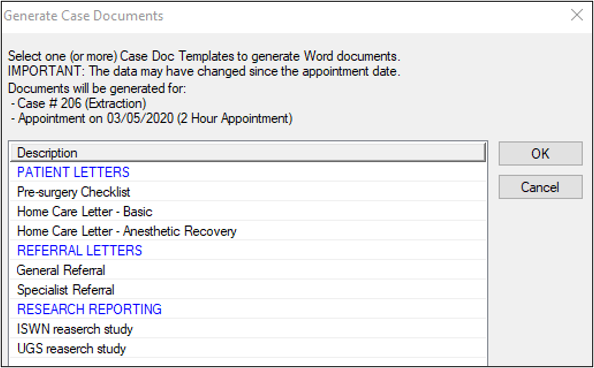
- Click Generate Docs to display the Generate Case Documents window.
Note: The Generate Docs button is only enabled when the appointment status is set to Active, Cancelled, or Failed.
Note: Blue items are headings and black items are selectable documents.
- Select one or more documents in the list and click OK.
axiUm opens Microsoft Word with the selected template
- Review and modify as necessary, then save in Microsoft Word.
When the letter is closed, it automatically saves to the patient’s file and is accessible in Attachments/Consents in the section/sub-tab specified for that document.
Manage Letter Attachments
Once a letter has been saved to axiUm, it can be viewed and printed. You can also edit the file description and the date information.
Note: The details of the file itself cannot be edited.
- Select a patient and open the Attachments/Consents module.
- Under Section, select an option and click a sub-tab to display all listed letter attachments.
Tip: If necessary, select the Show Deleted checkbox to include all deleted files.
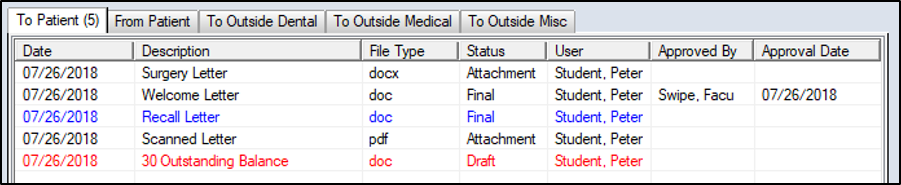
Notes:
-
Drafted letters display in red.
-
Letters that require approval display in blue.
-
Letters that have been approved or do not require approval display in black.
-
Scanned letters display Attachment under the Status column.
-
Letters with an Attachment status cannot be edited. Any changes to the document itself must be made outside of axiUm and re-added.
- Review the listed entries.
- To perform another task, complete any of the following:
View Letters
- Select a listed entry and click the Preview Report (
 ) icon. ) icon.
Edit Letters
- Select a listed entry and click the Edit Record (
 ) icon to open the letter in Word. ) icon to open the letter in Word.
Tip: You can also double-click a letter.
- Make any necessary changes and save.
Note: You can only edit letters that have a Draft status.
Edit Letter Details
-
Right-click a listed entry and select Edit Date/Description to display the Edit Patient Attachment window.
Tip: If applicable, the Entered field indicates the date/time that the entry was created.
-
Make any necessary changes and click OK.
Change Status
-
Right-click a listed entry and select Finalize Letter or Change to Draft.
Note: This is not available for scanned letters or Case Management documents.
Move Letters
-
Right-click a listed entry and select Move to another tab to display the Move Attachment Items window.
- Select a new Section and Tab from the drop-down lists and click OK.
Note: Only sections/sub-tabs that are configured to store letters or file attachments display in the drop-down lists.
Delete Letters
-
Select a listed entry and click the Delete Record (
 ) icon. ) icon.
- When prompted, click Yes to confirm the deletion.
Print Letters
- Select a listed entry and click the Print Report (
 ) icon. ) icon.
Print Letter List
- Right-click the letter list area and select Print List.
A list of all the letters within the Section and Sub-tab prints.
Approve Letters
Letters that require approval can be managed from the Attachments/Consents module.
Tip: You can also select a patient and click the teal chart number in the status bar to display the Patient Approvals window, then click Letters to review all letters for the patient that require approval.
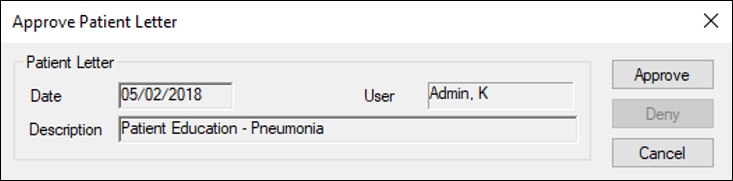
- Select a listed entry and click Approve to display the Approve Patient Letter window.
- Complete any of the following:
- To approve the letter, click Approve.
- To reject the letter, click Deny.
|