| Purpose:
|
Manage custom views for Info Manager that allow you to include information not available from standard Info Manager queries.
|
| Related Module(s):
|
Info Manager
|
| Accessed From:
|
Maintenance > System > Custom Lists
|
| Window(s):
|
Custom Lists
Custom Field Definitions
Custom List Access
|
| Dependencies:
|
None.
|
Custom Lists Window
Custom Lists are used to manage custom views in axiUm that are accessible in Info Manager. These views can include existing fields, calculated fields, or table combinations not available in the standard Info Manager queries.
The Custom Lists window allows you to manage custom views, as well as access and mappings.
Important: These custom lists require an Oracle view to be created in your database. For more information on working with custom views, please contact axiUm Support.
 Custom Lists - Field Definitions Custom Lists - Field Definitions
| View Name
|
A text field that indicates the Oracle SQL view name.
|
| Display Name
|
A text field that indicates the name that displays in the Info Manager list.
|
| Short Name
|
A text field that indicates a short name for the view.
The short name is used as a field prefix for the Info Manager column names and in the Report Definition window.
|
| Inactive
|
A checkbox that, when selected, indicates the field is inactive and not in use. |
Custom Field Definitions Window
(Maintenance > System > Custom Lists)
The Custom Field Definitions window allows you to review the field definitions for the selected view. It displays when you open the Custom Lists window, select a list and click the Custom Field Definitions ( ) icon. ) icon.
Note: These fields are pulled at the time the record is created in Maintenance. If changes are made to the view after the record is created, the field definitions must be refreshed.
Custom Field Definitions - Field Definitions
| View Name
|
A read-only field that indicates the selected view.
|
| Inactive
|
A checkbox that, when selected, indicates the field is inactive and not in use. |
| Field Name
|
A read-only field that indicates the field name for the selected record.
|
| Field Type
|
A read-only field that indicates the field type for the selected record.
|
| Display Name
|
A text field that indicates the text to display for the selected record.
Tip: By default, this is set to the field's Short Name followed by the Field Name.
|
| Maps To
|
A drop-down list that indicates any mappings to the Patient and/or User tables:
- N/A: This field is not mapped.
- Patient Id: Maps the field to the Patient table based on Patient Id (only one field in the view can be linked to the Patient table). This allows you to add additional Patient fields into your Info Manager report that don’t exist in the custom view.
- User Id: Maps the field to the Users table based on User Id. This allows you to add additional User fields into your Info Manager report that don’t exist in the custom view.
- User Id (Current User only): Maps the field to the Users Table based on User Id but will only display results for the logged-on user.
|
Custom Field Definitions - Tasks
| Edit Custom Field Definitions
|
-
Review the listed field definitions for the selected view.
-
Make any necessary changes and click the Modify Record ( ) icon. ) icon.
|
|
Refresh Custom Field Definitions
|
- If necessary, click the Refresh (
 ) icon to update the view's field definitions. ) icon to update the view's field definitions.
|
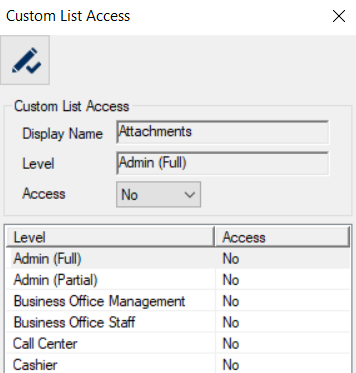
Custom List Access Window
(Maintenance > System > Custom Lists)
The Custom List Access window allows you to manage access to the selected view. It displays when you open the Custom Lists window, select a list and click the Level Access ( ) icon. ) icon.
Custom List Access - Field Definitions
| Display Name
|
A read-only field that indicates the selected view.
|
| Level
|
A read-only field that indicates the selected user level(s).
Tip: You can select multiple levels to save time. If multiple are selected, a comma and ellipsis (, ...) display after the first level.
|
| Access
|
A drop-down list that indicates access for the selected user level(s):
|
Custom List Access - Tasks
| Configure Custom List Access
|
-
Select one or more user levels that should have the same access.
-
Set the access fields as necessary and click the Modify Record () icon.
-
Repeat the steps for all necessary user levels.
|
|