|
Patient payments can be made by a patient or by a guarantor on their behalf. They are added from the Transactions module > Payment tab. Once entered into axiUm, they are linked to the patient record and must then be allocated to treatment, charges, and payment plans or as a pre-payment on a patient record.
Pre-payments are funds that are collected and held in reserve for a specific purpose.
Example: You receive a portion of a patient payment in advance for a costly procedure and want to ensure this money cannot be allocated elsewhere.
Allocation identifies which patient account the payment will be applied to as well as to which treatment/charges. A payment can be applied to multiple patient records.
Example: A guarantor makes one $500 payment and asks that it be split to pay for $200 and $300 treatments on two different patient accounts.
Patient payments cannot be deleted from axiUm. If a patient payment is entered in error, this must be corrected using an adjustment.
 Enter Patient Payments Enter Patient Payments
Tip: Use the General tab to check the patient's balance before adding a patient payment into axiUm.
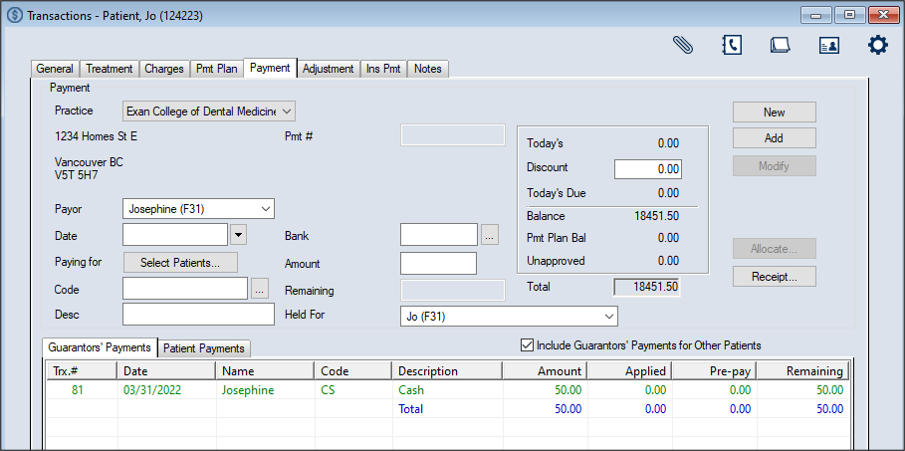
- Select a patient and open the Transactions module.
- Click the Payment tab > Guarantors’ Payments sub-tab and review the listed payments.
-
Click New.
-
Complete the Payment fields as necessary and click Add.
Note: Up to two custom fields may also be configured for use by your institution. If configured, they display below the Pmt # field.
Payment fields
| Practice
|
This defaults to the workstation's default practice.
If necessary, select another practice from the drop-down.
|
| Payor |
Select the person from whom you are taking payment from the drop-down.
Note: The entries are limited to the patient’s guarantor(s).
Tip: If the person making the payment is not in the list, ensure they have been correctly added as a guarantor for the patient.
|
| Date
|
This defaults to the current date.
If necessary, select another date from the calendar drop-down.
|
| Paying for
|
Tip: If a parent or other guarantor wants to pay for multiple patients at once, you can select multiple patients.
Click the Select Patients… button to display the Select Patient(s) (payment is for) window and select the patient(s) the payment is for.
|
|
Code |
Enter the payment code or click the ellipsis to select from the Payment Codes window.
|
| Desc. |
This field displays the description of the selected code.
Tip: Include any identifying numbers for the payment, such as the check number, to assist with auditing.
|
| Pmt # |
This read-only field displays an axiUm-generated payment number that is assigned when you click the Add button.
|
| Bank |
Enter the bank code for the cash drawer where the payment was made or click the ellipsis to select from the Bank Codes window. |
| Amount |
Enter the dollar amount of the payment.
|
| Remaining |
This read-only field automatically displays the amount remaining to be allocated to the patient account when you click the Add or Modify buttons. |
|
Held For |
Select where to hold any unallocated funds from the drop-down.
Depending on the selected payor, the options include the currently selected patient and payor, any other patients the payor is guarantor for, any other patients that are dependents of the patient's guarantors and any payment plans that exist under the selected patient and payor.
Example: If John Patient is guarantor for himself and several other family members, and also has a payment plan, the drop-down displays each family member as an option as well as John Patient’s payment plan.
Note: This is important for family payments when a guarantor has multiple dependents and is making a bulk payment. The Held For field indicates whose account any unallocated funds will remain on. The amount may increase/decrease as payments are allocated/unallocated and when any adjustments are made to the payment. The amount also affects the patient’s current account balance.
|
|
Today’s |
This read-only field displays the charges added to the patient account on today’s date.
|
| Discount |
This read-only field works in conjunction with the selected payment code and displays the discount that can be applied to this patient.
Note: This functionality is managed from the Payment Codes window. Payment codes that use discounts must have the Discount only if Today’s Charges Paid in Full? checkbox selected.
|
| Today’s due |
This read-only field displays the amount due from today's charges.
axiUm automatically calculates this value by subtracting the Discount field from the Today's field.
|
| Balance |
This read-only field displays the amount of all charges on the patient account excluding amounts that are on payment plans and any unapproved charges.
axiUm automatically calculates this value by adding the Today's Due field and all outstanding charges on the patient account.
|
| Pmt Plan Bal |
This read-only field displays the total amount due on the payment plan. It includes the amount currently due as well as any outstanding balances. |
| Unapproved |
This read-only field displays the charges entered today that have not yet been approved by a faculty member.
|
| Total |
This read-only field displays the total amount for the patient.
|
The record displays in the list view in green text to indicate it is not allocated.
Important: At this point the payment has been added but is not allocated anywhere. To allocate the payment, see Allocate Patient Payments.
Allocate Patient Payments
Once a payment is added, you can allocate it to a variety of items, including in progress or completed treatments, office charges, payment plans, and as pre-payments for future treatments. This may be done manually from the Transactions module or done automatically using an Auto-Apply Payments utility located in the Maintenance module or the overnight package created for your institution.
Important: Many institutions choose to auto-apply payments using the overnight package. Because the overnight package is often customized for your institution, it can take institution-specific allocation rules into consideration, and by default, follows the logic used by the Auto-Apply Payments utility in Maintenance. For more information on the overnight package, contact axiUm Support.
Pre-payments are funds that are collected and held in reserve for a specific purpose.
Example: You receive a portion of a patient payment in advance for a costly procedure and want to ensure this money cannot be allocated elsewhere.
If you allocate a payment as a pre-payment, you must allocate that pre-payment towards the correct treatment once it occurs.
Note: When allocating payments to pre-payments, you can specify the treatment/charge criteria. This is later used to control which items axiUm can apply the pre-payment toward.
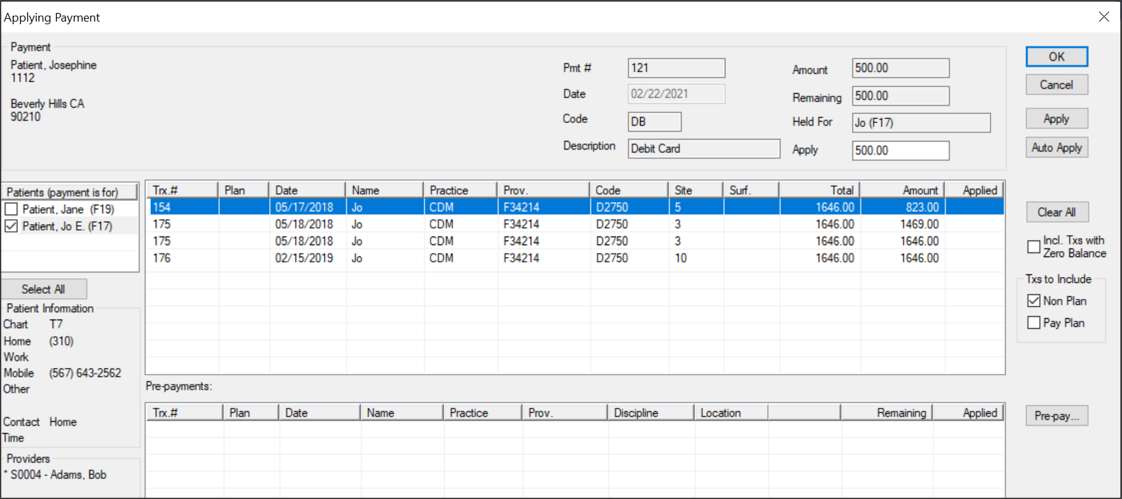
Allocate Payments to Treatments/Charges
- Select a patient and open the Transactions module.
- Click the Payment tab > Guarantors’ Payments sub-tab and review the listed payments.
- Select a listed payment with an amount left to allocate and click Allocate… to display the Applying Payment window.
Note: You can also select a pre-payment to allocate towards treatments.
Important: Because pre-payments are held with specific treatments in mind, axiUm warns you if you attempt to allocate the pre-payment to a treatment that doesn’t match the criteria specified.
- (Optional) Review the Payment fields as necessary.
-
Determine which treatments/charges display:
-
Under Patients (payment is for), select the checkbox next to any additional patients that the payor is a guarantor for.
Tip: You can also click Select All to select all listed patients quickly.
-
Select any of the following checkboxes:
- Incl. Txs with Zero Balance: Select the checkbox to include payment records with $0 balances.
- Non Plan: Select the checkbox to include treatments not on payment plans.
- Pay Plan: Select the checkbox to include treatments on payment plans.
All applicable treatments/charges with outstanding balances display in the list.
-
Complete any of the following:
The payment amount displays in the Applied column next to the outstanding treatment/charge(s).
Note: If the payment is less than the outstanding treatment/charge, a balance will remain. If the payment is more than the outstanding treatment/charge, part of the payment will remain unapplied.
-
If necessary, repeat Step 6 until the entire payment is allocated or no charges remain.
Tip: If you need to correct any allocations, click Clear All and repeat Steps 6-7.
-
Click OK to close the Applying Payment window.
Important: You must click OK to save your allocations. Clicking Cancel closes without saving your allocations.
Payments that are fully allocated display in black text while those that are partially allocated display in green text.
Allocate Payments to Payment Plans
- Select a patient and open the Transactions module.
- Click the Payment tab > Guarantors’ Payments sub-tab and review the listed payments.
- Select a listed payment with an amount left to allocate and click Allocate… to display the Applying Payment window.
- (Optional) Review the Payment fields as necessary.
-
Determine which treatments/charges display:
-
Under Patients (payment is for), select the checkbox next to any additional patients that the payor is a guarantor for.
Tip: You can also click Select All to select all listed patients quickly.
-
Under Txs to Include, select the Pay Plan checkbox to include treatments on payment plans in the list view.
All applicable treatments/charges with outstanding balances display in the list.
-
Complete any of the following:
The payment amount displays in the Applied column next to the outstanding treatment/charge(s).
Note: If the payment is less than the outstanding treatment/charge, a balance will remain. If the payment is more than the outstanding treatment/charge, part of the payment will remain unapplied.
-
If necessary, repeat Step 6 until the entire payment is allocated or no charges remain.
Tip: If you need to correct any allocations, click Clear All and repeat Steps 6-7.
-
Click OK to close the Applying Payment window.
Important: You must click OK to save your allocations. Clicking Cancel closes without saving your allocations.
Payments that are fully allocated display in black text while those that are partially allocated display in green text.
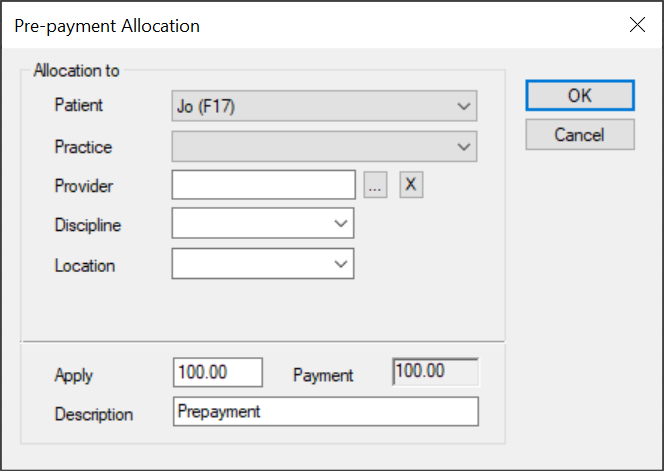
Allocate Payments as Pre-Payments
- Select a listed payment with an amount left to allocate and click Allocate… to display the Applying Payment window.
- (Optional) Review the Payment fields as necessary.
-
Click Pre-pay… to display the Pre-payment Allocation window.
-
Complete the fields as necessary and click OK.
Important: These fields are used to determine which treatments/charges this pre-payment can be applied to later.
Note: Up to two custom fields may also be configured for use by your institution. If configured, they display below the Discipline field.
| Practice |
Select the practice that this pre-payment amount is reserved for.
|
| Provider |
Enter the provider ID of the provider who will perform the treatments for which the pre-payment is reserved or click the ellipsis to select from the Providers List window.
|
| Discipline
|
Select the discipline this treatment will be performed under from the drop-down.
|
| Apply |
Enter the payment amount that will be applied towards the pre-payment.
Note: This amount must be equal or less than the amount displayed in the Payment field.
|
| Payment |
This read-only field displays the payment amount available for allocation.
|
| Description |
This field displays the description of the pre-payment.
Tip: Include the reason for the pre-payment.
|
The pre-payment is added and displays in the Pre-payments section.
-
Click OK to close the Applying Payment window.
Payments that are partially or fully allocated as pre-payments display in purple text.
Important: The pre-payment must still be allocated to the correct treatment/charge once the treatment has been performed or the charge has been set. This may be done automatically via your institution’s overnight package (if applicable) or you must remember to do this manually.
Manage Patient Payments
- Select a patient and open the Transactions module.
- Click the Payment tab > Guarantors’ Payments sub-tab and review the listed payments.
Tip: You can select the Include Guarantor’s Payments for Other Patients checkbox to include all records of payments made by the currently selected patient’s guarantor, including those made towards other patients.
Example: John Patient is the guarantor for his two children, Jo Patient and Mike Patient, and previously made payments for them. When this checkbox is selected, axiUm also displays Jo Patient’s and Mike Patient’s payment records.
- To perform a task, complete any of the following:
Print Payment Receipts
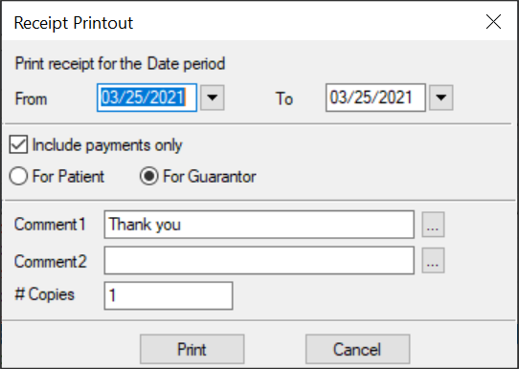
-
After adding a patient payment, click Receipt… to display the Receipt Printout window.
- Complete the fields as necessary and click Print.
| From / To |
Select the starting and ending date range.
|
| Include payments only |
Select the checkbox to include only payments on the receipt. If deselected, the receipt displays both payments and charges.
|
| For Patient / For Guarantor
|
Select a radio button to indicate whether the Patient Receipt or Guarantor Receipt report will print.
Note: The Patient Receipt report displays all payments made towards the current patient's account. The Guarantor Receipt report displays all payments the selected guarantor made towards their own account, plus other accounts for which they are responsible for. However, the usage of standard reports vs. custom reports may impact how this information displays.
|
|
Comment 1 / Comment 2 |
Enter free-form comments or click the ellipses to select template comments from the Comment Codes window.
When the report prints, these will display on the payment receipt.
|
| # Copies |
Enter the number of copies you want to print.
|
Tip: After printing, a digital copy of the receipt is stored in the Attachments/Consents module.
Edit Patient Payments
In the case of a small error when adding a payment, you can edit the payment.
Example: The wrong code or amount was entered.
Note: Payments that have already been allocated must be unallocated before they can be edited.
-
Select a listed payment.
- Modify the fields as necessary and click Modify.
Important: If the payment was previously allocated, you need to re-allocate the payment.
Review / Unallocate Patient Payments
-
Select a listed payment, right-click and select Disbursement to display the Payment Disbursement window.
-
Review the listed records as necessary.
Tip: If the value in the Applied column is higher than 0.00, the money has been partially or fully allocated.
-
(Optional) Complete any of the following
- To view the history of a record, select a record and click History.
-
To unallocate a record, select a record and click the Unallocate button.
View Payment History
-
Select a listed payment, right-click and select Show History to display the Payment History window.
-
Select a listed record and review the fields as necessary.
View Payment Plan History
-
Select a listed payment, right-click and select View Payment History to display the Payment Plan Payments window.
- Review the listed payments allocated to the payment plan.
|