|
Patient adjustments are used to alter patient payments, treatments, or office charges. They are added from the Transactions module > Adjustment tab. If a change is required to any of those items, you can add and apply a patient adjustment to increase or decrease the patient balance.
Tip: Payments can also be adjusted directly from the payment record on the Payment tab. If adjusted from the Payment tab, the payment record displays in red text.
 Types of Adjustments Types of Adjustments
Adjustments can be debits or credits and each may be applied to charges or payments. As a result, there are four possible adjustment scenarios:
-
Debits: These typically increase the amount owed by a patient.
-
Debit applied to a payment: Decreases the amount paid by the patient.
Examples:
-
A patient pays $150 but it overcharged by $50. The payment must be adjusted to $100 so that the account reflects that the patient only owed $100 to the institution and can be refunded a portion of their payment.
-
A patient makes a $400 payment with a check that bounces because of insufficient funds. The payment must be adjusted to $0 so that the account reflects that the patient still owes $400 to the institution.
-
Debit applied to a charge: Increases the amount owed for the charge.
Example: A process associated with a $20 charge takes longer than usual and becomes subject to a fee surcharge of an additional $10. The patient now owes $30.
-
Credits: These typically decrease the amount owed by a patient.
-
Credit applied to a payment: Increases the amount paid by the patient.
Example: A patient pays $25 for a treatment. A $10 credit is applied to the payment, making the payment total $35.
-
Credit applied to a charge: Decreases the amount owed for the charge.
Example: A patient can pay $400 in full for a treatment in cash and is therefore eligible for a $40 discount. The charge is adjusted to be $360 to reflect that and the patient pays in full.
Adjustment Reasons
Adjustments may need to happen for a variety of reasons, including:
- Partial or full refunds
- Payment reversals
- NSF checks
- Fee waivers and discounts, surcharges, and write-offs
Once added, adjustments must be manually allocated to one or multiple items. Because an adjustment alters a specific entry, and axiUm cannot guess which entry to adjust, you cannot use a utility or overnight process to allocate adjustments automatically.
Example: If an adjustment indicates that a patient payment was refunded, you must link that adjustment record to the correct payment.
Adjustments can also be deleted, provided they are not currently allocated to anything.
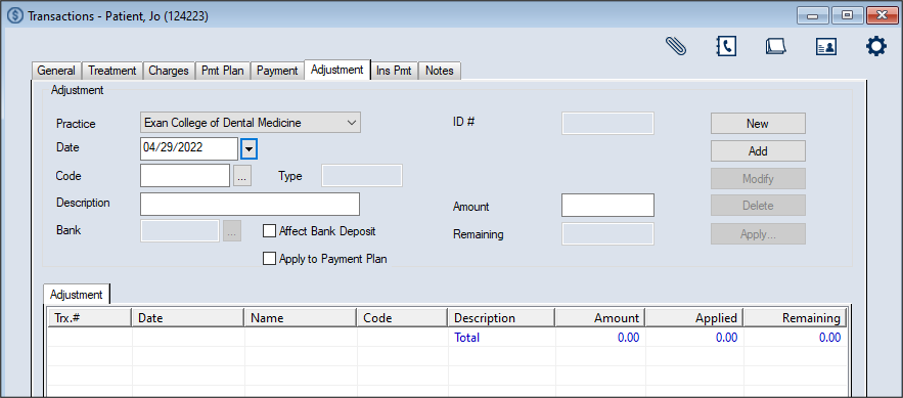
Enter Adjustments
- Select a patient and open the Transactions module and click the Adjustment tab > Adjustment sub-tab.
-
Click New.
-
Complete the Adjustment fields as necessary and click Add.
Note: Up to two custom fields may also be configured for use by your institution. If configured, they display below the ID # field.
Adjustment fields
| Practice
|
This defaults to the workstation's default practice.
If necessary, select another practice from the drop-down.
|
| Date
|
This defaults to the current date.
If necessary, select another date from the calendar drop-down.
|
|
Code |
Enter the adjustment code or click the ellipsis to select from the Adjustment Codes window.
|
| Description |
This field displays the description of the selected code.
|
| Type |
This read-only field displays whether the adjustment is a debit or credit to the patient’s account.
axiUm automatically enters this value based on the selected code.
|
| Affect Bank Deposit |
Select the checkbox to indicate that this adjustment affects the bank deposit and will display on the next bank deposit report opposite the record(s) being adjusted.
Note: If selected, the Bank field is enabled.
|
| Bank |
Enter the bank code for the cash drawer where the payment was made or click the ellipsis to select from the Bank Codes window.
Note: This field is only enabled if the Affect Bank Deposit checkbox is selected.
|
| Apply to Payment Plan |
Select the checkbox to apply this adjustment to the patient's current payment plan.
|
| ID # |
This read-only field displays an axiUm-generated adjustment number that is assigned when you click the Add button.
|
| Amount |
Enter the dollar amount of the adjustment.
|
| Remaining |
This read-only field automatically displays the unapplied amount for this adjustment when you click the Add button.
Note: If the adjustment has been fully applied to a payment, the value is $0.00. If the adjustment has not been fully applied, axiUm displays the remaining balance.
|
The record displays in the list view in green text to indicate it is not allocated.
Important: At this point the adjustment has been entered but is not allocated anywhere. To allocate the adjustment, see .
Allocate Adjustments
Once an adjustment is added, it can be allocated to specific treatments, payments, and/or office charges.
Note: Unapplied adjustments display in green text.
To allocate an adjustment:
- Select a patient and open the Transactions module.
- Click the Adjustment tab > Adjustment sub-tab and review the listed adjustments.
- Select a listed record and click Apply… to display the Applying Adjustment window.
All payments and charges on the selected patient’s account that are not fully allocated and can be adjusted display.
Note: If the adjustment is for a payment, any payments that have not been fully allocated display. If the adjustment is for a charge, any charges that have not been fully allocated display.
-
Complete any of the following:
-
To apply the adjustment to the oldest outstanding record first, click Auto Apply.
-
To apply the adjustment to a specific record:
-
Select a listed record.
-
(Optional) If you want to allocate only a portion of the adjustment, modify the amount in the Apply field.
-
Click Apply.
The adjustment amount displays in the Applied column next to the outstanding record(s) and the remaining balance displays in the Amount column.
-
If necessary, repeat Step 4 until the entire adjustment is allocated or no charges remain.
Tip: If you need to correct any allocations, click Clear All and repeat Steps 4-5.
-
Click OK.
Adjustments that are fully allocated display in black text while those that are partially allocated display in green text.
Note: If viewing a payment record that has been adjusted from the Payment tab, the record displays in red text.
Tip: We recommend you enter a patient note with the reason for the adjustment and the Trx #.
Manage Adjustments
- Select a patient and open the Transactions module.
- Click the Adjustment tab > Adjustment sub-tab and review the listed adjustments.
- To perform a task, complete any of the following:
Edit Adjustments
In the case of a small error when adding an adjustment, you can edit the adjustment.
Example: The wrong code or amount was entered.
Note: Adjustments that have already been allocated must be unallocated before they can be edited.
-
Select a listed adjustment.
- Modify the fields as necessary and click Modify.
Review / Unallocate Adjustments
Tip: If the value in the Applied column is higher than 0.00, the money has been partially or fully allocated.
- Select a listed adjustment, right-click and select Disbursement to display the Adjustment Disbursement window.
-
Review the listed records as necessary.
Tip: If the value in the Applied column is higher than 0.00, the money has been partially or fully allocated.
- (Optional) Complete any of the following:
- To view the history of a record, select a record and click History.
- To unallocate a record, select a record and click Unallocate.
Delete Adjustments
Note: Adjustments that have already been allocated must be unallocated before they can be deleted.
-
Select a listed adjustment and click Delete.
- When prompted, click Yes to confirm your deletion.
Print the Adjustments List
-
Select a listed record, right-click and select Print List.
- Select the appropriate printer settings and click Select.
Adjust Payments Directly
When necessary, you can adjust a payment using one of four adjustment methods directly from the Payment tab:
- NSF payments: This option is used when a check is returned due to insufficient funds.
- Partial refunds: This option is used to refund the unallocated or held portion of a payment.
- Full refunds: This option is used to provide a full refund to patient. Any allocations to payments will be unallocated automatically.
Examples: The patient requests their money back because of failed treatment or because their insurance company covered the treatment costs.
- Payment reversals: This option is used when the payment was entered in error by a staff member. Any allocations to payments will be unallocated automatically and the LastPmtDate and LastPaymentAmounts are recalculated to not include the selected payment.
Important: If any adjustments are added, at the end of each day, you'll need to run the Bank Deposit report.
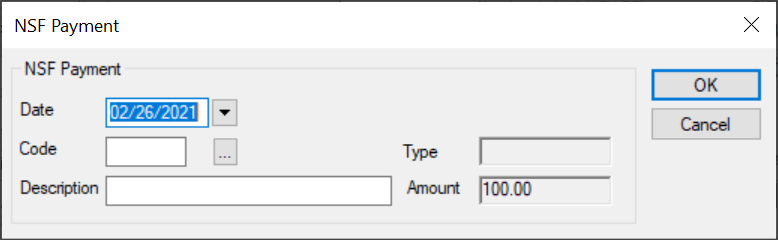
Set Payments as NSF
- Select a patient and open the Transactions module.
- Click the Payment tab > Guarantors’ Payments sub-tab and review the listed payments.
- Select a listed payment, right-click and select NSF Payment to display the NSF Payment window.
-
Complete the fields as necessary and click OK.
| Date
|
This defaults to the current date.
If necessary, select another date from the calendar drop-down.
|
|
Code |
Enter the adjustment code or click the ellipsis to select from the Adjustment Codes window.
Note: Once selected, the Type field displays Debit (+) or Credit (-).
|
| Description |
This field displays the description of the selected code.
If necessary, you can modify the description manually.
|
| Amount |
This field displays the payment amount.
|
The payment displays in red text to identify that there is an adjustment on the payment record.
Tip: If applicable at your institution, you should enter an NSF charge fee. You wil now need to take payment for the original treatment(s) and the NSF charge fee, if applicable.
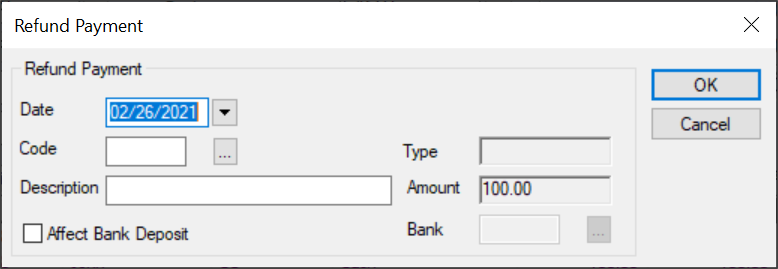
Partially Refund Payments
- Select a patient and open the Transactions module.
- Click the Payment tab > Guarantors’ Payments sub-tab and review the listed payments.
- Select a listed payment, right-click and select Refund Payment to display the Refund Payment window.
-
Complete the fields as necessary and click OK.
| Date
|
This defaults to the current date.
If necessary, select another date from the calendar drop-down.
|
|
Code |
Enter the adjustment code or click the ellipsis to select from the Adjustment Codes window.
Note: Once selected, the Type field displays Debit (+) or Credit (-).
|
| Description |
This field displays the description of the selected code.
If necessary, you can modify the description manually.
|
| Amount |
This field displays the payment amount that will be adjusted. It populates based on the amount that is still unallocated.
|
| Affect Bank Deposit |
Select the checkbox if this adjustment affects the bank deposit and will display on the next bank deposit report opposite the record(s) being adjusted. |
| Bank |
Note: This field is only enabled if the Affect Bank Deposit checkbox is selected.
Enter the bank code for the cash drawer where the payment was made or click the ellipsis to select from the Bank Codes window.
|
The payment displays in red text to identify that there is an adjustment on the payment record.
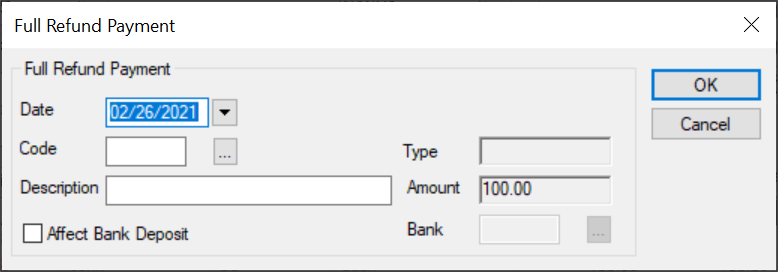
Fully Refund Payments
- Select a patient and open the Transactions module.
- Click the Payment tab > Guarantors’ Payments sub-tab and review the listed payments.
- Select a listed payment, right-click and select Full Payment to display the Full Refund Payment window.
-
Complete the fields as necessary and click OK.
| Date
|
This defaults to the current date.
If necessary, select another date from the calendar drop-down.
|
|
Code |
Enter the adjustment code or click the ellipsis to select from the Adjustment Codes window.
Note: Once selected, the Type field displays Debit (+) or Credit (-).
|
| Description |
This field displays the description of the selected code.
If necessary, you can modify the description manually.
|
| Amount |
This field displays the payment amount.
|
| Affect Bank Deposit |
Select the checkbox if this adjustment affects the bank deposit and will display on the next bank deposit report opposite the record(s) being adjusted. |
| Bank |
Note: This field is only enabled if the Affect Bank Deposit checkbox is selected.
Enter the bank code for the cash drawer where the payment was made or click the ellipsis to select from the Bank Codes window.
|
The payment displays in red text to identify that there is an adjustment on the payment record.
Reverse Payments
- Select a patient and open the Transactions module.
- Click the Payment tab > Guarantors’ Payments sub-tab and review the listed payments.
- Select a listed payment, right-click, and select Reverse Payment to display the Reverse Payment window.
-
Complete the fields as necessary and click OK.
| Date
|
This defaults to the current date.
If necessary, select another date from the calendar drop-down.
|
|
Code |
Enter the adjustment code or click the ellipsis to select from the Adjustment Codes window.
Note: Once selected, the Type field displays Debit (+) or Credit (-).
|
| Description |
This field displays the description of the selected code.
If necessary, you can modify the description manually.
|
| Amount |
This field displays the payment amount.
|
| Affect Bank Deposit |
Select the checkbox if this adjustment affects the bank deposit and will display on the next bank deposit report opposite the record(s) being adjusted. |
| Bank |
Note: This field is only enabled if the Affect Bank Deposit checkbox is selected.
Enter the bank code for the cash drawer where the payment was made or click the ellipsis to select from the Bank Codes window.
|
The payment displays in red text to identify that there is an adjustment on the payment record.
Tip:You will now need to enter the payment correctly.
|