|
If you have the necessary access permissions, you can customize the way the Transactions module displays on individual workstations to suit your preferences. Configuration is accessible from the Options/Settings ( ) icon > Transactions Options window. The following sections cover which station options can be configured. ) icon > Transactions Options window. The following sections cover which station options can be configured.
Note: To see the effects of your changes, close and re-open the Transactions module.
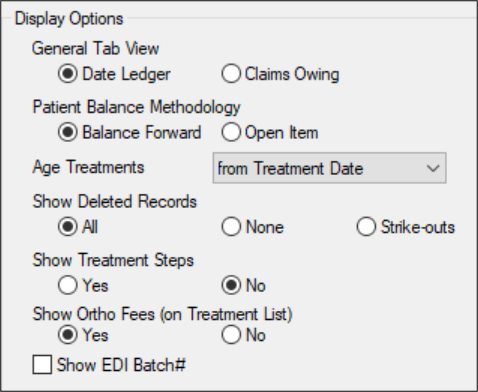
 Display Options Display Options
| General Tab View
|
Select a radio button to set how items in the General tab are ordered and displayed:
- Date Ledger: Sorts the records by entry date. axiUm does not necessarily display treatment records next to the associated payment applied to it, since these entries may have different dates.
- Claims Owing: Sorts the records by claim number. axiUm displays treatment records next to the associated payment applied to it, including any adjustments, and a running balance for the individual claim.
|
| Patient Balance Methodology
|
Select a radio button to set how axiUm calculates patient balances.
- Balance Forward: Maintains a list of charges and payments for each account.
To calculate the balance, axiUm adds the charges and payments, then subtracts the total payments from the total charges. This carries balances forward and applies payments to the oldest outstanding items first.
Note: This is similar to the first-in, first-out (FIFO) method.
Example: A treatment balance displays in the > 30 column and in the Current column. When a payment is allocated to the Current column, the > 30 column is reduced by the payment amount while the Current column remains at its original amount.
- Open Item: Selects a bucket when allocating a payment to associate payment to a specific treatment.
Example: A treatment balance displays in the > 30 column and in the Current column. When a payment is allocated to the Current column, the Current column is reduced, and the > 30 column remains at its original amount.
|
| Age Treatments
|
Select the aging start date of your account receivables from the drop-down:
|
| Show Deleted Records
|
Select a radio button to set how axiUm displays deleted and/or struck out records in the Transactions module.
- All: Displays both deleted and struck out records.
- None: Hides both deleted and struck out records.
- Strike-outs: Displays struck out records and hides deleted records.
Note: Deleted records have been deleted by a user. Struck out records have been deleted internally by axiUm and replaced by a new, updated record.
Example: When an in process treatment changes to complete, the in process treatment record is struck out and replaced with a completed treatment record.
|
| Show Treatment Steps
|
Some institutions add steps to procedure codes as a teaching tool or method of performing and grading individual steps in the procedure.
Tip: This is frequently used in an undergraduate area for difficult procedures (e.g., a bridge).
Select a radio button to set if child steps display in the Transactions module:
- Yes: Displays all steps in a procedure.
- No: Hides all steps in a procedure and displays only the parent procedure.
|
| Show Ortho Fees (on Treatment List)
|
Select a radio button to set if ortho treatment fees display in the Treatment tab:
- Yes: Displays ortho treatments and billings in the list.
- No: Hides ortho treatments and billings from the list.
|
| Show EDI Batch#
|
Select the checkbox to display a Batch # column in the General and Treatment tabs and list any applicable EDI batch numbers.
|
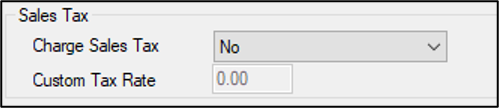
Sales Tax
| Charge Sales Tax
|
Select an option to set whether sales tax is charged to transactions.
|
| Custom Tax Rate
|
If enabled, enter the custom sales tax percentage axiUm used at the workstation on transactions.
Note: This field is only enabled if the Charge Sales Tax field is set to Yes (use Custom rate).
|
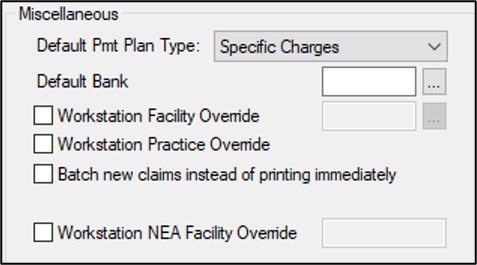
Miscellaneous
| Default Pmt Plan Type
|
Select the default payment plan type that displays in the Pmt Plan tab > Plan is for field from the drop-down:
- Specific Charges
-
Outstanding Balance
-
Orthodontics
|
| Default Bank
|
Enter the bank code or click the ellipsis to select from the Bank Codes window.
Note: If set, this default bank code overrides the default bank code associated with an individual user when they enter records at this workstation.
|
| Workstation Facility Override
|
Select the checkbox to set if this workstation uses facility codes. If selected, click the enabled ellipsis to select a facility from the Facilities window.
Note: The selected facility code displays on printed HCFA claims.
|
| Workstation Practice Override
|
Select the checkbox to override the practice associated to the logged in user and use the practice associated with this workstation.
Note: A practice is associated with your workstation from Maintenance > Office > Practices > Practices window.
|
| Batch new claims instead of printing immediately
|
Select the checkbox to set if claims should be batched to the Print Held Claims or EDI Claims window instead of printing when the Submit button is clicked.
This allows claims to be processed (printed or sent electronically) in batches instead of individually.
Note: As treatments entered in Transactions do not require approval, the Practice Option for batching on approval is different from this workstation option.
|
| Workstation NEA Facility Override
|
Select the checkbox and enter an NEA facility to use at this workstation. |
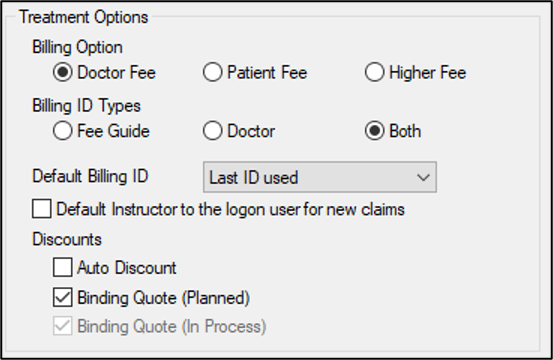
Treatment Options
| Billing Option
|
Select a radio button to set which billing option to use:
- Doctor Fee: Uses the billing doctor’s fee schedule.
- Patient Fee: Uses the patient’s fee schedule.
- Higher Fee: Uses the higher of the two options.
Note: The options above take into account any overrides, exceptions, and discounts.
|
| Billing ID Types
|
Select a radio button to set which billing IDs display in the Treatment tab > Billing ID field and Check Out Patient window:
|
| Default Billing ID
|
Select the default billing ID for new treatment records from the drop-down:
- Last ID used: When you create a new treatment record, axiUm defaults the billing ID to the one previously used.
- Based on Provider entered: When you create a new treatment record, axiUm defaults the billing ID to the one associated to the treatment provider.
|
| Default Instructor to the logon user for new claims
|
Select the checkbox to default the Approved By field to the logged on user when creating a new claim.
Deselect the checkbox to clear the Approved By field when creating a new claim.
Note: If deselected, users must complete the Approved By field manually.
|
| Auto Discount
|
Select the checkbox to write off the patient’s expected portion of a procedure automatically when the insurance fee is higher than the non-insurance fee, and clinic bills the higher fee.
Note: If this is the case, the insurance company is billed their amount, but the patient portion is automatically written off.
Example: If the regular fee amount is $40.00, but the insurance will cover 60% of $100.00, then the insurance company is billed $60.00 and the patient is billed $0.
Important: In most cases, an agreement between the clinic and the insurance company is required before this option can be used. In order for this to work, the Auto Discount checkbox must be selected, the Billing Option field must be set to Higher Fee, the procedure cannot have an individual charge, the Patient Info window > Insurance tab > Patient section > Write Off checkbox must be selected, and the patient cannot have a fee schedule specified in the Patient Information window.
|
| Binding Quote (Planned)
|
Select the checkbox if your institution honors the planned procedure’s original price even if fees change before it is moved to in process.
Note: If selected, this automatically selects the Binding Quote (In Process) checkbox.
|
| Binding Quote (In Process)
|
Select the checkbox if the cost of a procedure cannot change once the treatment moves to in process, even if fees are modified before it is set to completed.
Note: This checkbox is selected by default. It is only enabled if the Binding Quote (Planned) checkbox is deselected.
Important: If both the Binding Quote (Planned) and the Binding Quote (In Process) checkboxes are selected, axiUm holds the fee at whichever phase (planned or in process) from which the treatment occurred.
Example: If the treatment went from planned to completed, the patient pays the planned rate. If the treatment went from in process to completed, the patient pays the in process rate. If the rates had changed (at the planned, in process, or both stages), this affects what the patient in this example will pay.
|
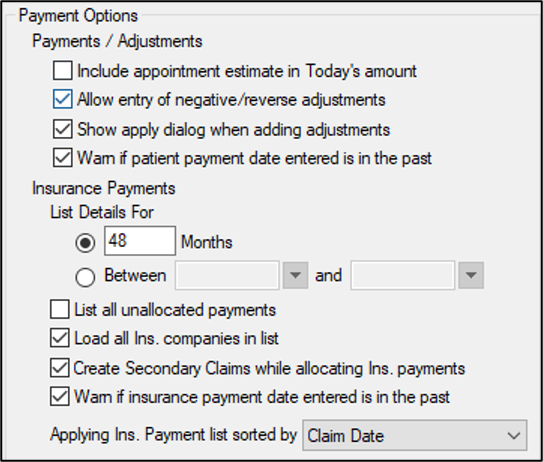
Payment Options
| Include appointment estimate in Today’s amount
|
Select the checkbox to include today’s appointment estimates in the total due from the patient in the Payment tab.
Estimate amounts are defined as the sum of the charges of planned treatments attached to checked-in appointments for today.
|
| Allow entry of negative/reverse adjustments
|
Select the checkbox to enable users to enter negative amount for adjustments.
Note: Entering a negative amount effectively turns debits into credits and credits into debits.
Tip: Do not select this checkbox. Use debits and credits instead.
|
| Show apply dialog when adding adjustments
|
Select the checkbox to force users to apply adjustments at the time adjustment records are created.
|
| Warn if patient payment date is entered in the past
|
Select the checkbox to display a warning message when the patient payment date entered is in the past. |
| List Details For
|
Select a radio button to set the date range for displaying insurance payment records in the Insurance Payment tab:
-
__ Months: This displays records in the last number of months. If selected, enter a value in the enabled text field to indicate the number of months of records that will display.
-
Between __ and __: This displays records from a set date range. Selecting this option enables the fields. If selected, set the start and end dates using the calendar drop-downs.
Tip: This allows you to display fewer records and avoid performance issues.
|
| List all unallocated payments
|
Select the checkbox to display all unallocated insurance payments regardless of the filter set in the List Details For field above.
This ensures that unallocated payments display until they are allocated.
Tip: Set the List Details For to 0 months and select this checkbox to load only unallocated insurance payments. Those are the payments users require most of the time.
If deselected, records only display until the date settings in the List Details For field are reached, even if they are not fully allocated.
Note: Many institutions want unallocated payments to remain in the list regardless of the entry date so that users can find records to complete allocations.
|
| Load all Ins. companies in list
|
Select the checkbox to list all insurance companies in the Insurance Payment tab by default.
Note: This may slow performance if the list is long. If this happens, deselect the checkbox to require users to search for insurance companies.
If deselected, you must enter a search criterion to find an insurance company.
|
| Create Secondary Claims while allocating Ins. payments
|
Select the checkbox to set if axiUm prompts you to submit the claim to the secondary insurance when the primary insurance payment is allocated to the treatment and a balance remains for the secondary insurance.
|
| Warn if insurance payment date entered in the past
|
Select the checkbox to display a warning message when the insurance payment date entered is in the past.
|
| Applying Ins. Payment list sorted by
|
Select an option to set how the payments in the Applying Ins. Payment window are sorted from the drop-down:
|
|