Scheduler Overview
|
The Scheduler module is a core axiUm module which allows you to book and manage appointments within your institution. It is adaptable to the needs of your institution, and can be customized for your specific workflows, clinic layouts, and appointment structure. Depending on your institution’s desired workflow, the Scheduler module allows providers and staff to view clinic schedules, book appointments, and manage clinics from one of two different perspectives:
Example: A group manager may be responsible for a group of providers and need to see all their appointments, regardless of where the appointments are scheduled. Example: A clinic manager may be responsible for a clinic and need to see all appointments within the clinic, regardless of who the appointment is for. Note: Student providers are often only allowed to see information pertaining to their own appointments. The Scheduler can handle a wide variety of workflows as well, which can vary dramatically based on the following (and other) questions:
Important: The Scheduler is designed to be flexible and accommodate many variations across all different types of clinics at your institution. If not used correctly, this flexibility can cause issues, as it is possible to perform tasks in the Scheduler that can lead to data and workflow issues later. This issue can become more complicated and difficult because the Scheduler may allow you to perform tasks incorrectly. Example: Different clinics may be set up to use different modes of scheduling. If not properly trained, a user may access a clinic and book appointments incorrectly, causing data issues. Warning: Because of the different modes that are available, you may not be using the Scheduler module correctly even if you do not get an error message. If unsure of the correct workflow for your clinic, please confirm with a supervisor. The Scheduler can be used by several different groups of people:
There are three main modes of scheduling. Each mode can accommodate different scheduling needs/workflows that may vary from clinic to clinic. Depending on clinic setup, your institution can use one mode for all clinics or can use different modes for different clinics. Book mode is the most common scheduling method used for any type of appointment. It displays the Scheduler > Active tab as a book with columns for all providers / chairs in the clinic and times that list scheduled appointments. Example scenario: Book mode is commonly used in faculty practice and graduate clinics as in most cases, provider schedules are known in advance and can be entered in axiUm as work schedules. You may work with two types of books when a clinic is set to Book mode:
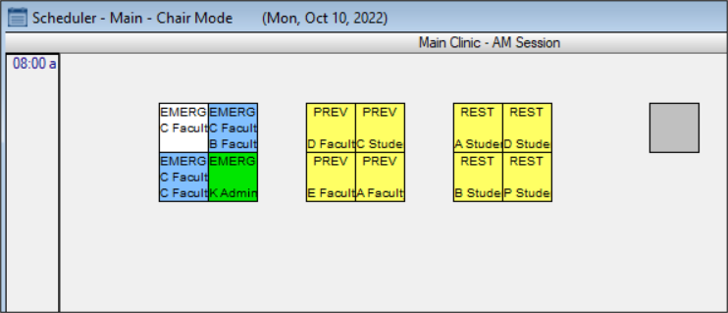
Note: If using this type of book, each column may contain appointments for several different providers on a given day. Example: An Emergency Clinic has three chairs, each displayed as a column and appointments are scheduled into each chair. Example: A faculty practice lists six provider codes, each displayed as a column and appointments are scheduled below them. Note: If a provider has reserved multiple chairs, multiple columns display. Once a book is created, it contains a column for each provider or chair in the clinic and appointments can be booked in available spots in one of those columns. Tip: If the columns represent chairs, all appointments in each column will be for that chair regardless of the provider. If the columns represent providers, all appointments in each column will be for that provider regardless of the chair. Important: Remember that books are merely a way to layout and view appointment information. Book mode does not require clinic layouts for each clinic (visual representations of the chairs in a clinic), but they can be used if the clinic will use a book that schedules by chair. When using Chair mode, the Scheduler > Active tab displays only one column for the schedule to list the provider’s chair reservations and appointments for the given date. Notes:
Example scenario: Chair mode is typically used in student clinics where students are restricted from seeing appointments for other providers and student schedules may or may not be known ahead of time. Tip: In most cases, student providers can only create appointment requests, so they would use the Scheduler mainly for viewing their current schedule. Staff can then schedule the requested appointments using Availability mode without mixing scheduling modes. Chair mode requires a clinic layout to allow users to schedule and manage appointments. Each chair in a clinic layout can display a variety of information including the assigned instructor, provider, and provider group, the current reservation, and the appointment type and status. Availability mode is an efficient way for staff to book appointments using appointment requests. It is especially beneficial for institutions which have more students than chairs available as requests can be filled on a first entered, first booked basis. Scheduling is done from the Scheduler > Availability tab and does not require clerks or managers to use the Chair or Active tabs to book appointments. Tip: A group manager or scheduling clerk usually books appointments for clinics that use Availability mode. Important: Any user that will use Availability mode must be configured as a group manager in axiUm. This gives them access to the providers assigned to the group(s) and all requests made by those group(s). When working in a clinic that uses Availability mode to schedule, providers can view the Chair or Active tab in a different mode to see available chairs and submit appointment requests. A staff member can see these requests in the Scheduler > Availability tab and determine if a chair is available in the requested clinic at that time. If available, the staff member can book the appointment and automatically create the chair reservation. Note: Because Availability mode is typically used in undergraduate clinics, student providers often view the Chair or Active tab in Chair mode to see chairs and submit appointment requests. This does not count as mixing methods as the actual scheduling is all done by the staff through the Availability tab. Important: Availability mode only works if chairs are not reserved beforehand so clinics cannot use predefined provider work schedules. Example scenario: Availability mode is commonly used in undergrad clinics as the student providers submit appointment requests because they cannot book their own appointments. Availability mode requires a clinic layout and appointments requests. Important: Understanding your scheduling mode is crucial for working with the Scheduler module as the workflows and usage are drastically different. Remember to note which scheduling mode is used in each clinic. Mixing scheduling modes within a clinic should be avoided as it can lead to data issues. This is managed from the Scheduler Options window > Chair / Book / Availability radio buttons. Myth: “You are in Chair mode if you are on the Chair tab.” This is incorrect. All modes allow you to access the Chair tab so you can view the current clinic’s chair layout and complete a variety of tasks. Myth: “If you use the Chair tab while in Book mode you are mixing methods.” This is incorrect. Mixing methods refers to doing an action in one mode of scheduling and then trying to perform another action on that record while in a different mode. Example: Scheduling an appointment in Book mode and then rescheduling the same appointment while in Chair mode. Myth: “Book by Chair means you are in Chair mode.” This is incorrect. Book by Chair and Book by Provider are simply views that control how the book organizes and displays appointments, and they are both only used in Book mode. Example: Both views organize the book into columns. Book by Chair displays a column for each chair in the clinic and lists all appointments in that chair underneath, while Book by Provider displays a column for each provider in the clinic and lists all appointments for that provider underneath. Important: An appointment can exist in axiUm without being scheduled. There are several types of appointments:
Example: A patient is seen by a student but requires a second visit. The student opens the Scheduler and looks for an available chair. They see one during the morning session in two weeks and submit an appointment request for that time. Example: A provider in a faculty practice clinic sees a patient and determines they need a filling. They plan the treatment and tie it to a planned appointment, then tell the patient to go to the front desk to have the appointment booked for some time in the next few months. The scheduling clerk sees the planned appointment and schedules it based on provider and patient availability. Example: After a crown has been placed, the provider may want to see the patient again in a few weeks to make sure that everything still looks good. Tip: Hygiene recalls are commonly used to check on the patient’s oral hygiene every 6-9 months. Completed procedures can be configured to trigger the creation of a recall and each recall can have a time frame associated with it. Example: After a routine cleaning is done, it can trigger a hygiene recall for 6 months from now. Although there are several modes of scheduling, there are only two main approaches to scheduling:
Note: This approach is most effective when there are enough chairs to cover the number of providers. Note: This approach is more common in environments where chairs are in high demand and ensures that chairs cannot be reserved without appointments. You can directly open the Scheduler module using one of the following methods:
Tip: You can also click the drop-down arrow ( The Scheduler window is separated into six tabs and offers a toolbar with a series of icons. Each tab offers another way to access and work with Scheduler information. Note: For detailed information on the tabs beyond the information below, see the applicable section. Tip: The Chair, Active, or Availability tab can be configured to display by default from the Scheduler Options window > Chair/Book/Availability radio buttons. The Chair tab displays a clinic layout as a visual representation of the currently selected clinic and allows you to manage chair reservations. Tip: This tab is used for Chair and Availability modes, as both modes require clinic layouts, but can also be used with Book mode if a clinic uses a book that schedules by chair. When working in Availability mode, actually working in this tab may not be applicable, depending on your workflow. When working in Chair or Book mode, the clinic layout offers information about the clinic and chairs including:
When working in Availability mode, the clinic layout can only offer information about the clinic and chairs such as disciplines and covering instructors.
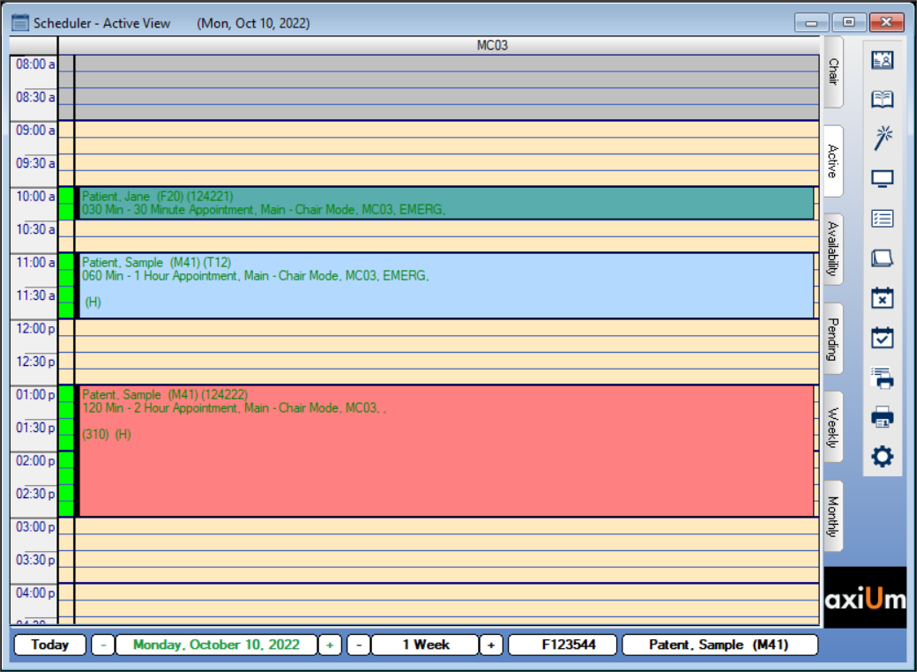
You can also perform a variety of other tasks related to the clinic layout. Tip: The Scheduler can display the Chair tab by default. This is configured from the Scheduler Options window > Chair radio button. The Active tab displays all active appointments are appointments that have been created and scheduled. From here you can review information about active appointments including patient name, chair, and type, time, and length of appointment. You can also perform a variety of other tasks related to appointments from the Active tab. The Active tab's behavior is dependent on the clinic’s scheduling mode: When working in Book mode, the Active tab displays as a book with columns for all providers / chairs in the clinic and appointments can be booked in available spots in one of those columns. Each column displays any active patient appointments scheduled for the provider(s)/chair(s) in colored time blocks.
Tip: If the book is set to Book by Chair, each column may contain appointments for several different providers on a given day. If the book is set to Book by Provider, and a provider has reserved multiple chairs, multiple columns display. When working in Chair or Availability mode, the Active tab displays any active patient appointments scheduled for the currently selected provider in colored time blocks. Tip: Most undergraduate or student clinics use Chair mode to restrict students to their own appointments in the Active tab. If a provider has reservations in multiple chairs, the Active tab displays a column for each chair, regardless of the clinic the reservation is in.
Important: Chair mode allows you to view the schedule for only the currently selected provider.
Note: In Chair mode, the Active tab typically only displays one column for the schedule (i.e., the selected provider’s chair reservations and appointments) on the given date. However, if a provider has reservations in multiple chairs, a column for each additional chair reservation displays, regardless of the clinic the reservation is located in.
Tip: If a provider is double-booked in a chair with the same start time and time length, the appointments display in a split-column. If a provider is double-booked in a chair with slightly different start times and time lengths, the appointments display as staggered. When working in Availability mode, the Active tab typically allows you to view the schedule for the selected provider. Note: Aside from viewing appointments, this tab is not applicable to Availability mode. If working in Availability mode, additional tasks are typically completed from the Availability tab.
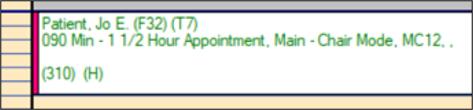
A variety of colors can display in the Active tab: The text color for each appointment displayed in the Active tab can change depending on the status of the appointment:
Note: These colors are hardcoded into axiUm and cannot be modified or removed. Tip: These colors are also used in the Operatory Monitor when set to graphic mode.
An A in the bottom-right corner of an appointment time block indicates that the patient has an alert on file. There are two types of alerts:
Patient alerts are managed from the Patient Info window > Codes tab > Patient Alerts section while medical alerts are managed from the Patient Medical Alerts window. The Scheduler > Active and Weekly tabs are divided into time blocks. The background colors for each time block vary according to the time block status:
Custom color blocks display according to a scheduled appointment’s background color. Appointment background colors can be configured from the Scheduler Options window > Appt Background Color field. Tip: Appointment blocks can also be customized to display up to five lines of data about a patient appointment.
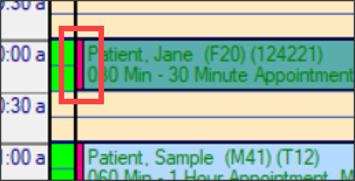
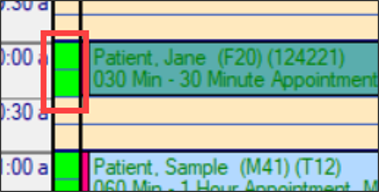
The colored bar to the left of the appointment indicates the provider's schedule color. Provider schedule color is configured from the Maintenance > Office > Users window > Provider tab > Schedule Color field.
The colored bar to the left of the provider’s schedule color indicates the different types of provider time:
The provider time column is configured from the Scheduler Options window > Show Provider Time Column for Current Provider field.
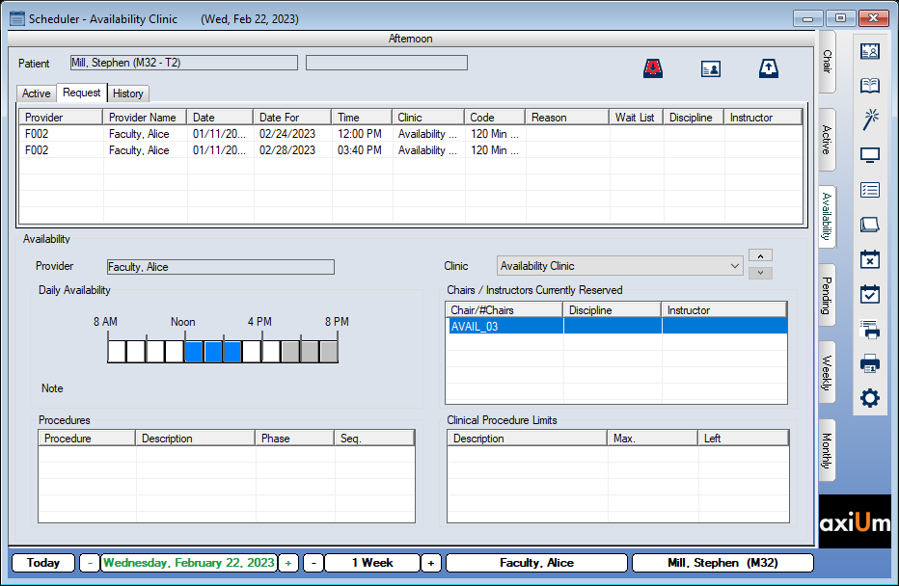
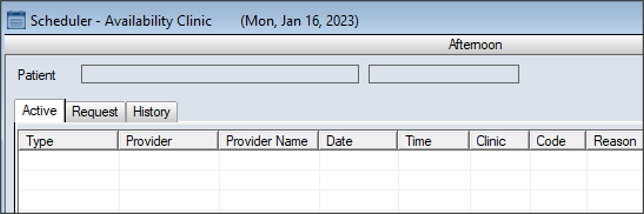
Note: This tab is only applicable for staff responsible for scheduling appointments in Availability mode. When working in Availability mode, the Availability tab allows you to view the selected patient’s active appointments, any appointment requests related to them, as well as their historic record of all appointment activities. You can also access and manage all appointment requests that have been received. From here, they can be scheduled as appointments or sent back to the provider for more information when needed. The Availability tab lists the selected clinic as well as the current session.
The Daily Availability area indicates the selected provider’s availability for the selected day. The time blocks may display in different colors:
Note: If using Availability mode correctly, this color should not display. The Procedures section lists any procedures assigned to an appointment request. The Clinic drop-down list allows you to change the selected clinic and the arrow buttons allow you to change the session. Below that, you can see a list of which chairs are currently available in the clinic/session. Each listed chair displays whether they are stamped with a discipline or covering instructor. The Clinical Procedure Limits section lists any procedure limits that exist for the selected clinic. These restrict how many procedures of a certain type can be performed at the clinic. Examples: An ortho clinic can limit the number of banding appointments performed in an afternoon. A general clinic can limit the number of endo-type appointments or procedures performed in a morning.
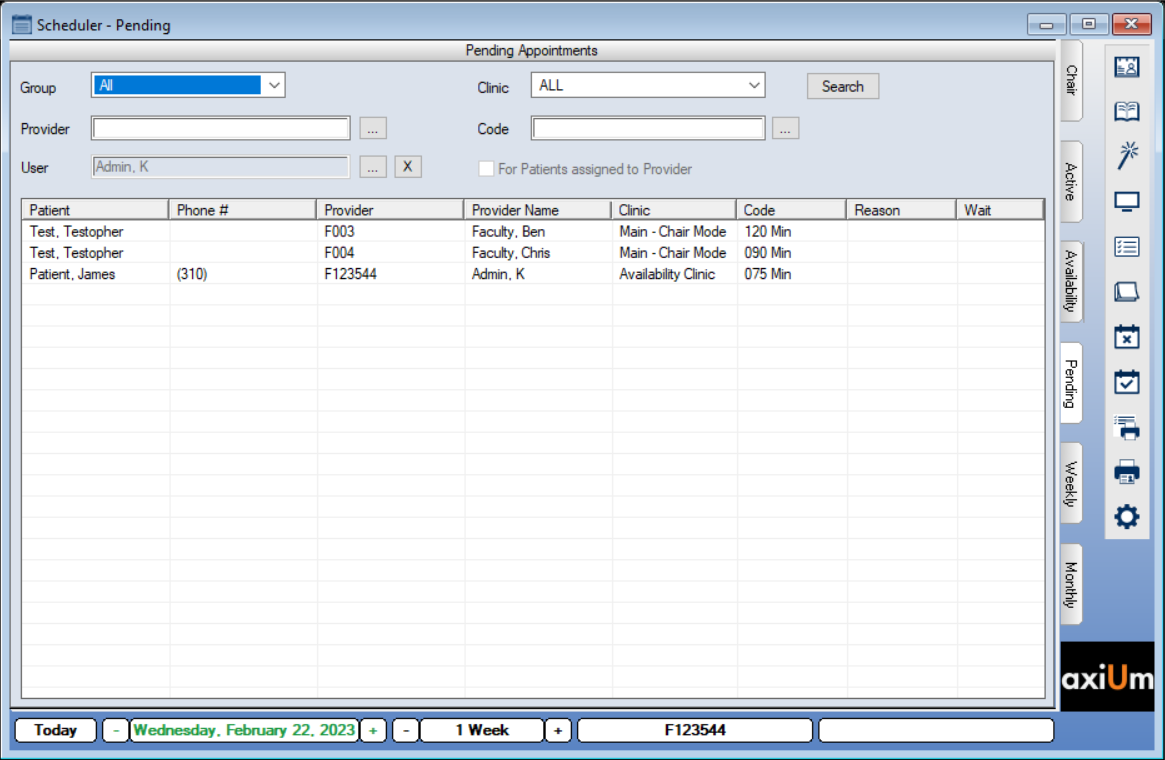
The Pending tab allows you to temporarily store and manage appointments that need some action or information before they can be scheduled. Typically, appointments may be moved to the Pending tab because they require additional scheduling information. Examples: You are scheduling an appointment with a patient on the phone and the patient needs to call back to confirm the appointment, or if you are uncertain of a provider’s availability during a certain appointment block. Note: This tab is not applicable to Availability mode.
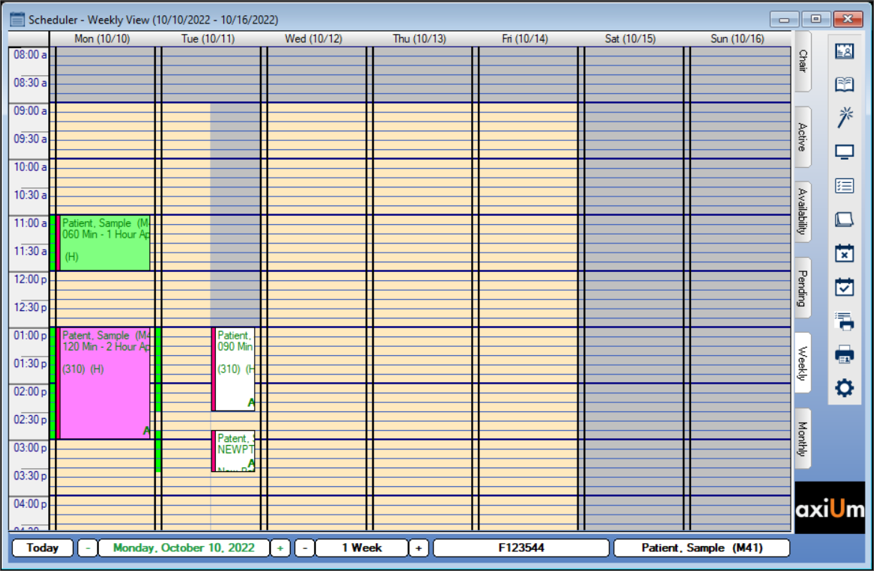
Note: This tab is not applicable to Availability mode. This tab allows you to view the currently selected provider’s schedule for a given week. When working in Book or Chair mode, appointments can be booked in open spaces. You can also click a date column to open the Active tab and view the currently selected provider’s reservations for that date.
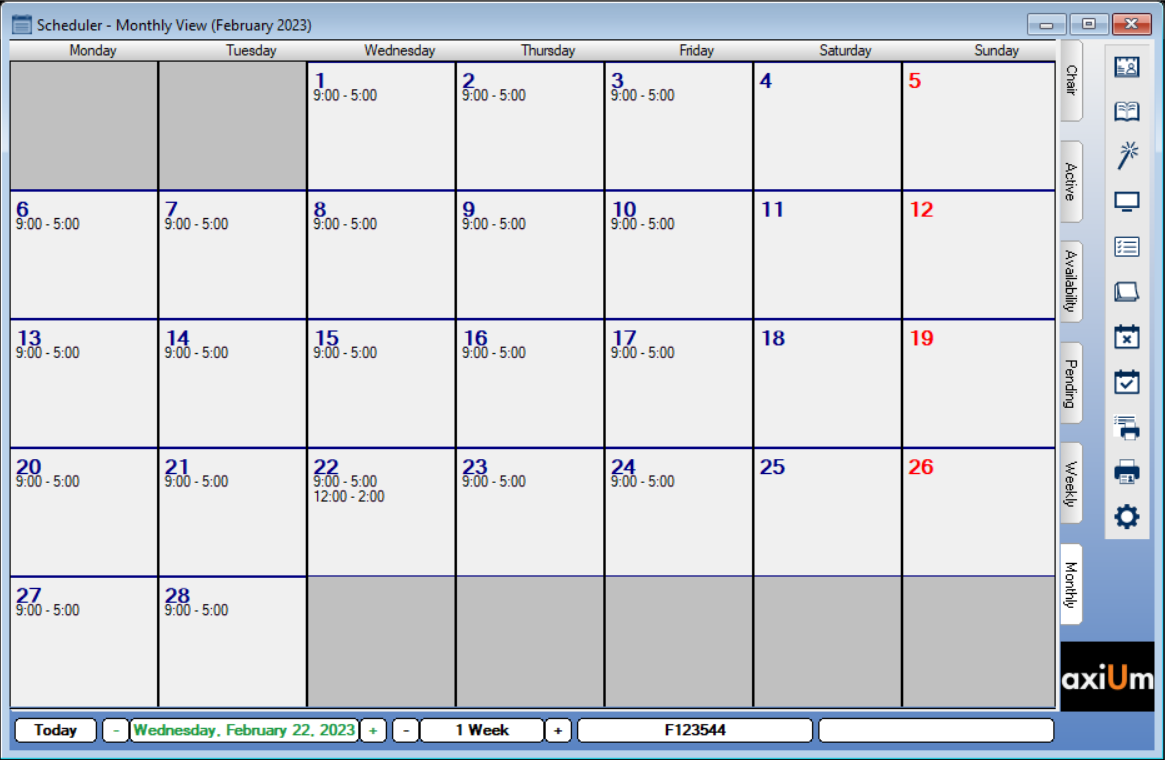
Note: This tab is not applicable to Availability mode. The Weekly tab allows you to view the currently selected provider’s schedule for a given month. You can also click a date to open the Active tab and view the currently selected provider’s reservations for that date. Reservations display in this tab with a start and end time. Tip: You can hover over a reservation to display more information.
Note: The icon behaves differently depending on which tab is open. If on the Chair or Availability tab, the icon is labeled Clinic and the Clinics window displays. If on the Active, Weekly, or Monthly tab, the icon is labeled Book and the Appt. Books window displays. Note: This icon is not applicable to Availability mode. Note: This icon is not applicable to Availability mode. Note: This icon is not applicable to Availability mode. Sticky notes store and display small pieces of information and can be used as reminders for you or other users. Note: This icon is not applicable as clinic time exceptions cannot be used when working in Availability mode. Note: This icon is not applicable as provider schedules cannot be used when working in Availability mode. Note: The icon behaves differently according to the open tab. If on the Active tab, the Appointment Report window displays. You can run a variety of custom reports from the Info Manager module > Appointment tab to help monitor Scheduler activity. You use these reports the same as other Info Manager reports. You can customize, create, filter, save, and print or export them. Key reports include the following:
|


 ): This indicates the block is not available for appointments.
 ): This indicates the block is available for appointments.
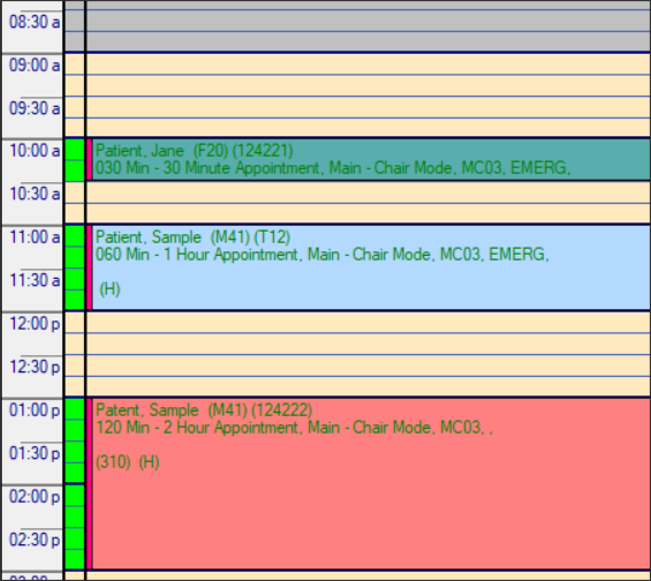
 ): This indicates the chair is not reserved by anyone.
 ): This indicates the chair is reserved without an appointment made yet.
 ): This indicates that the chair is reserved for another person with a student-entered appointment.
 ): This indicates that the chair is reserved for another person with a staff-entered appointment.
 ): This indicates that the chair is reserved for the student currently logged in.
 ): This indicates that this is an unavailable time slot.
 ): This indicates that the time is scheduled off for a holiday.