|
You can perform a variety of other tasks from the Patients module.
Some tasks are completed from the Patients window, while others are completed from the Patient Card window.
 Check Patients In and Out Check Patients In and Out
Note: Depending on your institution’s setup, a patient check in may differ from a sign in. Some institutions have patients sign in at reception and check in for their appointment at the clinic. Other institutions may be set up to check in a patient automatically at sign in.
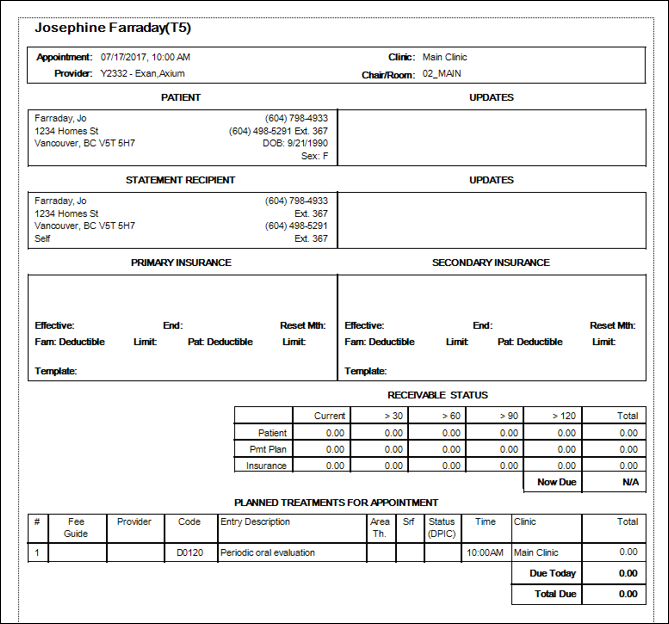
When patients arrive at the clinic, they must be checked in for their appointments. This tells the dentist they’re ready to be seen. If necessary, you can also review the Patient Check In Form. The Patient Check In form contains basic patient information including insurance and balances due, and planned treatment data.
Notes:
- axiUm may be set up to auto-display the Patient Check In Form when a patient checks in.
- The Patient Check In Form option is disabled until the patient checks in for an appointment.
You must also check out patients when they leave the clinic.
 Check Patients In/Out Check Patients In/Out
- Open the Patients module, and locate the correct patient in the patient list pane.
- If the patient must be checked in, right-click the patient name and select Patient Check In.
The name now displays in red.
- If the patient must be checked out, right-click the patient name and select Patient Check Out.
The name now displays in black.
- (Optional) If checking a patient in, you can review the Patient Check In form.
- Right-click the patient name and select Patient Check In Form to display the form.
 Undo Patient Check In Undo Patient Check In
If a patient was checked in by mistake, you can easily undo this action.
- Open the Patients module and locate the correct patient in the patient list pane.
- Right-click the patient name and select Undo Patient Check In.
Note: If the patient has multiple checked in appointments for today, they are listed for the user to review and select as necessary.
 Undo Patient Check Out Undo Patient Check Out
If a patient was checked out by mistake, you can easily undo this action.
- Open the Patients module and locate the correct patient in the patient list pane.
- Right-click the patient name and select Undo Patient Check Out.
 Add Notes to Patients Add Notes to Patients
Two types of notes can be used in the Patients module:
- Sticky notes: These notes are used to store and display small pieces of information and can be used as reminders for you or other users.
They display as small, numbered icons that indicate the number of notes waiting.
- Patient contact notes: These notes record and track the date, reason(s), and outcome of all attempts to contact patients. When patients return calls to the institution, contact notes help users quickly understand why the patient is contacting them and what must be done for the patient.
They are added via the Patient Card window > Contact Notes ( ) icon. ) icon.
 Submit Requests Submit Requests
From the Patients module, you can make a variety of patient-related requests.
Note: After you submit a request, you can manage it from the Patient Assignments module.
To submit requests:
- Open the Patients module and locate the patient.
- Complete a request using the list below.
 Submit Needs Requests Submit Needs Requests
Often, providers must complete a series of specific treatments to meet their graduation requirements. A provider can submit a Needs Request to ask for a patient with a specific recorded patient need.
-
From the search results, right-click the patient name, and select Needs Request to create and submit a need request.
 Submit Appointment Requests Submit Appointment Requests
Depending on your institution’s workflow, you may be able to request appointments from the Patients module when you are ready to make an appointment for a patient.
Note: A request does not schedule appointments; requests are reviewed and scheduled by an appropriate staff member.
- Locate the correct patient in the selection list or search results.
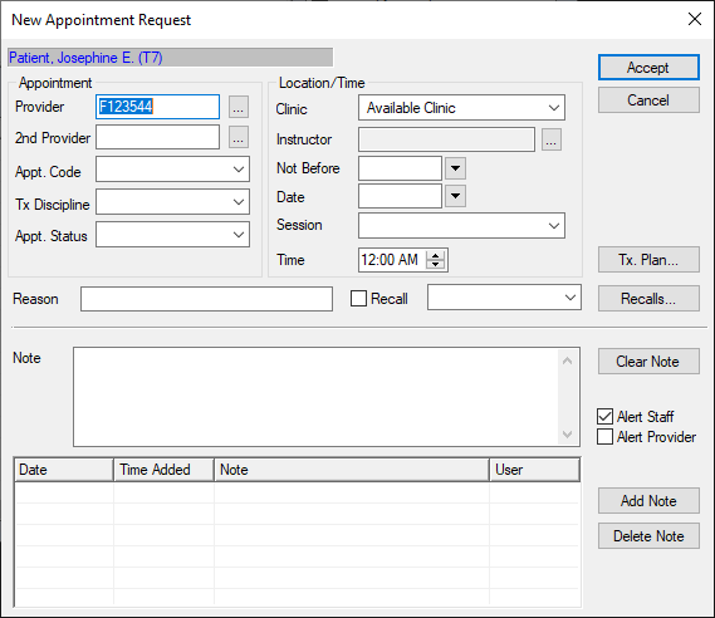
- Right-click the patient name and select Appt Request to display the New Appointment Request window.
- Complete the fields as necessary and click Accept.
 Submit Chart Requests Submit Chart Requests
Chart requests control access to paper charts so only one person may use a chart at one time. There are two chart request types:
- Automatic chart requests: These are sent when an appointment is scheduled. They ensure the provider has the patient's chart on the correct day.
- Manual chart requests: These are sent when a user requires a patient's paper chart but doesn’t have an appointment.
The person responsible for dispersing charts ensures the user receives the chart at the specified date and time.
Note: After you make a request, you can view, modify, or delete your request from the Chart Tracker module.
- From the search results, right-click the patient name and select Chart Request to create and submit a manual chart request.
Note: If the patient has an electronic chart, a prompt appears.
- Click Yes to display the Request Chart-Out window and record the time, location, and reason needed.
 Submit Manual Dispensary Requests Submit Manual Dispensary Requests
Providers should submit a dispensary request for a kit when they need equipment for treatment. There are two requests types:
- Automatic requests: These are sent when an appointment is scheduled and the treatment is specified.
- Manual requests: These are sent when you add individual items to an appointment or when a treatment and the required equipment changes.
- From the search results or selection list, right-click the patient name and select Dispensary Request.
- Complete the fields to create and submit the dispensary request.
 Access Patient Approvals Access Patient Approvals
The Patient Approvals window is used to review and approve work done by student providers. It must be reviewed and approved by an instructor or faculty member.
While the Patient Approvals window is generally accessed via the patient’s chart number on the status bar, the window is also accessible through the Patients module.
To access Patient Approvals:
- Open the Patients module and locate the patient in the selection list.
- Right-click the patient name and select Patient Approvals to display the Patient Approvals window.
Note: When you first open the Patient Approvals window, the Criteria filters default based on the following:
-
For providers that require approval requests, the Requested Items radio button is selected.
-
For all other users, the All Unapproved Items radio button is selected.
-
For non-providers, the All Users and All Dates radio buttons are selected.
-
For providers, the Current User and All Dates radio buttons are selected.
- Complete the approval as necessary.
 Display Eligibility Checks Display Eligibility Checks
Insurance eligibility checks verify that a patient has adequate insurance coverage. You can configure the most recent eligibility check's result and date to display in the Patients module.
Tip: You can also configure the most recent eligibility check's result and date to display in the Scheduler module > Appointment Lists window.
To set the last eligibility check to display:
- Open the Patients module and click the Options/Settings (
 ) icon. ) icon.
- From a Display Field drop-down list, select Last Elig. Result.
- From a second Display Field drop-down list, select Last Elig. Date.
- Click OK.
 Add Recalls Add Recalls
Depending on your institution's workflow, you may be able to add a recall reminder manually from the Patients module.
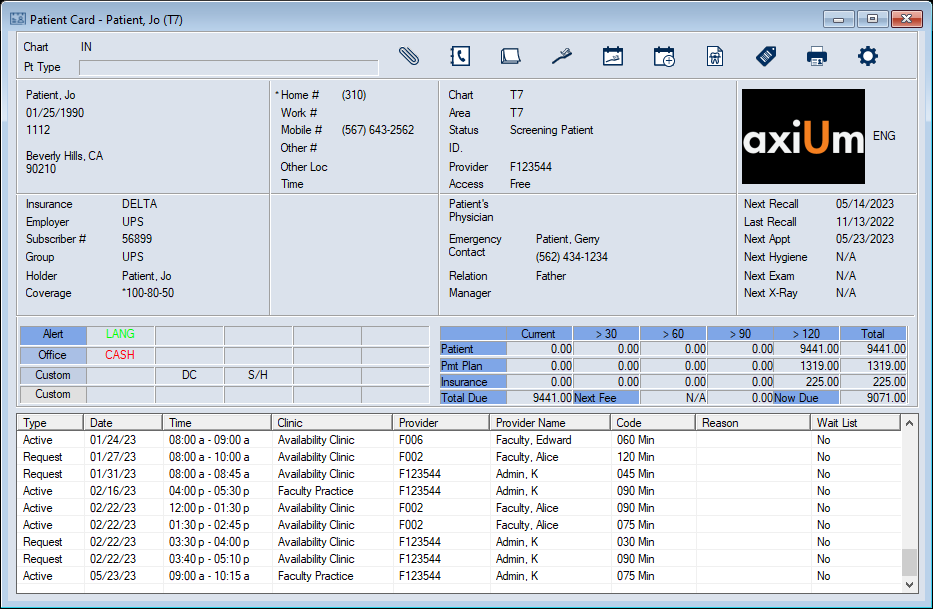
Recall reminders should be added after a patient appointment treatment is completed. Once created, a recall appointment reminder displays the next recall date on the Patient Card window but does not automatically schedule an appointment. When ready to schedule an appointment for a patient with a recall, you can access the Patient Recalls window and select a listed recall appointment reminder to associate with the appointment.
Tip: You can also add a manual recall reminder from the Scheduler.
To add a recall reminder:
- Open the Patients module and select the patient.
-
Click the Patient Card ( ) icon to display the Patient Card window. ) icon to display the Patient Card window.
- Click the Recall (
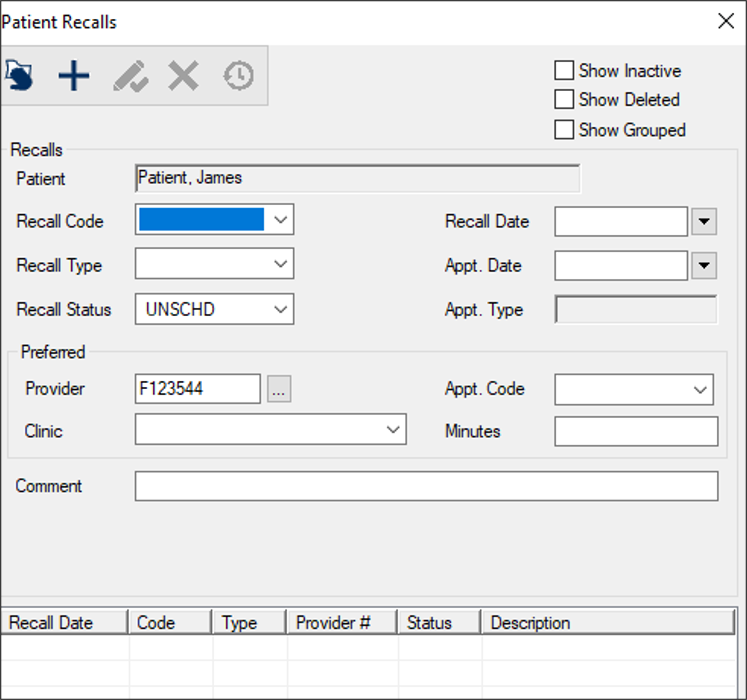
 ) icon to display the Patient Recalls window. ) icon to display the Patient Recalls window.
-
Click the Clear Data ( ) icon. ) icon.
- Complete the fields as necessary and click the Add a new Record (
 ) icon. ) icon.
| Recall Code |
Recall codes indicate the length of time between the current date and the date a patient is due to return to the clinic.
Select a recall code from the drop-down list.
Once selected, axiUm calculates the date using the length of time and displays the recall date in the Recall Date field.
|
| Recall Type |
Select a recall type from the drop-down list.
Examples: HYG - Hygiene recall and PER - Periodontal recall.
|
| Recall Status |
Select a recall status from the drop-down list.
|
|
Recall Date |
axiUm auto-populates this field with the date the patient is expected to return for the recall if the Recall Code field is set.
If necessary, select another date from the drop-down calendar.
|
| Appt. Date |
This indicates the date of the actual recall appointment.
Note: If you scheduled a recall appointment for this patient from the Scheduler module, axiUm auto-populates and disables the field.
If necessary, select another date from the drop-down calendar.
|
| Appt. Type |
This read-only field indicates the status of the actual recall appointment.
Examples: Planned, Active, etc.
|
| Provider |
Click the ellipsis to display the Providers List window and select a provider.
|
| Clinic |
Select the clinic the recall should be scheduled in from the drop-down list.
|
| Appt. Code |
Select the appointment code that the recall appointment will be associated with from the drop-down list.
|
| Minutes |
Enter the number of minutes required for the recall appointment.
Tip: This will help you schedule the required length of time when scheduling this patient’s recall appointment.
|
| Comment |
Enter any additional information about this recall.
Example: If cancelling a recall, you can enter the cancellation reason for reporting purposes.
Note: If axiUm creates a recall as a result of a procedure, this field is auto-populated with a description.
|
|

