|
As patients return to your institution for additional appointments, patient records must be kept up-to-date in the Patient Info window.
You can open the Patient Info window using two methods:
- From the Patients window, click the Edit Patient (
 ) icon. ) icon.
- From the Patients window, click the Patient Card (
 ) icon and click the relevant pane to open the Patient Info window to the related tab. ) icon and click the relevant pane to open the Patient Info window to the related tab.
Note: If a patient marks their personal information incorrect or updates it from their PatientAccess account, a sticky note displays when you select the patient record. Depending on the changes made, you can review the sticky note contents, confirm the changes with the patient, and make the changes as necessary on the applicable tab.
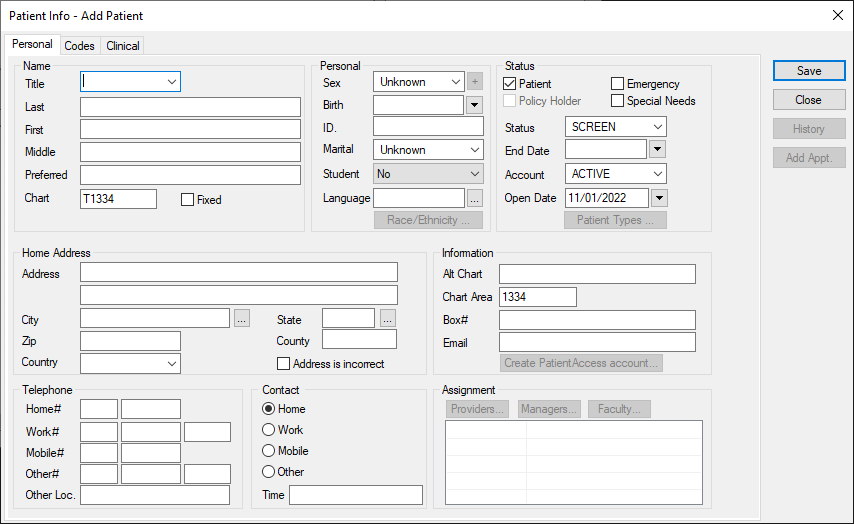
 Manage the Personal Tab Manage the Personal Tab
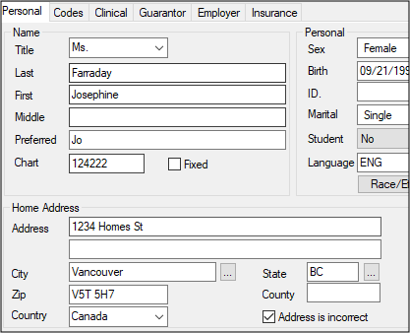
The Personal tab holds patient details such as name, chart number, address, contact information, personal demographics, items related to patient status, and assigned dental staff.
You can also use the Personal tab to specify if a patient’s address is incorrect, deactivate patient records, and specify a patient’s access to PatientAccess.
To manage the Personal tab:
- Select a patient and open the Patient Info window > Personal tab.
- Review that patient’s details.
- To perform another task, complete any of the following:
View Additional Gender Information History
-
Next to the Sex drop-down field, click the ellipsis to display the Additional Gender Information window.
-
Click the Show History ( ) icon to display the history of the patient’s answers. ) icon to display the history of the patient’s answers.
Specify Address Is Incorrect
If the home address attached to a patient record is incorrect, you can mark it as incorrect until the correct address can be added.
To specify an address is incorrect:
- Under Home Address, select the Address is incorrect checkbox.
- Click Save.
A sticky note is generated and remains on the Patient Card window as a reminder to update to the correct address.
Deactivate Patient Records
In some situations, it is necessary to deactivate a patient record.
Examples: If the institution is notified that a patient has passed away, moved out of the area, or if they are excused from the institution, or don’t pay their bills.
- From the Status drop-down list, select Inactive Patient.
Tip: Many institutions include a custom field on the Codes tab that allows you to select an inactivation reason entry that describes the situation.
- Click Save.
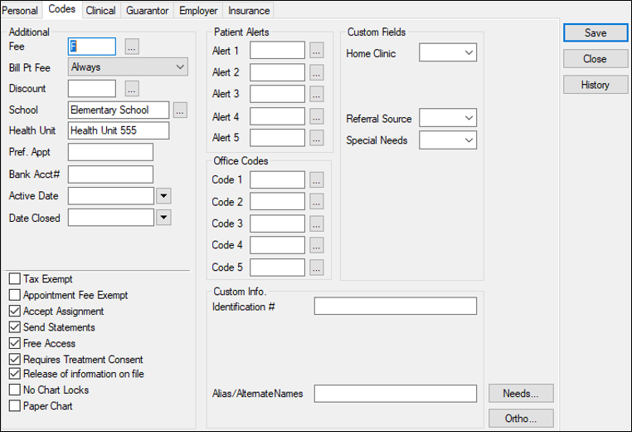
Manage the Codes Tab
The Codes tab holds patient details such as school, banking, and billing information, patient alerts and office codes that apply to the patient, custom fields and custom info (if configured by your institution).
You can also use the Codes tab to display the Ortho Patient Information and Patient Needs windows.
To manage the Codes tab:
- Select a patient and open the Patient Info window > Codes tab.
- Review the patient’s details, including Patient Alerts, Office Codes, Custom Fields, and Custom Info sections.
-
To perform another task, complete any of the following:
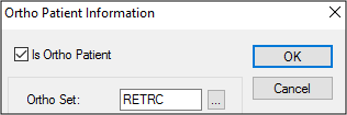
Set as Ortho Patient
When a patient is specified as an ortho patient, they receive ortho-specific treatment because scheduling, clinical aspects, and billing are completed differently. If a patient is an ortho patient, you must indicate their current set as it tracks their progression through their treatment.
- Click Ortho... to display the Ortho Patient Information window.
Tip: You can also display the Ortho Patient Information window from the Patients window > Patient Card window > Ortho Information ( ) icon. ) icon.
- Select the Is Ortho Patient checkbox to enable the Ortho Set field.
Note: To remove an ortho program, deselect the Is Ortho Patient checkbox.
- Next to the Ortho Set field, click the ellipsis to select a code.
- Click OK.
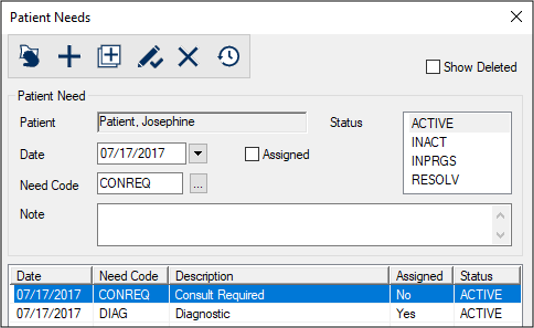
Manage Patient Needs
Patient needs can be managed in the Patients module and the Patient Info window > Codes tab.
A patient need is an identified dental issue or requirement that must be addressed by your institution. Some patients may have multiple needs. Patient needs aren’t specific to ADA codes and have no associated dollar value.
Example: A patient arrives at the institution and requires a crown.
Most institutions enter patient needs during the screening period. Once identified, axiUm uses the needs to match patients to providers who must fulfill specific treatment procedures to meet their graduation requirements.
To manage patient needs:
- Open the Patient Needs window and click the Codes tab.
- Click Needs... to display the Patient Needs window.
Tip: You can also open the Patients window > right-click the patient > select Patient Needs to display the Patient Needs window.
- Review the listed patient needs.
Add One Patient Need
- Click the Clear Data (
 ) icon. ) icon.
- Complete the fields as necessary and click the Add a new Record (
 ) icon. ) icon.
| Field
|
Description
|
| Date
|
The current date auto-fills the field. |
| Need Code
|
Click the ellipsis to display the Need Codes window, and double-click a code.
|
| Assigned
|
If the patient is assigned to a provider, select the checkbox.
|
| Status
|
Select the current status of the patient need. |
| Note
|
If necessary, enter additional information. |
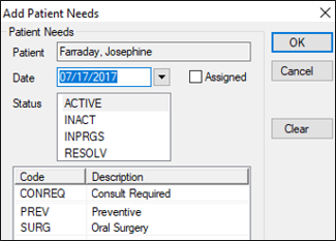
Add Multiple Needs
- Click the Clear Data () icon.
- Click the Add Multiple Records (
 ) icon to display the Add Patient Needs window. ) icon to display the Add Patient Needs window.
-
Hold the Ctrl key and select multiple from the list.
- Complete the following fields and click OK.
| Field | Description | | Date | The current date auto-fills the field. | | Assigned | If the patient is assigned to a provider, select the checkbox. | | Status | Select the current status of the patient need. |
View Needs
-
Select and review an entry displayed in the lower list and review the associated details.
View Deleted Needs
-
Select the Show Deleted checkbox.
The deleted patient need displays in the lower list in gray.
Edit Needs
- Select a listed patient need.
- In the upper fields, modify the information where necessary and click the Modify Record (
 ) icon to save your changes. ) icon to save your changes.
Remove Needs
- Select a listed patient need and click the Delete Record (
 ) icon. ) icon.
- When prompted, click Yes to confirm the deletion.
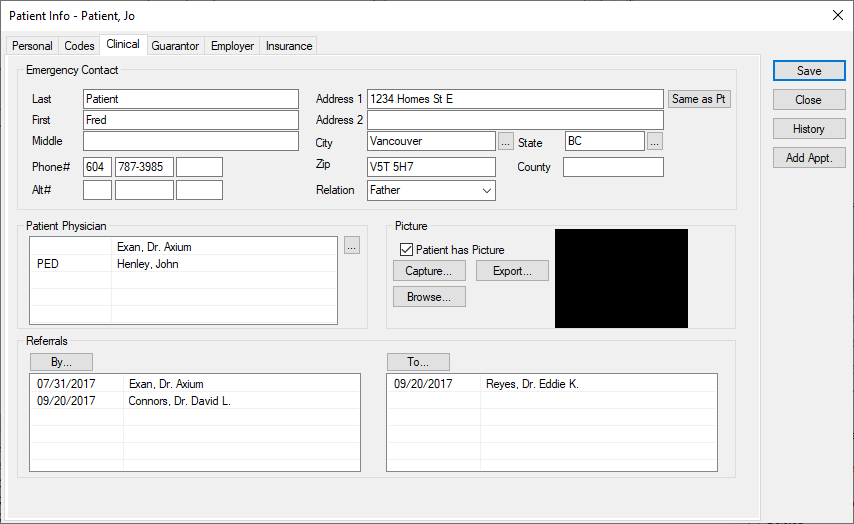
Manage the Clinical Tab
The Clinical tab holds patient details such as the emergency contact information, physician, photo, and referral information.
You can use the Clinical tab to add a new photo, a referral, or modify the physician.
To manage the Clinical tab:
- Select a patient and open the Patient Info window > Clinical tab.
- Review the patient’s details, including the Emergency Contact, Patient Physician, Picture, and Referrals sections.
- To perform another task, complete any of the following:
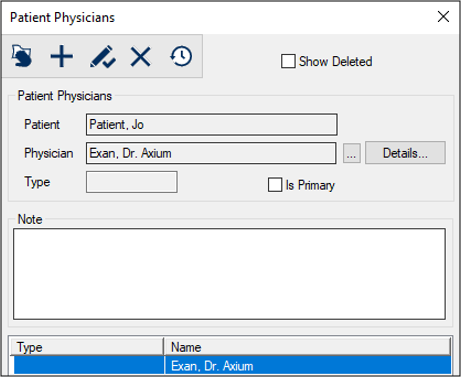
Add Physicians
During or after the patient record creation process, you can add the patient’s physician to the record. This is helpful if you must contact them concerning the patient and any dental procedures.
To add a patient physician:
- Under Patient Physician, click the ellipsis to display the Patient Physicians window.
- Complete the fields as necessary and click the Add a new Record () icon.
| Field
|
Description |
| Patient
|
A read-only field that displays the patient name.
|
| Physician
|
Click the ellipsis to open and select a physician.
|
| Type
|
The field auto-populates if the selected physician has a type.
|
| Details
|
Click the button to display the Physicians window and review or modify information.
The physician’s name, clinic, address, and contact information display.
Note: This button is enabled once the physician has been added.
|
| Is Primary
|
Select the checkbox if the physician is the patient’s primary. |
| Note
|
Enter any additional information. |
Manage Patient Photos
You can add a patient photo to help identify the patient when they arrive at the clinic.
Tip: If a patient doesn’t want to have a photo taken, upload a standard or stock image to indicate the patient declined and prevent you from asking again.
Note: You can use TWAIN driver webcams, integrated webcams, and USB-connected webcams to capture patient and user photos in axiUm.
- Review the Picture section.
-
To perform another task, complete any of the following:
Upload Patient Photos
-
If necessary, select the Patient has Picture checkbox.
-
Click Browse... and locate the saved photo.
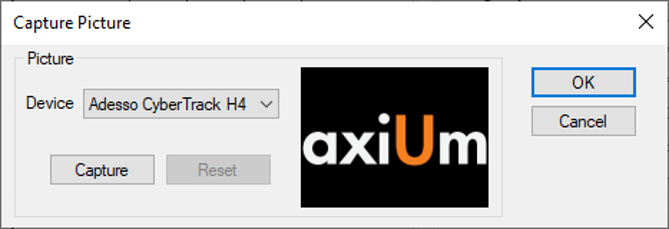
Capture Patient Photos
-
If necessary, select the Patient has Picture checkbox.
-
Click Capture… to display the Capture Picture window and a preview of the webcam image.
-
If necessary, select an appropriate entry from the Device drop-down.
-
Click Capture to take an image.
-
(Optional) Click Reset to clear the photo and take a different one.
-
Click OK.
Export Patient Photos
-
Click Export… to select a location to save the photo file.
Note: The image file is saved in the same format used for the original photo.
- Click Save.
Manage Referrals
You can add referrals to the patient record. There are two types of referrals:
- Referrals To: Send the patient to another dentist or specialist.
- Referrals By: Explain how the patient was referred to the institution.
Examples: Another physician, the yellow pages, an advertisement.
Referrals include information such as the type, any associated clinical or office codes, and the contact and ID information, if applicable.
To manage referrals:
-
Review the list of referrals in the Referrals section.
-
To perform another task, complete any of the following:
Add Referrals
- Click By or To to display the Referrals By or Referrals To window.
- Click the Clear Data () icon.
- Complete the fields as necessary and click the Add a new Record () icon.
| Field
|
Description
|
| Referred To / Referred By
|
Click the ellipsis to display the Referrals List window and search for the correct referral.
- If listed, double-click the entry to select and close the Referrals List window.
- If not listed, click the Add a new Record () icon to display the Referrals window.
- Complete the fields as necessary and click Save to close the Referrals window.
- Double-click the new entry to select and close the Referrals List window.
|
| Details
|
Click the button to display the Referrals window and review or modify information.
Note: This button is only enabled once the referral has been created.
|
| Referral Date
|
Enter the date the patient was referred.
|
| End Date
|
Enter the date the treatment ends (if applicable).
|
| Is Primary
|
If the patient was referred by multiple practitioners, select the checkbox if this is the patient’s primary referral. |
| Note
|
Enter any additional information. |
Edit Referrals
- Select a listed referral.
- Modify the fields as necessary and click the Modify Record () icon.
Delete Referrals
- Select a listed referral and click the Delete Record () icon.
- When prompted, click Yes to confirm the deletion.
View Referral History
- Select a listed referral and click the Show History () icon.
-
Review the listed changes in the Referred By History or Referred To History window.
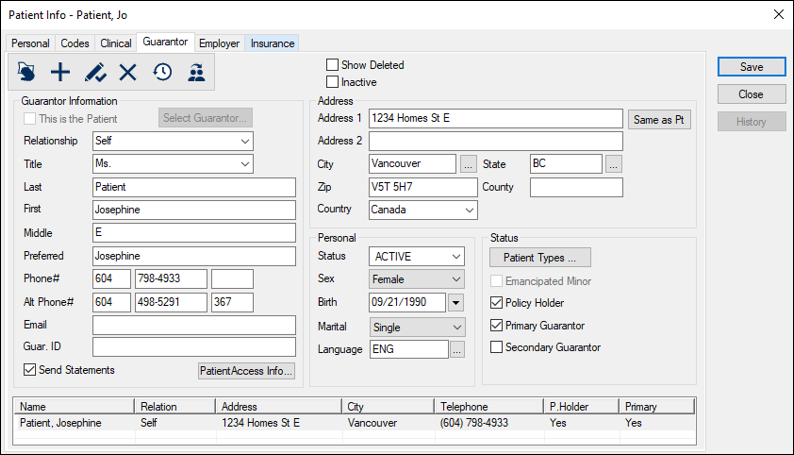
Manage the Guarantor Tab
The Guarantor tab holds guarantor details such as name, address, contact information, personal demographics, and items related to status.
You can also use the Guarantor tab to remove guarantor records from the patient record, convert a guarantor to a patient, or delete guarantor records.
To manage the Guarantor tab:
- Select a patient and open the Patient Info window > Guarantor tab.
- Select a guarantor entry to review the guarantor’s details in the upper fields.
-
To perform another task, complete any of the following:
Convert Guarantors to Patients
If a patient’s guarantor also decides to attend your institution, you can convert their guarantor record into a patient record.
Note: This does not remove them as guarantor from other patient records.
- Click the Convert to Patient (
 ) icon. ) icon.
Note: If the icon is disabled when the guarantor is selected, the guarantor is already a patient.
- If necessary, enter additional information.
Tip: Change the guarantor patient's status to Active.
Remove Guarantors from Patient Records
Occasionally you may need to remove a guarantor from a patient record.
Example: If a guarantor is no longer responsible for a patient.
To remove a guarantor:
- Select the listed guarantor and confirm the Primary Guarantor checkbox is deselected.
Note: All patients much have a guarantor marked as primary. If necessary, another guarantor can be added and marked as primary.
- Click the Delete Record () icon.
- When prompted, click Yes to confirm your deletion.
The guarantor is removed from the patient record.
Delete Guarantors
Occasionally you may need to delete the guarantor from axiUm.
Example: Duplicate guarantor records.
When deleting a guarantor, we advise you to identify which guarantor record must be removed before removing the record.
Tip: Modify an obvious field such as the phone number or name that clearly identifies it as the record you want to delete.
Deleting a guarantor is much more permanent than removing the guarantor from a record. To delete a guarantor, you must convert the guarantor to a patient, then delete the patient record.
To delete a guarantor:
- In the First, Last, or Phone# field, modify the contents to distinguish clearly from other records and click the Modify Record () icon.
- Select the modified guarantor entry from the lower list, and click the Convert to Patient () icon.
- Return to the Patients window and search by guarantor name to see the list of associated patients (if any).
Note: If the patient is a guarantor for other patient(s), and you attempt to delete without removing them as guarantor from the other records, you will get an error message telling you that you cannot delete a patient who is another patient’s guarantor.
- If the guarantor is present on other patient records, remove the guarantor:
- Open an associated patient record and click the Guarantor tab.
- Identify and select the modified guarantor record, then click the Delete Record () icon.
- When prompted, click Yes to confirm your deletion.
- Repeat the steps as necessary.
- Delete the modified patient record.
- Return to the Patients window, search for the modified patient record, and click the Delete Record () icon.
- When prompted, click Yes to confirm your deletion.
The patient is deleted from axiUm.
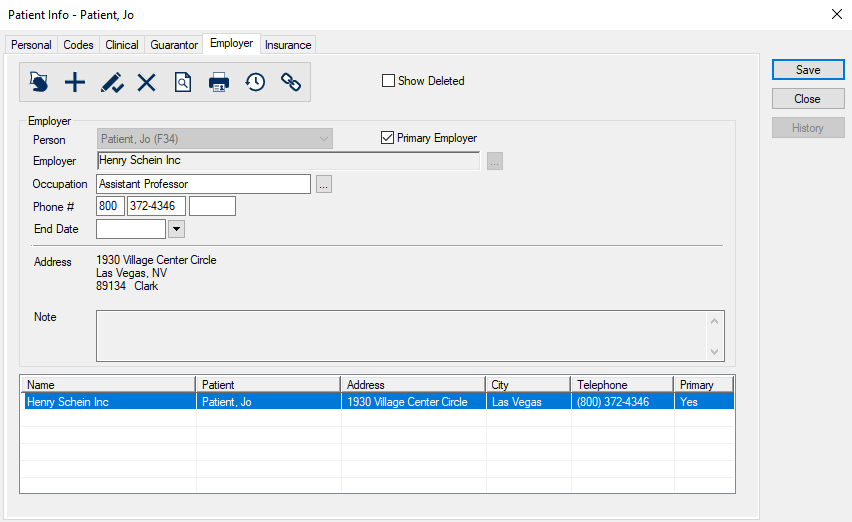
Manage the Employer Tab
The Employer tab holds a patient’s work details (if applicable) such as employer company, occupation, address, and contact information.
You can also use the Employer tab to link patients to employer insurance benefit plans.
To manage the Employer tab:
- Select a patient and open the Patient Info window > Employer tab.
- Select an employer entry to review the employer’s details in the upper fields.
- To perform another task, complete any of the following:
Remove Employer Information from Patients
Warning: If a benefit plan is attached to an employer, you cannot remove the employer from the patient record until you remove the plan from the patient record.
- Select a listed employer and click the Delete Record () icon.
- When prompted, click Yes to confirm.
If associated with other patient records, the employer is removed from the patient record, but remains in axiUm.
If the employer is not associated with other patient records, a second prompt displays, asking if you want to delete the employer record.
- If prompted to delete the record, click Yes or No to confirm.
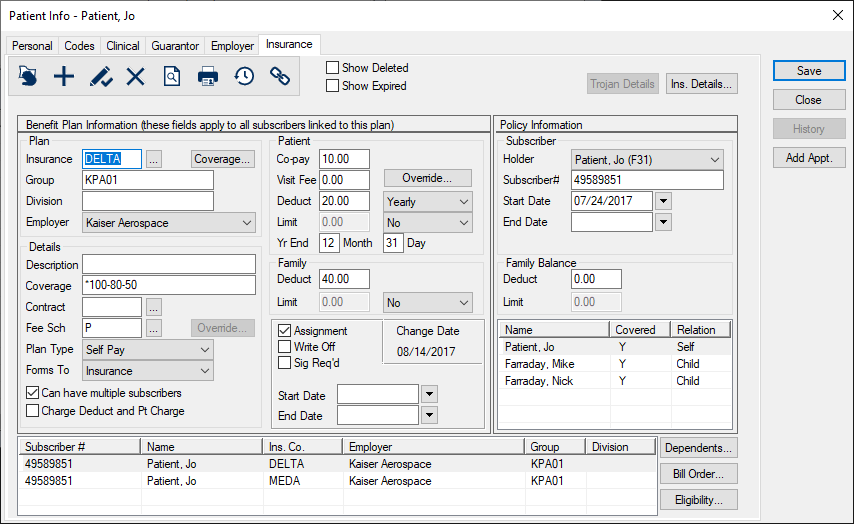
Manage the Insurance Tab
Insurance benefit plan information displays in the Patient Info window > Insurance tab. Information located under the Benefit Plan section affects all subscribers to the policy; information located under the Policy Information section affects only the individual subscriber.
To manage the Insurance tab:
- Select a patient and open the Patient Info window > Insurance tab.
- Select an insurance plan entry to review the plan’s details in the upper fields.
-
To perform another task, complete any of the following:
View Insurance Company Information
-
Click Ins. Details... to display the Insurance Company window.
Note: If the plan is a Trojan plan, click Trojan Details.
Tip: You can also double-click a listed entry.
View Current Benefit Plan Coverage
- Next to the Insurance field, click Coverage... to display the Linked Coverage Template or Benefit Plan Coverage window.
Note: The window that opens depends whether the benefit plan is linked to the patient record.
- Review the listed procedures and the percentage covered.
Modify Benefit Plan Information
Note: If you edit insurance information on a patient record, the changes are reflected on any dependent patient records.
- Modify the fields as necessary and click the Modify Record() icon.
If you added changes to the Benefit Plan Information section, a warning cautions that your changes will affect all subscribers.
-
Click Yes to continue and confirm your changes.
Note: If changes must be reflected in previously created claims, treatments will need to be rebilled using the updated coverage information.
|