|
Warning: Before you create a new patient record, search for the record to ensure it is not in the system as a patient or a guarantor.
Note: The following sections may vary depending on your institution’s configuration.
When a new patient is seen at your institution, a new patient record must be created. Depending on the status of the patient and your practice settings, you must collect different amounts of information.
Examples:
- A restorative clinic screening patient may require minimal collected information.
- A referred surgical patient likely requires much more collected information.
Note: Required fields are based on the practice and the patient status. They highlight in pink if you attempt to save without completing them.
 Create Basic Patient Records Create Basic Patient Records
When creating a patient record, all required fields in the Personal, Codes, and Clinical tabs must be completed before a new patient record can be saved. Required fields are configured based on the practice and patient status.
- Personal tab: Contains fields related to the patient’s basic information, including names, demographics, address, status, contact information, assigned personnel, and additional information.
- Codes tab: Contains fields related to the patient’s additional information, alerts, codes, account information, custom fields, and custom information.
- Clinical tab: Contains fields related to the patient’s emergency contact information, physician, picture, and referrals.
Note: This information can be updated after the record is saved.
After the basic patient record has been saved, you can continue on to complete the Guarantor, Employer, and Insurance tabs.
To create a basic patient record:
- Open the Patients module and search for the patient to ensure they are not already in the system.
- Click the Add Patient (
 ) icon to display the Patient Info – Add Patient window. ) icon to display the Patient Info – Add Patient window.
Note: The Guarantor, Employer and Insurance tabs only display after you click Save.
- Complete the Personal tab fields as necessary.
Personal Tab Fields
| Title / Last / First / Middle / Preferred |
Enter the patient’s title, last, first, middle, and preferred names.
Notes:
- The Preferred field auto-defaults to the First field but may be changed afterward.
- axiUm searches using the Preferred name entry.
- The fields can hold a maximum of 30 characters.
|
| Chart
|
Review the auto-generated patient chart number.
Note: This can be changed, if necessary.
|
| [empty field]
|
A field to the right of the Chart field that displays a unique number for external chart-sorting functions.
Note: This is only available if configured in Maintenance.
|
|
Fixed
|
Select the checkbox if only administrators may edit the Chart field.
|
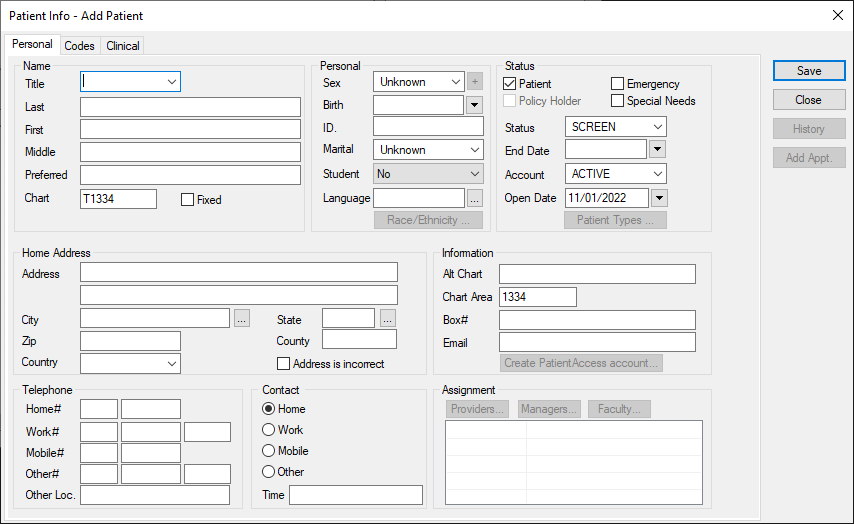
| Sex |
Select the patient’s sex from the drop-down list.
|
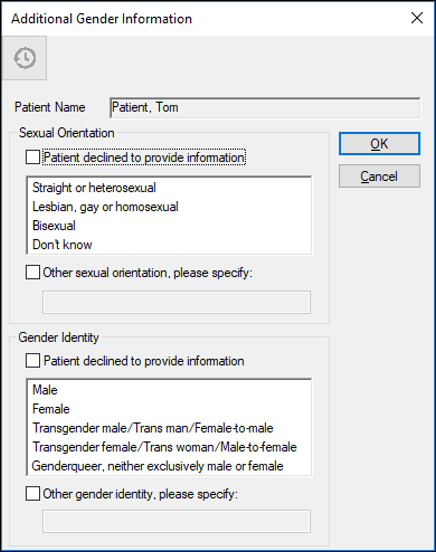
| Additional Gender Information |
- Click the + icon to display the Additional Gender Information window.
- Under Sexual Orientation, complete any of the following:
- Select the Patient declined to provide the information checkbox if the patient chose not to provide this information.
- Select a listed entry.
- Select the Other sexual orientation, please specify: checkbox if their sexual orientation is not listed and enter it in the field below.
- Under Gender Identity, complete any of the following:
- Select the Patient declined to provide the information checkbox if the patient chose not to provide this information.
- Select one or more listed entries.
- Select the Other gender identity, please specify: checkbox if their sexual orientation is not listed and enter it in the field below.
Important: This checkbox and field can be used in addition to specifying entries from the list.
-
Click OK to close the Additional Gender Information window.
|
| Birth |
Select the patient’s date of birth. |
| ID |
Enter the patient ID number.
Note: The number may be partially masked with asterisks if configured by the institution.
Example: A social security number or number set by the institution.
Note: The ID must be unique if Patient Options window > Patient Entry > Patient ID is Unique checkbox is selected.
If the patient is a policy holder, the ID may also display in the Guarantor tab > Guarantor ID field and in the Insurance tab > Subscriber field.
|
| Marital |
Select the patient’s marital status.
|
|
Student |
Select the patient’s student status.
Note: Being a student affects a patient’s insurance coverage.
|
| Language |
Click the ellipsis to select the patient’s preferred language.
|
|
Race/Ethnicity... |
Click the button to select and display the patient’s race and ethnicity.
|
| Home Address |
Enter the patient’s full address in the available fields.
Tip: If you complete the Zip field first, the City, State, Country, and County fields auto-populate.
|
| Telephone |
Enter the patient’s phone numbers.
If used, the third field displays an extension number or descriptor.
|
| Other Loc. |
Enter a location or the type of number entered in the Other# field.
Example: Another workplace number or a service number.
|
| Home, Work, Mobile, Other / Time |
Select a radio button to indicate the preferred contact method and enter the best time to contact the patient, e.g., after 3:00 PM. |
| Patient |
Select the checkbox if the record is for a patient.
Note: Non-patients can be searched for, but aren’t available in Scheduler, EHR, etc.
|
| Emergency |
Select the checkbox if the patient began as an emergency patient.
Note: This is for reporting purposes and does not affect user access.
|
| Special Needs |
Select the checkbox if the patient is a special needs patient.
Note: This may extend insurance coverage beyond usual age limits.
|
| Policy Holder |
Select the checkbox if the patient is a policy holder.
Note: The checkbox is auto-selected if the person is a listed policy holder in Patient Info > Guarantor tab.
|
| Status |
Select the patient status: screening patient, a guarantor/policy holder, active, or inactive.
Notes:
- If the status is set to Inactive, some actions are unavailable.
- If a patient changes from Inactive to Active, an existing recall is updated to the current date or a default recall is added for today.
Tip: Many institutions set brand new patients to Screen. They don’t set the status to Active until after the first appointment.
|
| End Date |
Select the date the account was closed, if applicable.
Note: If a future-dated end date is present, you can still access or enter treatments for this patient.
|
| Account
|
Select a patient account status.
|
| Open Date |
The auto-generated date the account opened.
|
| Patient Types... |
Click the button to select a patient type and set the access for different levels for each patient type.
|
| Alt Chart |
Enter the patient record’s alternate chart number.
Note: Some institutions use this number to find the chart in specialty clinics; others record the chart number used prior to axiUm.
|
| Chart Area / Box# |
Enter the chart storage area and storage box number. |
|
Email |
Enter the patient’s email address.
Note: axiUm validates email addresses according to RFC standards. If the address is in an invalid format when you click Save, an error displays.
|
|
Create PatientAccess... / PatientAccess Info...
|
Click the button to display the PatientAccess Info. window and manage the patient’s PatientAccess account, including adding specific forms and adding representatives.
Notes:
|
|
Providers..., Managers..., Faculty... |
Click the buttons to display the Provider Assignments, Manager Assignments, or Faculty Assignments window and manage assigned providers, managers, and faculty members for the patient.
|
| [text box]
|
Displays all assigned providers, managers, and faculty members.
|
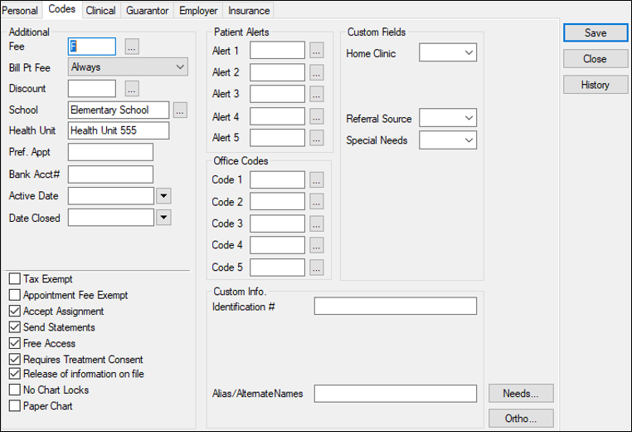
- Complete the Codes tab fields as necessary.
Codes Tab Fields
| Fee / Bill Pt Fee |
Select a fee schedule code that will override an existing fee schedule and select when to use the selected fee schedule.
Notes:
- This field may be applicable if the patient doesn’t have coverage.
- Only complete this field if the situation warrants.
- The Bill Pt Fee field is only enabled if the Fee field displays a code.
|
| Discount
|
Click the ellipsis to select the discount group that applies to the patient and reduces patient fees by a set percentage.
|
| School / Health Unit
|
Click the ellipsis to select the patient’s school and enter the district health unit.
|
|
Pref. Appt |
Enter the patient’s preferred appointment time.
|
| Bank Acc# |
Enter the patient’s bank account number.
Note: Some states may garnish overdue fees. If this is the case, fees are deducted from this bank account.
|
| Active Date / Date Closed |
Select the date on which the patient record became active and the date will close, if applicable.
If the patient record is still active, this field must be blank.
Note: These dates are used for reporting purposes.
|
| Tax Exempt |
Select the checkbox if the patient is exempt from taxes. |
|
Appointment Fee Exempt |
Select the checkbox if the patient is exempt from failed or cancelled appointment charges.
|
| Accept Assignment |
Select the checkbox if the institution accepts insurance from the patient.
Note: This option is also set from Maintenance > Office > Practices.
|
|
Send Statements |
Select the checkbox if statements should be sent to the patient.
Note: If deselected, the patient is excluded when axiUm generates a batch of statements in the Info Manager module.
|
| Free Access |
Select the checkbox if the patient’s chart is accessible to all providers.
|
| Require Treatment Consent |
Select the checkbox if a signed consent form is required before treatment is performed.
Note: This works in conjunction with the Maintenance > System > System Options > Require Consent checkbox.
|
| Release of information on file |
Select the checkbox if the patient has a release of information consent form on file that authorizes the institution to contact insurance companies with claims.
Note: If your state doesn’t require this consent, it doesn’t need to be a required field.
|
| No Chart Locks |
Select the checkbox if chart locks in the Chart Tracking Locks window do not apply to the patient. |
| Paper Chart |
Select the checkbox if the patient has a paper chart.
Note: If deselected, an error message displays when a user manually requests a paper chart, and areas that auto-request a chart are blocked.
|
| Patient Alerts |
Enter up to five patient alerts that appear on the Patient Card.
Alerts are not clinical in nature but offer important additional patient information. E.g., Deaf.
|
| Office Codes |
Enter up to five office codes that appear on the Patient Card.
Office codes are not clinical in nature but offer patient administration information. E.g., Cash Only.
|
| Custom Fields |
Enter up to 10 customized field categories and their selected entries that are used for reporting and research. E.g., Home Clinic, Referral Source, Language.
|
| Custom Info |
Enter identifying information for up to five customized fields. E.g., Driver’s License.
|
| Needs... |
Click the button to view the Patient Needs window.
|
| Ortho... |
Click the button to view the Ortho Patient Information window. |
- Complete the Clinical tab fields as necessary.
Clinical Tab Fields
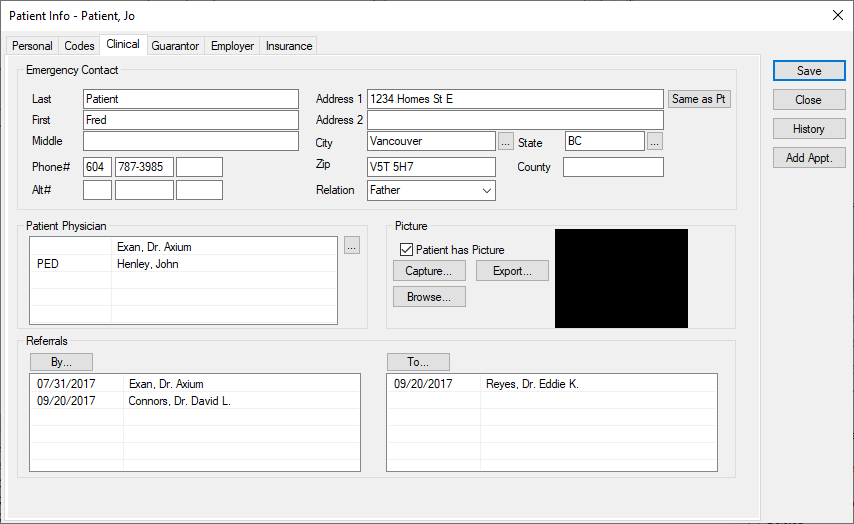
| Last / First / Middle |
Enter the emergency contact’s last, first, and middle name.
Note: The fields can hold a maximum of 30 characters.
|
| Phone# / Alt# |
Enter the emergency contact’s main and alternate phone numbers, including an optional extension number or descriptor.
|
| Address / City / State / Zip / County
|
Enter the emergency contact’s full address.
Tip: If you complete the Zip field first, the City, State, Country, and County fields auto-populate.
|
| Same as Pt |
Click the button to make the emergency contact’s address the same as the patient’s address. |
| Relation |
Select the emergency contact’s relationship to the patient or enter a free-text option.
Note: If you enter a non-standard relationship, you will be asked to confirm you want to proceed.
|
| Patient Physician |
Click the ellipsis to select the patient’s physician.
|
| Patient has Picture |
Select the checkbox if the patient has a picture.
When selected, the Capture... and Browse... buttons are enabled.
|
|
Capture... |
Click the button to display the Capture Picture window.
Note: Previously only TWAIN scanners were available, but any integrated or USB-connected web cams are now supported.
|
| Export... |
Click the button to select a location to save the photo file.
Note: The image file is saved in the same format used for the original photo.
|
| Browse... |
Click the button to locate an image stored on a local or network drive.
|
| Referrals |
The left-side field displays physicians or sources that referred the patient.
The right-side field displays physicians or sources this patient has been referred to.
|
| By... |
Click the button to display the Referred By window and add a referral to explain how the patient was referred to the institution.
|
| To... |
Click the button to display the Referred To window.
|
-
Click Save.
The patient record is saved and the Guarantor, Employer, and Insurance tabs display.
Note: If any required fields are incomplete, they display in pink and the record cannot be saved until they are complete.
Once the patient record has been saved successfully, you can specify a guarantor, specify an employer, and specify a benefit plan as necessary.
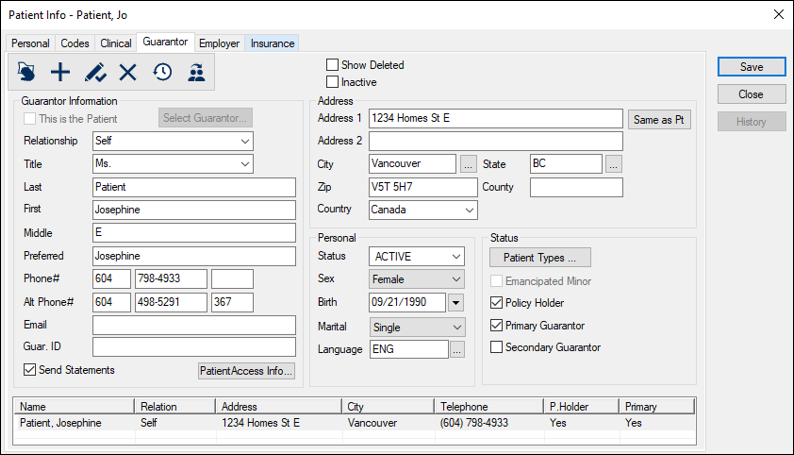
Specify Guarantors
A guarantor is a person responsible for the patient. A patient can have multiple guarantors. By default, a person is their own guarantor, but other guarantors can be added, if necessary.
Example: A parent or guardian is usually a child’s guarantor.
Note: The same person can be guarantor for a maximum of 21 patients.
The Guarantor tab contains fields related to the patient’s guarantor(s). This includes basic information such as names, demographics, address, status, contact information, and additional information.
When a patient record is created, the patient is selected as their own guarantor. If the patient doesn’t need an additional guarantor, you can skip to 1. If the patient can't remain their own primary guarantor, then you must specify the guarantor record(s).
Notes:
- If the guarantor record is the patient, many fields are disabled and cannot be modified from the Guarantor tab.
- Guarantors don't have to be patients in the clinic, but they must have their own their record in axiUm that contains their name and pertinent details.
To specify a patient guarantor:
Warning: Before you create a new guarantor record, search for the guarantor name to ensure they are not in axiUm.
- With the Patient Info window open, click the Guarantor tab.
Note: By default, the patient’s information displays in this tab and the This is the Patient checkbox is selected.
- Click the Clear Data (
 ) icon to reset the fields in the tab and enable the Select Guarantor button. ) icon to reset the fields in the tab and enable the Select Guarantor button.
- Search for the guarantor.
- Click Select Guarantor to display the Select Guarantor window.
-
In the text field, enter the last name and press Enter.
- Add the guarantor.
- If the guarantor is listed in the results:
Add the Existing Guarantor
- Double-click to select the name and close the Select Guarantor window.
Tip: If the checkbox next to the guarantor is selected, the guarantor is a patient in axiUm.
- Click the Add a new Record () icon.
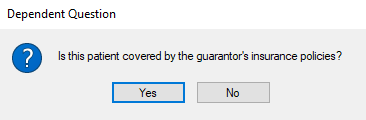
If the guarantor has an insurance policy, the following question displays.
- If the patient is covered under this guarantor’s insurance, click Yes.
- If the patient isn’t covered under this guarantor’s insurance, click No.
- If the guarantor is not listed in the results:
Add a New Guarantor
- Close the Select Guarantor window.
- Complete the Guarantor Information, Address, Personal, and Status section fields as necessary.
Guarantor tab fields
| This is the Patient |
Select the checkbox if the guarantor is the patient.
|
| Select Guarantor... |
Click the button to select a guarantor from the Select Guarantor window.
|
| Relationship
|
Select the guarantor’s relationship to the patient.
Note: When the This is the Patient checkbox is selected, the Relationship field is set to Self and should not be modified.
Tip: Do not edit the Self guarantor record other than to change the Primary Guarantor, Secondary Guarantor or Policy Holder fields.
|
| Title / Last / First / Middle / Preferred |
Enter the guarantor’s title, last, first, middle, and preferred names.
Note: The fields can hold a maximum of 30 characters.
|
| Phone# / Alt Phone# |
Enter the guarantor’s main and alternate phone numbers, including an optional extension number or descriptor.
|
| Email |
Enter the guarantor’s email address.
Note: axiUm validates email addresses according to RFC standards. If the address is in an invalid format when you click Save, an error displays.
|
|
Guar. ID |
Enter the guarantor’s ID number.
Notes:
- The number may be partially masked with asterisks (***) if the institution has been configured to preserve confidentiality.
- If the patient is their own guarantor, axiUm uses the entry from Personal tab > ID field by default.
|
| Send Statements |
Select the checkbox if the guarantor should be included in the guarantor statement report.
Note: The field is enabled and selected by default when the selected guarantor is a non-patient but disabled if the guarantor is a patient.
|
| PatientAccess Info... |
Click the button to display the PatientAccess Info window.
Note: An error displays if the email address in the Email field is in an invalid format.
|
| Address / City / State / Zip / County / Country |
Enter the guarantor’s full address in the available fields.
Tip: If you complete the Zip field first, the City, State, Country, and County fields auto-populate.
Note: If the guarantor resides in a country other than the institution’s country of address, only complete the Country field.
|
| Same as Pt |
Click the button to make the guarantor’s address the same as the patient’s address. |
| Status |
Select the guarantor’s status at the institution.
Note: The Guarantor/Policy Holder status is specifically for guarantors who are not patients at the institution.
|
| Sex / Birth |
Select the guarantor’s gender and date of birth. |
| Marital |
Select the guarantor’s marital status. |
| Language |
Select the patient’s preferred language. |
| Patient Types |
Click the button to display the Patient Types window. |
| Emancipated Minor |
Select the checkbox if the patient is an emancipated minor and is legally their own guarantor. |
| Policy Holder |
Select the checkbox if the guarantor has an insurance policy.
Note: If selected, the guarantor’s name populates in the Insurance tab > Policy Information > Subscriber > Holder drop-down list.
|
| Primary Guarantor |
Select the checkbox if this is the patient's primary guarantor.
Note: The guarantor is not necessarily a policy holder.
|
| Secondary Guarantor |
Select the checkbox if this is the patient's secondary guarantor.
Note: The guarantor is not necessarily a policy holder.
|
- Click the Add a new Record () icon to add the guarantor to the list.
axiUm auto-fills some fields and sets the Guarantor Status to Primary.
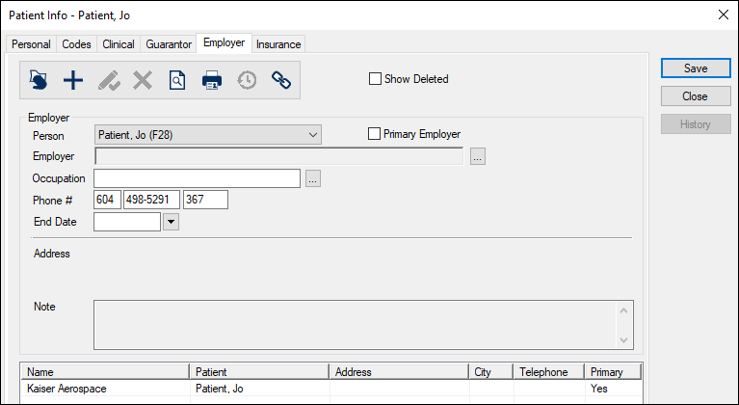
Specify Employers
The Employer Tab allows you to record the patient’s employment information. It contains fields related to the patient’s employer(s). This includes information such as the employer name, occupation, address, and contact information.
Note: Some institutions choose to skip adding the employer information. You can still add insurance without adding employer information.
If configured by your institution, this can be used to link the employer’s insurance plan to the patient.
If a patient has multiple employers, you can set one as primary and add other employers afterward.
Children, self-employed patients, and patients who have contracted insurance (such as Medicaid) do not require employer information. For these patients, skip to Specify Benefit Plans.
To specify a patient employer:
- With the Patient Info window open, click the Employer tab.
- Complete the fields as necessary and click the Add a new Record () icon to add the employer entry to the list below.
Employer Tab Fields
| Primary Employer |
Select the checkbox if this is the patient’s primary employer.
Note: If they have other employers, this checkbox must be deselected in those employment records.
|
| Employer |
Click the ellipsis to display the Employer List window and search for the employer.
- If listed, double-click the correct entry to select and close the Employer List window.
- If not listed, click the Add a new Record () icon to display the Employer window.
- Complete the fields as necessary and click OK to close the Employer window.
- From the Employer List window, search for and double-click the new entry to close the Employer List window.
|
| Occupation |
Click the ellipsis to display the Occupations window and search for the job title.
- If listed, double-click the correct occupation entry to close the Occupations window.
- If not listed, in the Occupation field, enter a new title and click the Add a new Record () icon.
- Double-click the new entry to close the Occupations window.
|
| Phone # |
Enter the employer’s phone number.
|
| End Date |
Enter the date the employment ends (if applicable).
|
| Note |
Enter any additional information. |
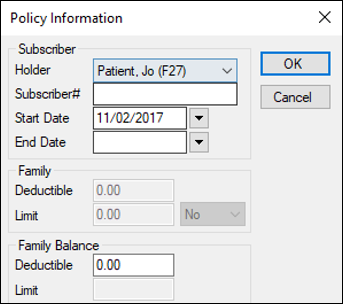
Specify Benefit Plans
Important: Given the complex nature of benefit plans, we do not recommend adding benefit plans from the Patient Info window > Insurance tab. We recommend that your institution disable all fields in the Insurance tab except for the Link to Insurance Benefit Plan ( ) icon so that only users with insurance permissions can create benefit plans. Even then, we recommend you add plans via the Maintenance module to prevent benefit plan duplicates. ) icon so that only users with insurance permissions can create benefit plans. Even then, we recommend you add plans via the Maintenance module to prevent benefit plan duplicates.
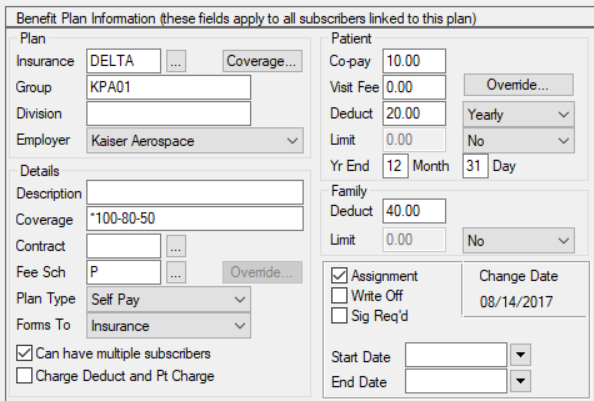
The Insurance Tab contains fields related to the patient’s insurance plans(s). This includes the benefit plan information such as the insurance provider, employer, coverage details, patient payment details, and policy information, such as subscriber details and family balance.
A benefit plan provides coverage for a variety of medical and dental procedures. Insurance companies provide coverage to patients through benefit plans that are private (purchased by the individual), provided by an employer or provided through government programs.
Note: Many people obtain coverage through another person’s insurance coverage (spouses, children, etc.)
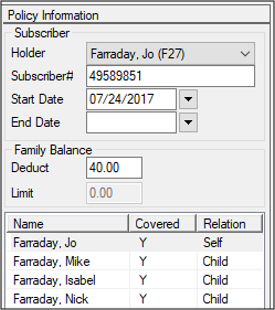
Depending on the type of plan, the coverage may be for full or partial, and the patient may be responsible to pay deductibles, and/or any amounts not covered by their insurance. Some plans contain multiple people with the same coverage. The benefit plan has the same insurance company, group number (the benefit plan ID) and coverage, but each person on the plan has a different subscriber number.
In the cases of employer-provided plans, many companies provide insurance benefit plans that covers some or all of their employees’ dental procedures and expenses. Some companies have multiple benefit plans that provide varying levels of coverage linked to them. This is more common for companies in multiple states/provinces because insurance providers often vary by region.
When an employee with a company benefit plan becomes a patient, and has their employer added to their record, you can add the employer’s insurance to the patient.
Tips:
-
Before you link an employer’s insurance to a patient, confirm the plan exists in the employer record.
-
Depending on your institution's workflow, employer-provided insurance may be linked from the Employer tab. However, if an employee benefit plan has been linked to a patient, its details are available from the Insurance tab.
To specify a benefit plan:
- With the Patient Info window open, click the Employer or Insurance tab.
- Click the Link to Insurance Benefit Plan () icon to display the Select Benefit Plan window and search for the appropriate benefit plan.
Create Related Patient Records
Sometimes you must create a patient record that has many of the same details as another patient record.
Example: You must create a patient record for a family member that has the same last name, address, contact information, and emergency contact information details.
It is much faster and easier to copy an existing patient record and modify differences instead of making a brand new one.
When you copy patient records, axiUm copies the last name, address, and phone number, and requires confirmation to copy emergency contact and insurance information.
Note: This does not copy any clinical information.
Warning: To avoid data issues, ensure that no one will access the original patient record during the copy process.
To create a copied patient record:
- Open the Patients module and select the patient to copy from.
Note: If you can choose between a policy holder and a dependent with insurance to copy from, select the dependent. This prevents the new patient from being added as another policy holder on the same policy.
Example: If a mother and child attend the same dental institution and you must create the father’s patient record, copy the child’s record.
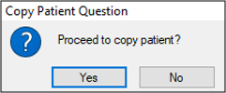
- Click the Patient Copy (
 ) icon to display the Copy Patient Question window and click Yes. ) icon to display the Copy Patient Question window and click Yes.
If the source patient is a policy holder or is associated with a policy holder, the Select Policies window displays.
Note: If the source patient is a policy holder, the policy is marked with an * symbol.
- If applicable, review the Select Policies window and complete any of the following actions:
- If the new patient will be a policy holder, select a policy with an (*) and click OK.
- If the new patient won’t be a policy holder, don’t select a policy and click OK.
Note: If the new patient should have an insurance policy, you must add the benefit policy holder to the record later.
- If the new patient will be a dependent of a policy holder, select a policy without an (*) and click OK.
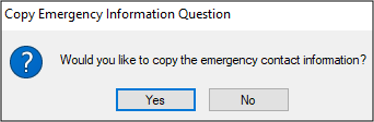
If the source patient has Emergency Contact information entered, a Copy Emergency Question window displays.
- If the patient should have the same emergency contact information, click Yes.
- If the patient shouldn’t have the same emergency contact information, click No.
- From the displayed Patient Info – Copy window, complete the fields as required, click Save, and close the Patient Info window.
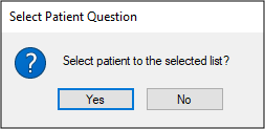
- When prompted with the Select Patient Question window, click Yes to display in the selection list or click No to continue without displaying in the list.
- If necessary, add a guarantor, employer, or additional benefit policy.
|