Approve Treatments

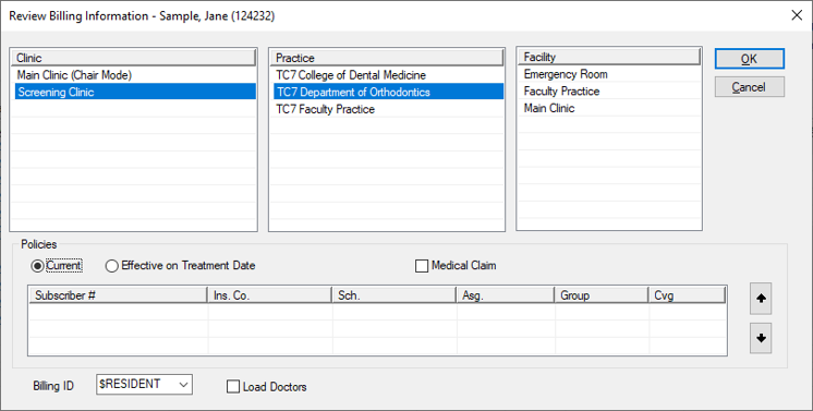
When approving a P/I/C treatment record, and the Billing Info checkbox is selected, the Review Billing Info window displays.

Note: If you are approving an in-progress or completed treatment that has an (E) or (D) status, the Billing Info checkbox is disabled so the Review Billing Information window cannot display.

Note: The Review Billing Information window only displays once, even if multiple treatments are selected.

To approve a treatment:

  1. Review the fields.
  2. (Optional) Modify the fields and contents as necessary.
  3. Important: The fields below are not intended to be modified unless absolutely necessary. For most situations, we do not recommend modifying the fields.

    Field Description
    Clinic

    This field displays the clinic where the treatment is performed.

    If necessary, select another clinic.

    Practice

    This field displays the Practice where the treatment is performed.

    If necessary, select another Practice.

    Facility

    This field displays the facility where the treatment is performed.

    If necessary, select another facility.

    Current / Effective on Treatment Date

    These determine which insurance companies display in the Policies list.

    If necessary, select another radio button.

    Medical Claim Select the checkbox if the treatment is for a medical claim.
    Billing ID

    This field displays the current billing ID.

    If necessary, select another billing ID from the drop-down list.

    Load Doctors Select the checkbox to include doctor billing IDs in the Billing ID drop-down list.
  4. Complete any of the following:
    • Click OK to approve the treatment(s).
    • Click Cancel to cancel the approval and keep the treatment(s) listed in the Patient Approvals window.
    • Note: If you click Cancel and other items are selected for approval, the Abort Approval Process Question window displays. Click Continue or Stop as necessary.

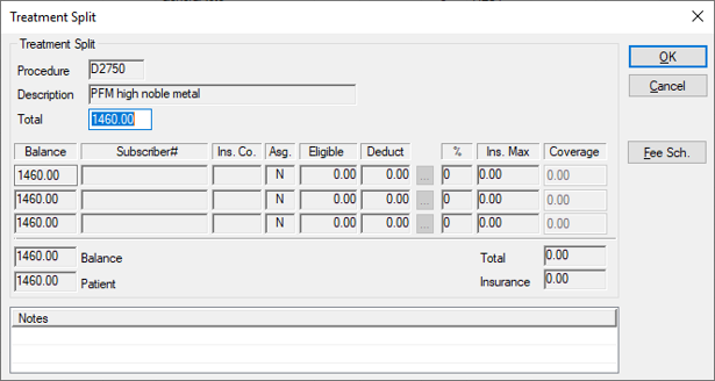
  5. If you clicked OK and the Tx Amounts checkbox was selected, the Treatment Split window displays.
  6. Review the fields.
  7. (Optional) Modify the fields and contents as necessary.
  8. Complete any of the following:
    • Click OK to approve the treatment(s).
    • Click Cancel to cancel the approval and keep the treatment(s) listed in the Patient Approvals window.
    • Note: If you click Cancel and other items are selected for approval, the Abort Approval Process Question window displays. Click Continue or Stop as necessary.

  9. If the student provider requires an evaluation and the Evaluations window displays, perform the evaluation or cancel as necessary.