|
This section explores how to open axiUm, navigate the axiUm desktop, and use the desktop to complete common tasks.
After login, the desktop displays. All activity in axiUm occurs in or from the desktop. It acts as a central location that allows you to complete a variety of actions:
 Access the axiUm Desktop Access the axiUm Desktop
The axiUm desktop displays when you first launch axiUm. To access the axiUm desktop, you must select the database (if applicable) and authenticate yourself in the system.
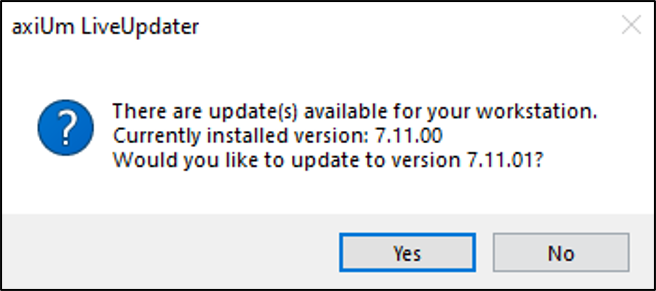
Note: If the axiUm LiveUpdater is configured on your machine and a patch is available when you launch axiUm, the axiUm LiveUpdater process may run before you can log in.
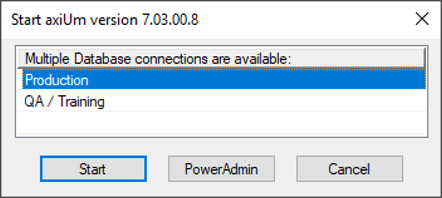
Select the Database
If you have access to multiple axiUm databases on your workstation, you can select which database to connect to.
Example: You have access to both Production and Training databases.
To select the database:
-
From the axiUm run folder, double-click the axium.exe file to launch axiUm.
A pop-up displays, allowing you to select the database connection.
Note: The database connection listed in the axium.ini file is the selected connection by default.
- Select the database you want to connect to and click Start to display a login window.
Notes:
-
An error displays if you attempt to connect to a different database version. If this occurs, contact your axiUm administrator.
-
If you have write access to the axium.ini file, your choice is saved and displays as the default database connection next time you run axiUm.
-
The PowerAdmin button displays if the application is in your axiUm run folder. If available, you can launch PowerAdmin with the selected database instead of the information stored in PowerAdm.ini file.
- Proceed to Step 2 of Log In to axiUm.
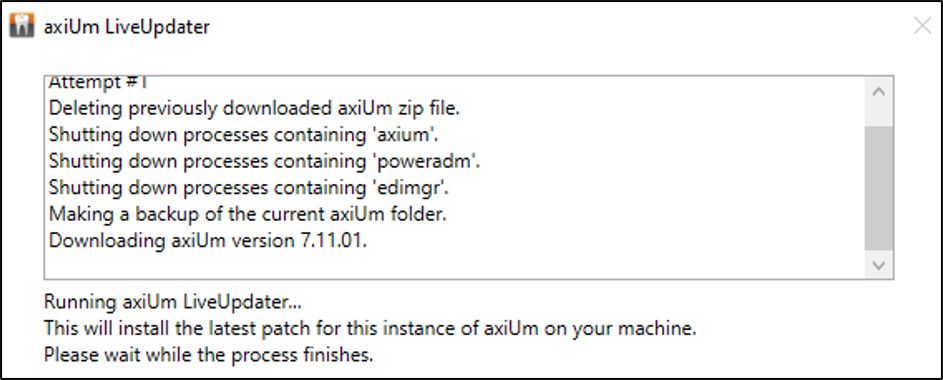
Run the axiUm LiveUpdater Utility
The axiUm LiveUpdater utility allows you to immediately access and install axiUm patches to an instance on your workstation as they become available.
If configured and a patch is available when you launch axiUm, the axiUm LiveUpdater process begins:
-
If the instance on your workstation is set to On Prompt, a message displays. Click Yes to proceed with the update or click No to cancel out of the LiveUpdater process and open axiUm with the current axiUm patch.
- If the instance on your workstation is set to Automatic, the axiUm LiveUpdater window displays automatically and updates the axiUm version.
When the update is complete, axiUm opens and you can log in.
Note: For workstation instances that do not use axiUm LiveUpdater, the previous update methods such as manually copying files or using the auto-update folder can still be used.
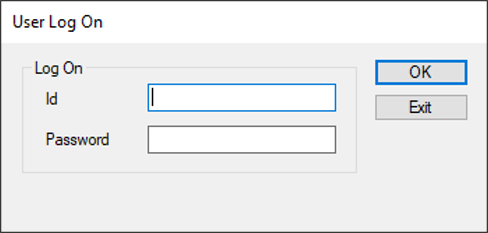
Log In to axiUm
You must authenticate your credentials to open and access axiUm.
-
From the axiUm run folder, double-click the axium.exe file to launch axiUm.
-
In the login window, enter your credentials as specified by your institution and click OK. These may include:
The axiUm desktop opens.
Note: If your level or workstation has a default module configured, that module loads.
Exit axiUm
When finished in axiUm, or if another user needs to use axiUm, you will need to end your session.
Note: Depending on configuration, if left inactive for a set period of time, axiUm auto-closes or returns you to the log in screen.
There are a variety of ways you can end your axiUm session:
- Switch axiUm users: Another user needs to use axiUm during your session.
Example: An administrator must perform a task in axiUm that you cannot.
-
Click the Tools menu and select Switch User to display the Switch User window.
-
Enter your login credentials.
-
(Optional) If you want to keep the selected patient, select the Keep currently selected patient checkbox.
- Click OK.
- Log out of axiUm: Your session is finished, but you want axiUm to continue running.
Example: Another user may need to use axiUm after your session.
-
Close axiUm: You have completed your session and want to close axiUm.
Example: Your session is finished, and no other users require the program.
Note: If configured, this option may also return you to the log in screen.
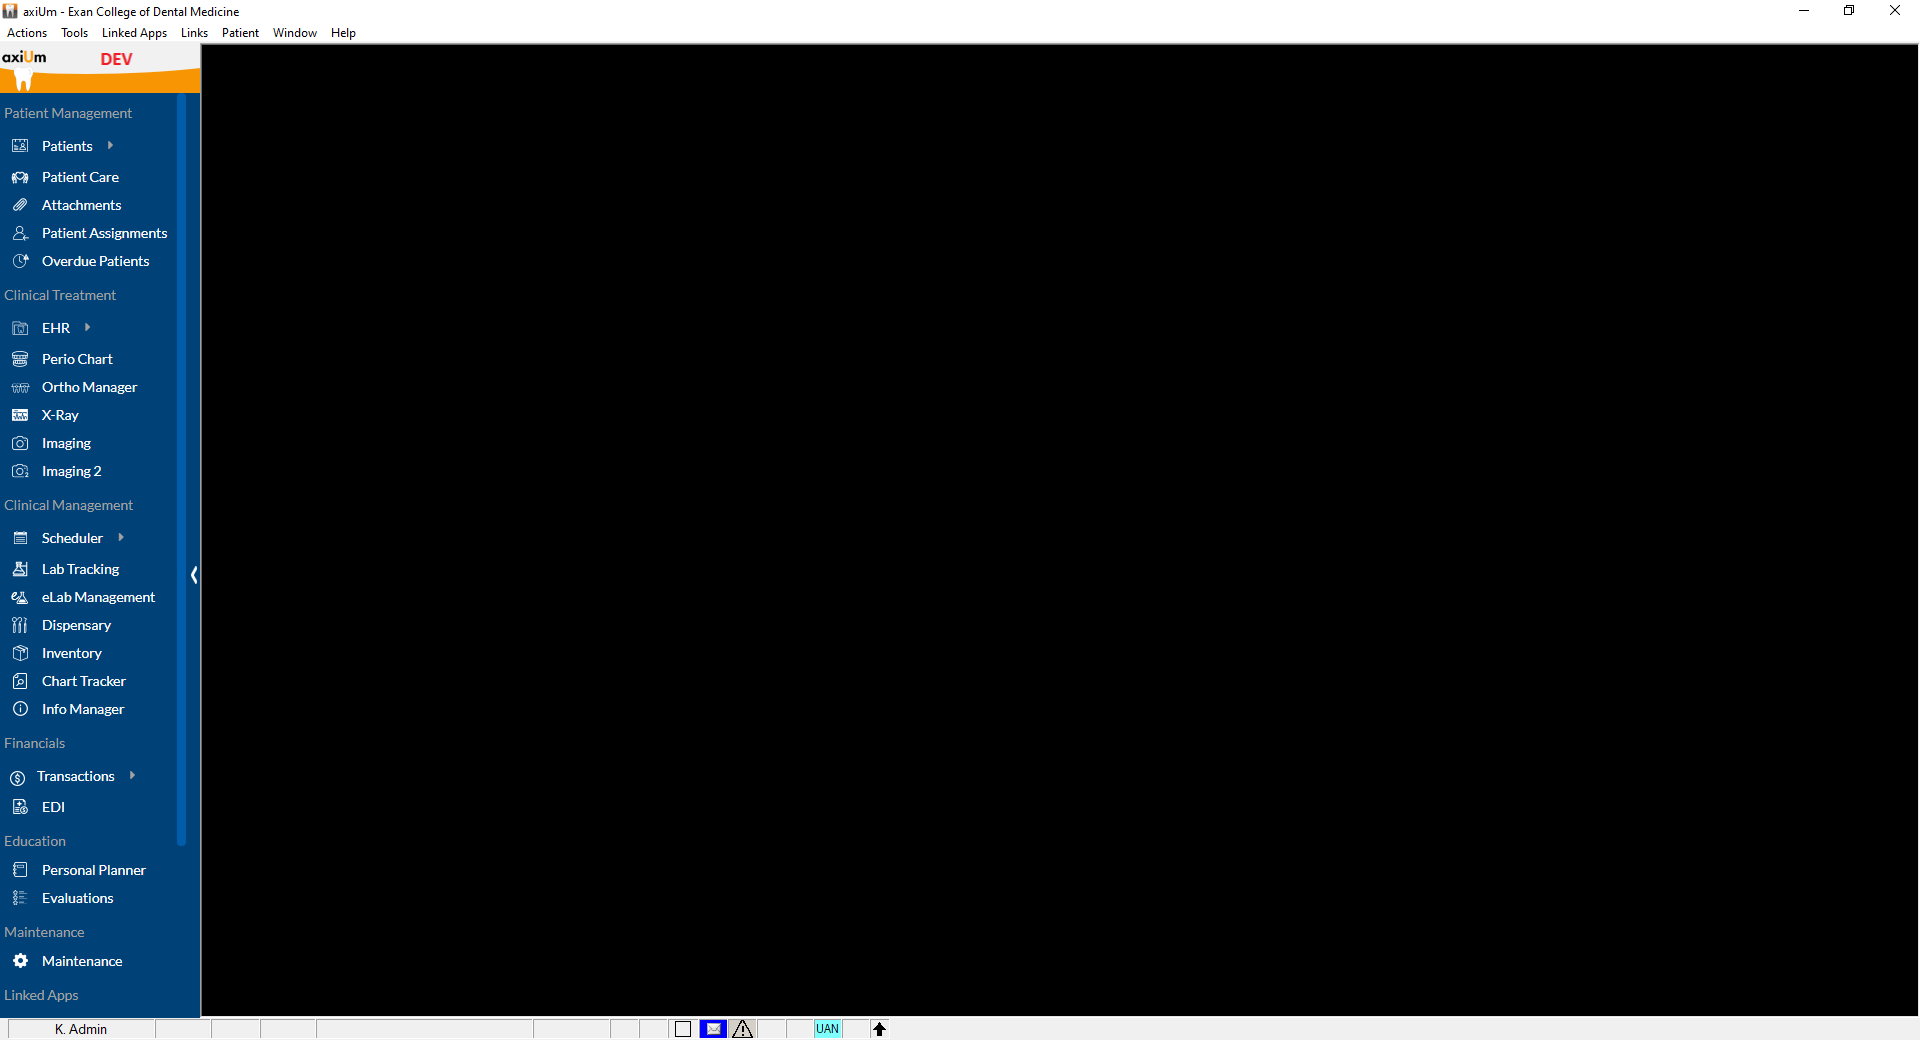
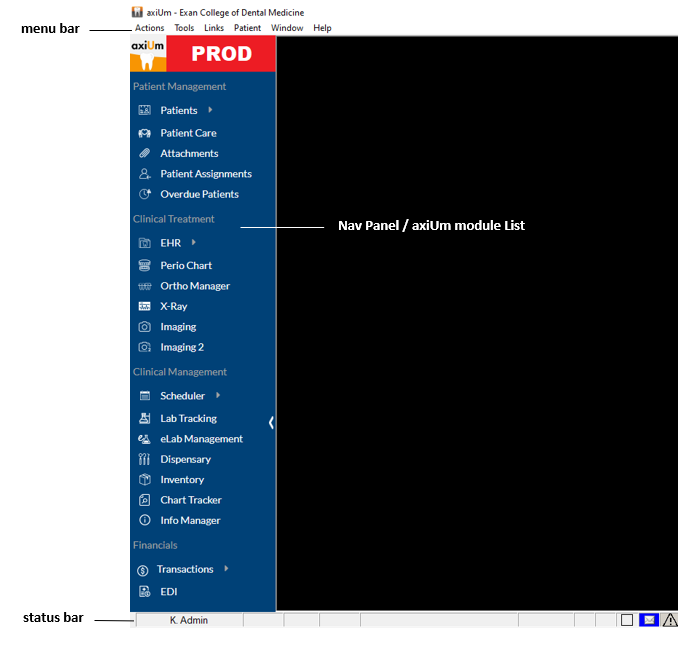
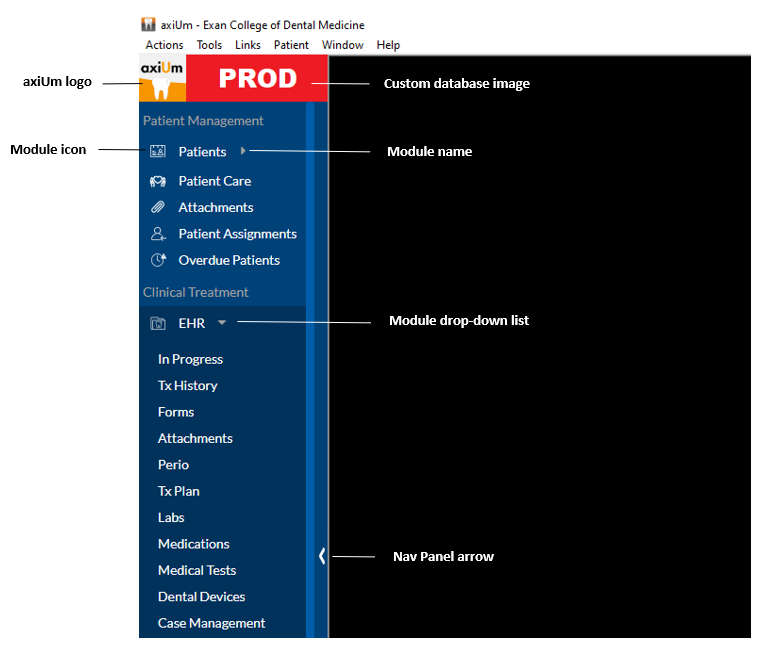
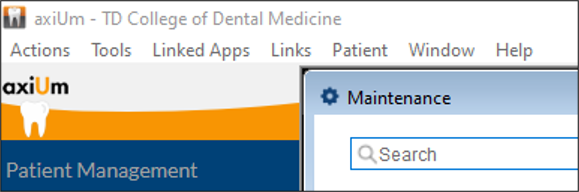
axiUm Desktop Organization
The axiUm desktop has three main parts: Nav Panel, menu bar, and status bar.
Note: axiUm has user and workstation settings that control what displays according to the logged in user and the location they work from.
The Nav Panel displays on the left side of axiUm. It lists all available modules. Certain modules may also have sub-menus that open specific areas in the module.
Important: The number of displayed modules depends on your security level.
Tip: If needed, you can click the ( ) icon to minimize the Nav Panel so that only the icons display. If minimized, the sub-menus are not available. ) icon to minimize the Nav Panel so that only the icons display. If minimized, the sub-menus are not available.
If present, a customized DB image displays next to the axiUm logo.
Note: When minimized, only the axiUm logo displays.
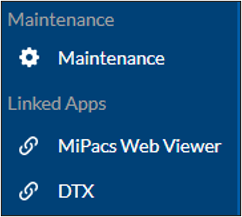
At the bottom of the Nav Panel, a Linked Apps section may display a list of software applications that have been integrated with axiUm. If configured, you can select a linked app to launch the configured URL or command line application and automatically pass information from axiUm to the app.
Example: MiPacs Web Viewer
The menu bar displays along the top of axiUm. Each menu contains a set of options. It offers another method to open modules and use tools. It also lists patients and allows you to open Help.
The status bar displays along the bottom of axiUm and includes the logged in user, the selected patient, and a variety of indicators that convey additional information.
Work with the Menu Bar
The menu bar displays along the top of axiUm. It allows you to open axiUm modules, use tools integrated with axiUm, and complete additional tasks. It also lists patients in the selection list and allows you to open Help.
Note: The number of options you see under each menu depends on your security level.
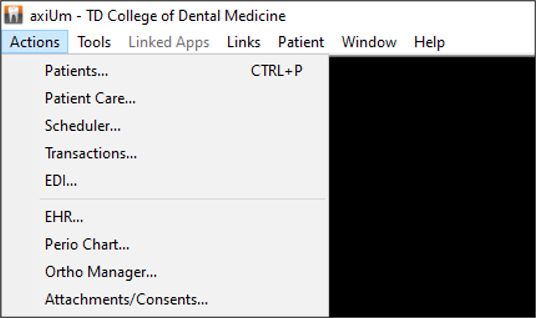
Use the Actions Menu
The Actions menu displays a list of the axiUm modules, offering you another way to open axiUm modules.
-
Click the Actions menu and select a module name.
Use the Tools Menu
The Tools menu displays additional axiUm features for you to use.
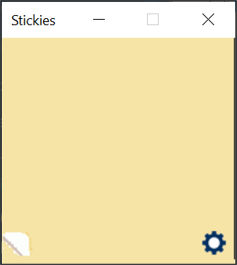
Use Sticky Notes
Sticky notes are used in axiUm to store and display small pieces of information and can be used as reminders for you or other users.
-
Click the Tools menu and select Note... to display the Stickies window.
-
Enter the note contents.
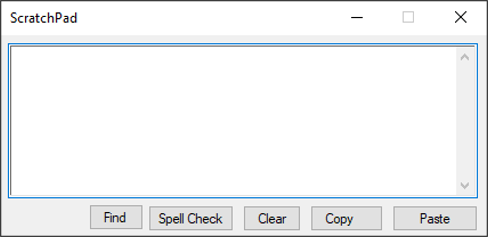
Use ScratchPad
ScratchPad allows you to spell check your text before entering it in axiUm.
-
Click the Tools menu and select Scratchpad... to display the ScratchPad window.
-
Enter your text and click Spell Check.
-
When your text is satisfactory, cut and paste it into the correct field and close the ScratchPad window.
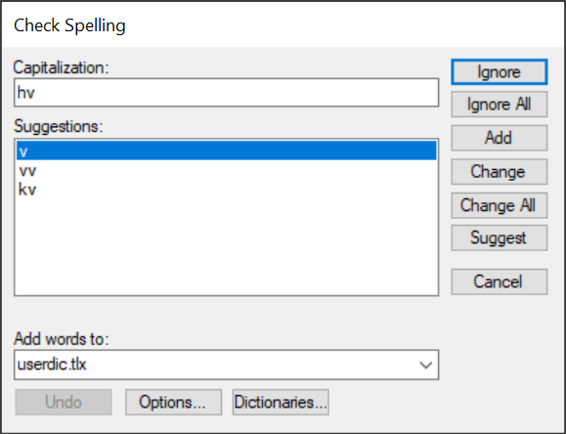
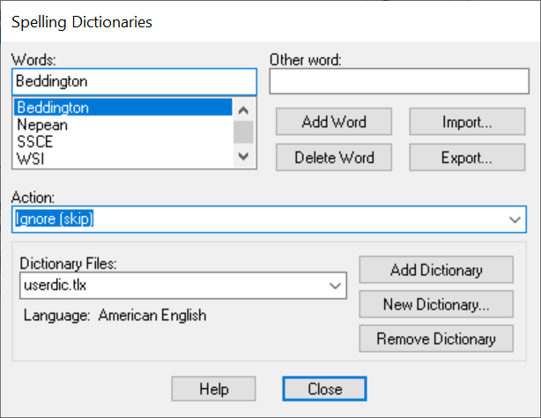
Import Spelling Dictionaries
When necessary, you can import updated dictionaries or additional dictionaries into axiUm.
Note: The dictionary file must be located in the axiUm run files or another place in the files on your local machine.
To import a spell check dictionary:
-
Click the Tools menu and select Scratchpad... to display the ScratchPad window.
-
Click Spell Check to display the Check Spelling window.
-
Click Dictionaries... to display the Spelling Dictionaries window.
-
Click Add Dictionary or New Dictionary... to browse to the updated dictionary files.
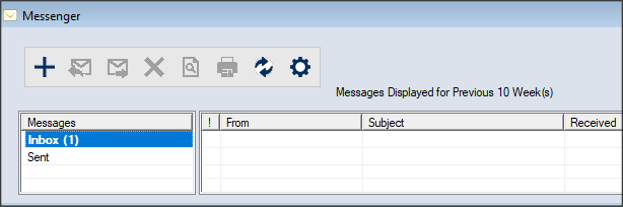
Open Messenger
Messenger allows you to send and receive messages within axiUm.
-
Click the Tools menu and select Messenger... to display the Messenger window.
Tip: You can also open the Messenger window from the status bar.
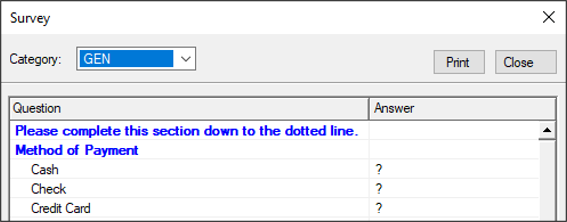
Use Surveys
When necessary, you can select a survey template to conduct, and record survey responses.
Examples: Patient screening interviews and patient satisfaction reports.
Once you have completed a survey, you can print a copy to preserve the answers.
Note: Completed surveys cannot be attached to patient records; however, you can review/report on answers in the Info Manager module.
To use surveys:
-
Click the Tools menu and select Survey to display the Survey window.
-
From the Category drop-down list, select a survey type.
-
Complete the survey questions and click Print.
-
If signature(s) are required, have the appropriate person sign in the assigned area.
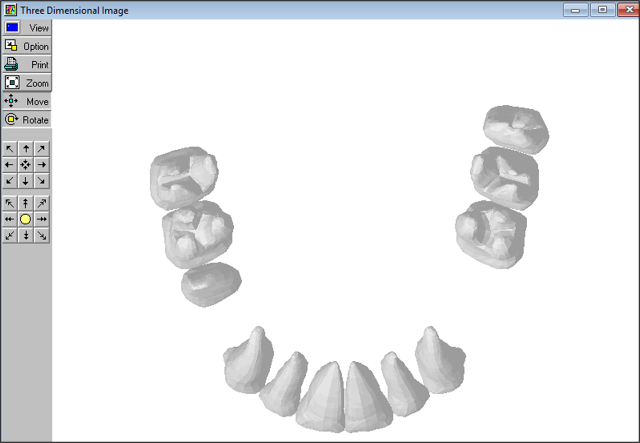
Open Imaging Tools
You can use 3D Imaging to display a 3D image of the currently selected patient's mouth based on current tooth state.
If axiUm is configured to interact with X-Ray and/or other imaging software programs, you can open each application to take and store digital x-rays and images.
To open imaging tools:
-
Click the Tools menu and select an imaging option to display an imaging window/module:
-
Select 3D Image to display the Three Dimensional Image window.
-
Select X-Ray, Imaging, or Imaging 2 to open the configured imaging software.
Note: Depending on your institution, each option may launch a different imaging software program.
Open Educator
If configured, the Educator tool allows you to open a software program chosen by your institution.
Note: Educator is generally used to train users.
-
Click the Tools menu and select Educator....
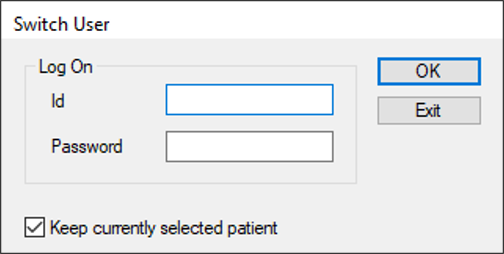
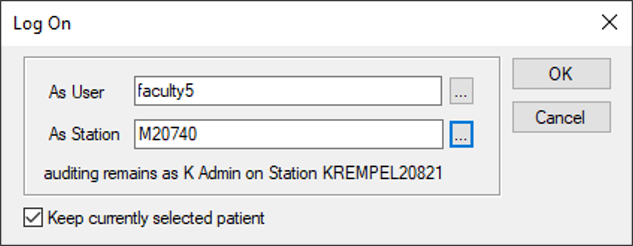
Switch Users
You can switch users while axiUm runs and keep the current patient selected.
-
Click the Tools menu and select Switch User... to display the Switch User window.
-
Enter your login credentials.
-
(Optional) If you want to keep the selected patient, select the Keep currently selected patient checkbox.
-
Click OK.
Log On As User
If you have the required permissions, you can log on as a different user without entering the user’s password.
Tip: This is most useful in cases of troubleshooting.
Notes:
-
Most user types do not have access to this option.
-
This differs from logging in as an administrator. You see only what the second user would see and axiUm audits your actions using your original username.
-
You cannot perform prescription-type tasks or send messages while in this mode.
-
Click the Tools menu and select Log On As User... to display the Log On window.
-
Enter the username or click the As User ellipsis to select the user.
-
Enter the station or click the As Station ellipsis to select the station.
-
(Optional) If you want to keep the selected patient, select the Keep currently selected patient checkbox.
-
Click OK.
Log Off
You can log out of axiUm but continue to run the application.
-
Click the Tools menu and select Log Off....
-
When prompted to confirm, click Yes.
axiUm logs you off and displays the User Log On window for another user.
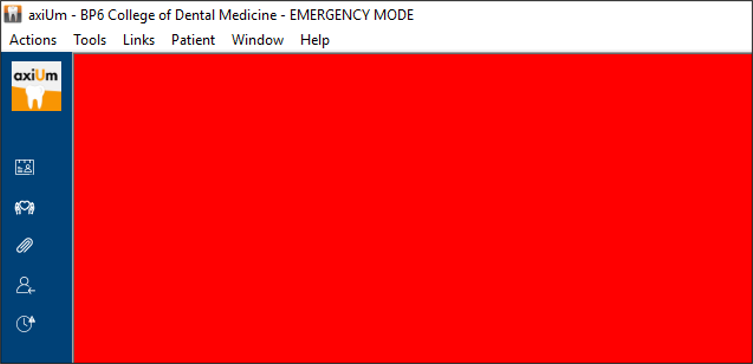
Enter/Exit Emergency Mode
If necessary, you can place axiUm in emergency mode. This gives you access to all patients in axiUm regardless of assignment, creates an emergency mode log entry, and notifies all appropriate staff through Messenger.
To use emergency mode:
-
Click the Tools menu and select Enter Emergency Mode.
-
When prompted to confirm, click Yes.
The title bar now displays EMERGENCY MODE and the background displays in red.
-
To exit emergency mode, click the Tools menu and select Exit Emergency Mode.
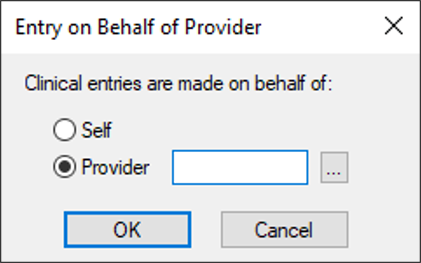
Perform Entries on Behalf of Providers
If you have the correct permissions, you can enter information for another provider.
Example: A hygienist will often enter treatment on behalf of the treating provider.
Any actions performed are stamped with the other provider's name. Some actions may require approval even if the logged-in user does not require approval for the action.
Note: Actions that are not associated to a provider (e.g., notes) are stamped with the logged-in user's name.
To perform an entry on behalf of a provider:
-
Click the Tools menu and select Entry on Behalf of Provider... to display the Entry on Behalf of Provider window.
- Select a radio button:
-
Self: Indicates you are making clinical entries for yourself.
Tip: Select Self if you are finished entering on behalf of another provider.
-
Provider: The provider you are entering records for.
- If you selected Provider, enter the provider number or click the ellipsis to select a number.
- Click OK.
On the left side of the status bar, the provider number changes to the selected provider’s and is highlighted in orange.
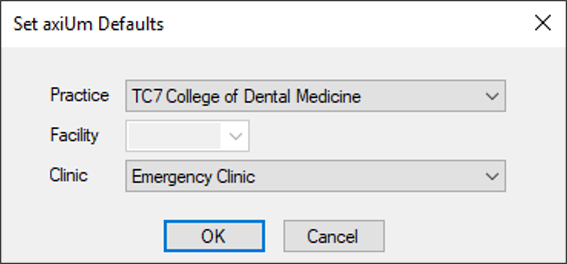
Set axiUm Defaults
You can set the session values for the workstation.
Note: Any changes made are valid for the current session only. The next time you log on to this workstation, axiUm resets to the previous options.
-
Click the Tools menu and select Set axiUm Defaults... to display the Set axiUm Defaults window.
-
Select an option from the Practice, Facility and Clinic drop-down lists.
Note: The Facility field is only enabled if the Transactions module > Transactions Options window > Work Station Facility Override checkbox is selected.
-
Click OK.
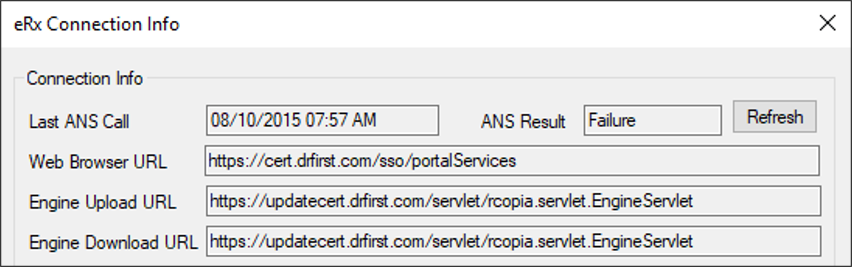
Review eRx Connection Info
You can view the eRx connection details for the workstation.
Tip: This is most useful in cases of testing or troubleshooting.
-
Click the Tools menu and select eRx Connection Info... to display the eRx Connection Info window.
-
To run a new ANS query, click Refresh.
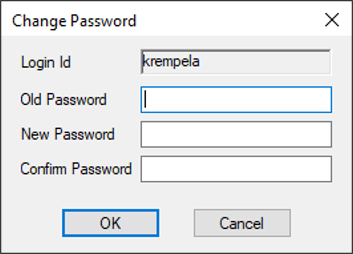
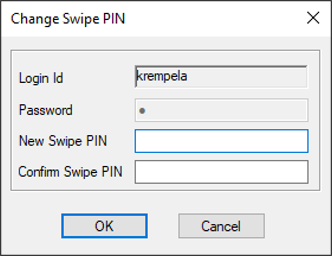
Change Password / Change Swipe Pin
You can change your current password or PIN to a new one.
-
Click the Tools menu and select Change Password... or Change Swipe PIN... to display a Change Password or Change Swipe PIN window.
-
Enter your old and new credentials and click OK.
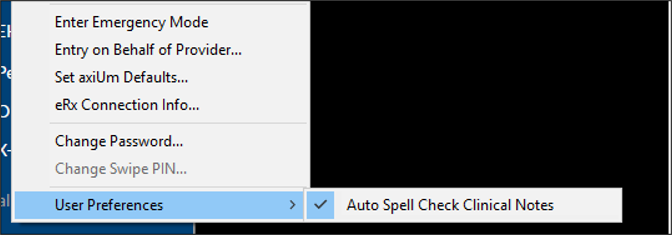
Set User Preferences
You can turn on auto spell check for clinical notes.
-
Click the Tools menu > User Preferences > Auto Spell Check Clinical Notes.
A check mark displays, and spell check is enabled.
Use the Linked Apps Menu
The Linked Apps menu displays a list of software applications that have been integrated with axiUm.
If configured, you can select a linked app to launch the configured URL or command line application and automatically pass information from axiUm to the app.
-
Click the Linked Apps menu and select an app.
Example: MiPACS Viewer
Tip: Linked apps are also accessible from the Nav Panel > Linked Apps section.
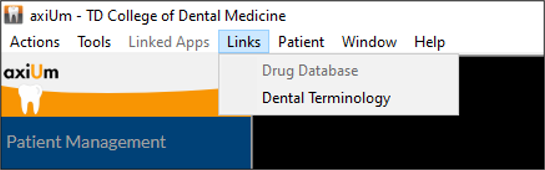
Use the Links Menu
The Links menu displays a list of resources available to you.
If configured, you can open links to web addresses or network resources.
-
Click the Links menu and select a link.
Example: Dental Terminology
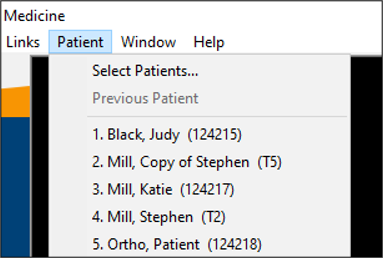
Use the Patient Menu
The Patient menu displays the patients that are currently listed in the Patients module > selection list and offers several quick selection options.
Quick Select Previous Patient
You can quickly select the previously selected patient.
-
Click the Patient menu and select Previous Patient (____, ___).
Note: If a previous patient was not selected, the option is disabled.
Quick Select Patients
You can quickly select a patient from the selection list without opening the Patients module.
-
Click the Patient menu and select a listed patient.
Tip: You can also press the number key for the number next to the patient name to select the patient automatically.
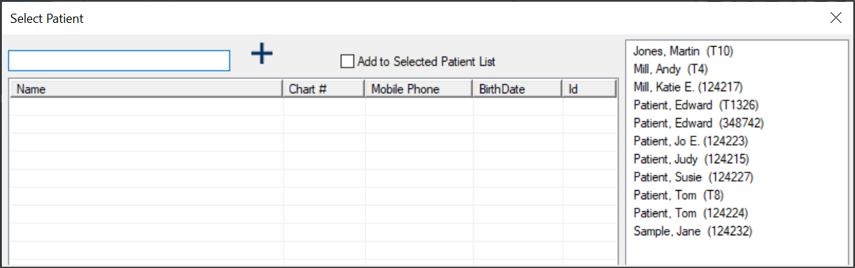
Additional Patient Tasks
You can perform additional patient-related tasks from the Patient menu.
-
Click the Patient menu and choose Select Patients... to display the Select Patient window.
-
Complete any of the following tasks:
Search for and Add Patients to the List
-
In the search bar, enter a patient name and press Enter.
-
Select the Add to Selected Patient List checkbox.
-
Double-click the patient name to select, add to the selection list, and close the Select Patient window.
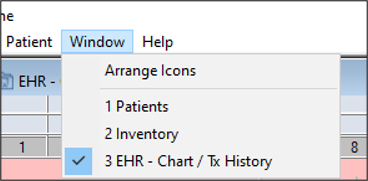
Use the Window Menu
The Window menu displays all open windows in axiUm and allows you to toggle quickly between open windows.
-
Click the Window menu and select a listed window.
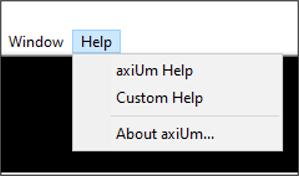
Use the Help Menu
The Help menu displays options to access axiUm Help or custom help (if configured) and view information about axiUm.
Tip: axiUm Help is also available online from http://axiumhelp.com/axium.
Your institution may use the built-in axiUm Help, custom help, or both.
-
axiUm Help: Contains the same content as the axiUm user guides. It presents information in a web-based layout and employs time-saving features, such as a search bar, an organization tree, drop-down sections, and image callouts.
Note: Help updates are made in real time and are no longer restricted to axiUm releases.
-
Custom Help: Your institution may have developed custom help that is specific to your institution’s best practices and workflows.
Open axiUm Help
-
Click the Help menu and select axiUm Help.
Tip: You can also press F1 to open axiUm Help.
-
If a custom help file is also available, a prompt displays allowing you to select the appropriate option.
Tip: axiUm Help automatically opens in your web browser to the overview section for the currently selected module.
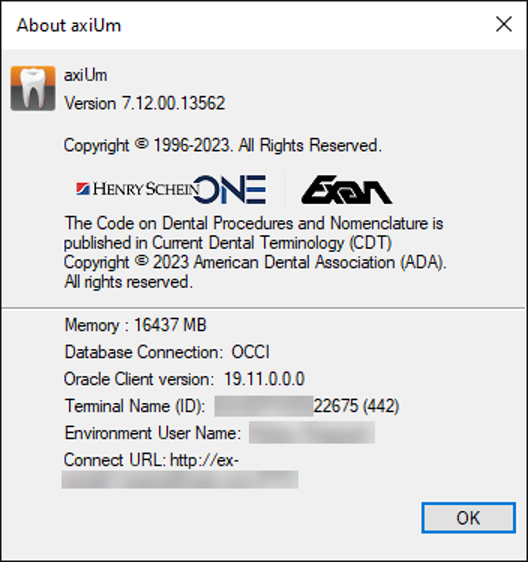
View About axiUm
The About axiUm window allows you to view information about axiUm. This includes, but is not limited to the version number, copyright, Oracle Client version, and Connect URL.
Note: If the axiUm Communication API is installed and configured, it is also listed in this window.
-
Click the Help menu and select About axiUm to display the About axiUm window.
Tip: If necessary, you can copy the Connect URL value.
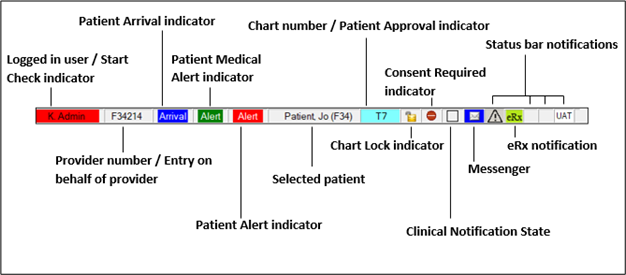
Work with the Status Bar
The status bar displays along the bottom of axiUm. It displays the logged in user, the selected patient, and a variety of indicators that pertain to them.
Note: The number of items you see in the status bar varies depending on your user level.
The status bar may contain any of the following items:
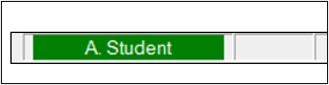
| Logged In User
|
The currently logged in user.
If the user is a provider that currently requires a start check, the name displays in red or yellow.
-
Click the name to display the Appointment Start Check window.
Note: After a start check is complete, the provider name displays in green.
|
| Provider Number / Entry on behalf of provider
|
The currently logged in user’s provider number.
This field also allows you to perform entries on behalf of another user.
Note: When you are performing entries on behalf of another provider, the other provider’s number displays and is highlighted in orange.
-
Click the provider number to display the Entry on Behalf of Provider window.
|
| Patient Arrival indicator
|
When a patient assigned to the logged in provider arrives and signs in for an appointment, a blue Patient Arrival indicator displays.
-
Click the indicator to display the Patient Arrivals window and review the signed in patient.
|
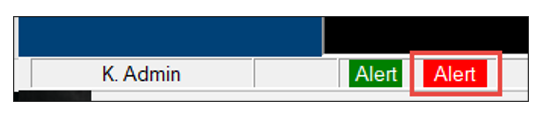
| Patient Alert Indicator
|
When the selected patient has one or more patient alerts, a green indicator displays.
-
Click the indicator to display the Patient Card window and review the alert(s).
|
| Patient Medical Alert Indicator
|
When the selected patient has one or more patient medical alerts, a red indicator displays.
-
Click the indicator to display the Patient Medical Alerts window and review the alert(s).
|
| Selected Patient |
The name of the currently selected patient displays, as well as their gender and age.
-
Click the patient's name to display the Patient Card window.
|
| Chart Number / Patient Approval Indicator |
The chart number of the currently selected patient displays.
This field also operates as the approval indicator. When an approval is required, the chart number turns teal.
-
Click the chart number to display the Patient Approvals window.
|
| Chart Lock Indicator |
When the selected patient has a chart lock condition, an ( ) indicator displays. ) indicator displays.
Note: Chart lock conditions are configured for users, but display based on patient settings.
Example: A chart lock may be in place if a patient’s balance is too high.
-
Click the Chart Lock () indicator to display one of the following:
-
Electronic Chart Lock Warning window: You can still access the patient’s record but cannot complete treatment.
-
Electronic Chart Lock Error window: You cannot access the patient’s record unless you request temporary access.
|
| Patient Consent Indicator |
When a patient consent is missing for the selected patient, an indicator displays.
-
Click the Consent Required ( ) indicator and select Add Patient Consent... or View Missing required Consents.... ) indicator and select Add Patient Consent... or View Missing required Consents....
|
| Clinical Notification States |
Your current clinical notification state displays during an appointment.
You can set the state to indicate that you require a type of assistance. When set, a colored indicator displays on the status bar.
-
Click the Clinical Notification State ( ) indicator and select a listed notification state. ) indicator and select a listed notification state.
|
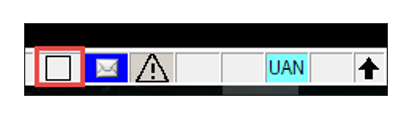
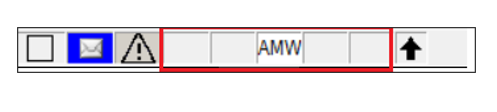
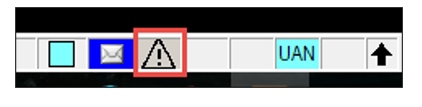
| Messenger |
The Messenger ( ) icon always displays, and when an axiUm message arrives, turns blue or red. ) icon always displays, and when an axiUm message arrives, turns blue or red.
Click the Messenger () icon to display the Messenger window.
|
| Status Bar Notifications |
When information requires your attention or action, a notification displays.
The notification may be for an indicator or an intervention.
-
Indicator:
-
Intervention:
Tip: A mild intervention displays as an ( ) icon, a moderate intervention displays as an ( ) icon, a moderate intervention displays as an ( ) icon and a severe intervention displays as an ( ) icon and a severe intervention displays as an ( ) icon. ) icon.
Note: Each indicator and intervention is associated with an Oracle function that returns information from a database query.
-
Hover over the indicator to display a tooltip with the full description.
Example: UAN = Unapproved notes
-
If necessary, click the notification to display the Provider Interventions Display window or a pop-up window.
|
| eRx Notifications |
If eRx is configured for you and your institution, an indicator displays.
-
Click the eRx indicator to display the eRx Notifications window.
|
|