|
If you have the necessary access permissions, you can customize the way the Dispensary module displays and behaves on individual workstations.
Configuration is accessible from the Setup… button > Dispensary Setup window.
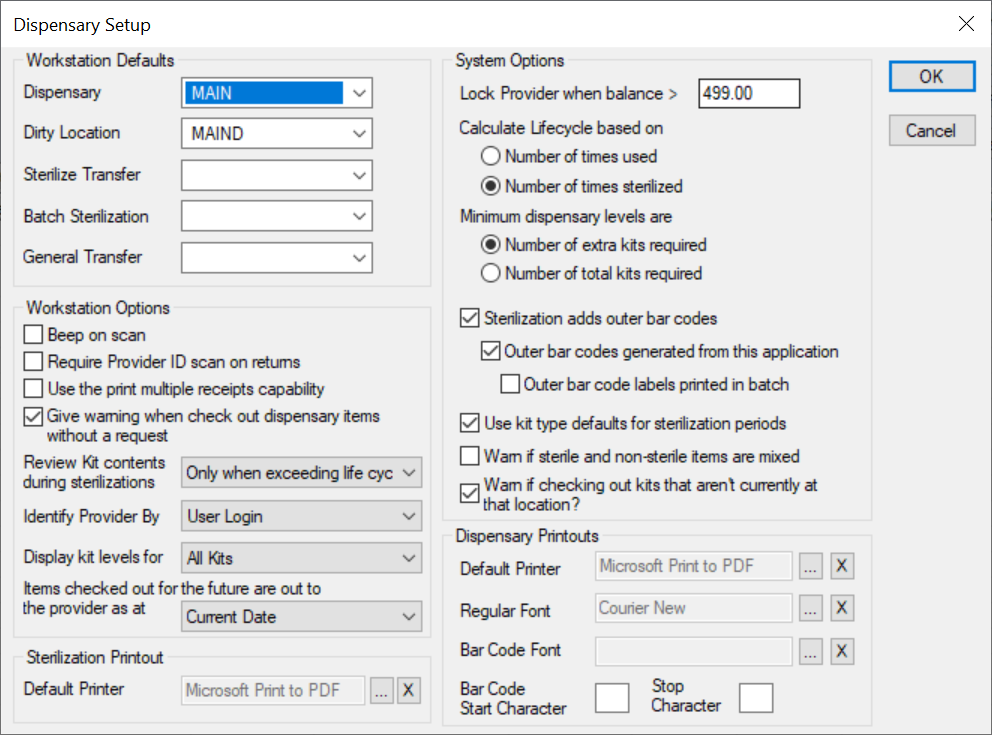
 Workstation Defaults Workstation Defaults
The Dispensary Setup window > Workstation Defaults section controls the default locations used in the Dispensary module. Setting these can help you minimize the amount of time needed to complete certain tasks in the module.
Example: If your role requires you to take items from dirty carts after a clinic session and sterilize them, you can set the Sterilize Kits window > Transfer to field to default to your institution’s sterilization location.
Note: The defaults will vary depending on which dispensary location you work at most frequently and the size of your institution.
Example: A staff member at a larger dental institution may have a primary role of checking dirty items in. Because they check items in all day and spend most of their time in the Check In window, you can set the To Location field to default to the dirty dispensary location that they work at.
| Field
|
Description
|
| Dispensary
|
Select a default dispensary location.
If set, it displays in the Dispensary module > Location field.
|
| Dirty Location
|
Select a default location for staff to check in used items.
If set, it displays in the Check In window > To Location field.
|
| Sterilize Transfer
|
Select a default location that items are transferred to once they are marked as sterilized.
If set, it displays in the Sterilize Kits window > Transfer to field.
|
| Batch Sterilization |
Select a default location from which you take items to be sterilized in batches.
If set, it displays in the Sterilization Batch Kit Processing window > At Location field.
|
| General Transfer
|
Select a default dispensary (i.e. a cart) used to transfer items between dispensary locations.
If set, it displays in the Transfer Kits window > Transfer to field.
|
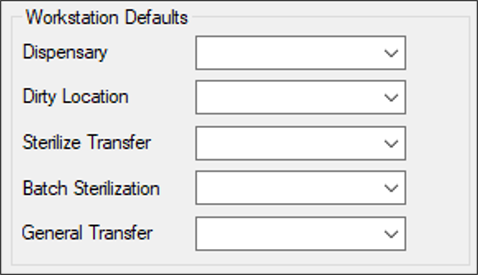
Workstation Options
The Dispensary Setup window > Workstation Options section allows you to customize some aspects of Dispensary module behavior, including how some of the search fields display and how items are moved around the module.
| Field
|
Description
|
| Beep on scan
|
Select the checkbox to use audible beeps to alert users when an item is scanned correctly or incorrectly.
Note: A low tone indicates an error and a series of high-pitch tones indicate success.
|
| Require Provider ID scan on returns
|
Select the checkbox as necessary.
If selected, when users open the Check In window, the Provider Code or User Login field is enabled, allowing the provider to swipe their card and display their information in the field as well as the Provider field. axiUm also enables the Dispensary Item field, allowing you to scan all items the provider checks in.
If deselected, when users open the Check In window, the Provider Code or User Login field is disabled, and the Dispensary Item field is enabled. When you scan an item into this field, axiUm auto-populates the Provider Code or User Login field and the Provider field with the information associated to it when it was last checked out.
Note: The Provider Code / User Login field displays based on the Identify Provider By field.
|
| Use the print multiple receipts capability
|
Select the checkbox to indicate that clicking the Print button will produce a receipt for each provider who checks items in or out.
Example: If three providers check in five items together, axiUm prints three receipts, one for each provider.
Note: If selected and users did not click the Print button before the Close button, axiUm displays an “<x> items were scanned. Do you want to print receipts for them?” message.
|
| Give warning when check out dispensary items without a request |
Select the checkbox to indicate users will be prompted if they check out an item for which there is no request.
Note: This is used by institutions that require providers to request all instruments prior to pick up at the dispensary.
If selected, when users check out an item without a kit request, axiUm displays a “No request could be found for this item. Do you want to check out the item without a request?” warning.
|
| Review Kit contents during sterilizations
|
Select an option to determine when axiUm displays the Replace Kit Instruments window during sterilization:
- Never: If selected, axiUm never displays the window automatically after sterilization.
- Always: If selected, axiUm always displays the window automatically after sterilization.
- Only when exceeding life cycle: If selected, axiUm displays the window automatically after sterilization only if an item has reached the end of its life cycle.
|
| Identify Provider By
|
Select an option to determine which field is used to identify a provider:
- User Login: If selected, the User Login field displays in the Check In and Check Out windows.
- Provider Code: If selected, the Provider Code field displays in the Check In and Check Out windows.
|
| Display kit levels for
|
Select an option to determine how the Kit Level tab’s list view displays:
- All Required: If selected, all kit types that have something in the Require column display.
- All Unfilled: If selected, all kit types that have something in the Need column or the Requested column display.
- All Kits: If selected, all kit types display regardless of the column contents.
|
| Items checked out for the future are out to the provider as at
|
Select an option to determine how items are checked out in future:
- Current Date: If selected, items are considered checked out as of the current system date and time.
Example: axiUm uses the current date/time when you check out an item for the provider.
- Future Date: If selected, items are considered checked out as of the future time that was entered when they are scanned.
Example: If the user enters a future date/time, axiUm uses that date/time when you check out an item for the provider.
|
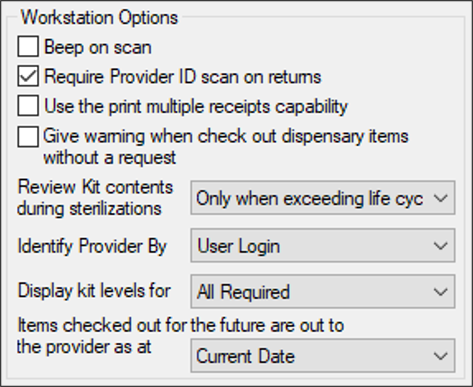
Sterilization Printout
The Dispensary Setup window > Sterilization Printout section sets the default printer used for sterilizations in the Dispensary module.
| Field
|
Description
|
| Default Printer
|
This disabled field specifies the default printer for the sterilization bar codes generated by axiUm.
(Optional) Click the ellipsis to display the Select Printer window and select a printer or click the X to remove the selected printer.
|
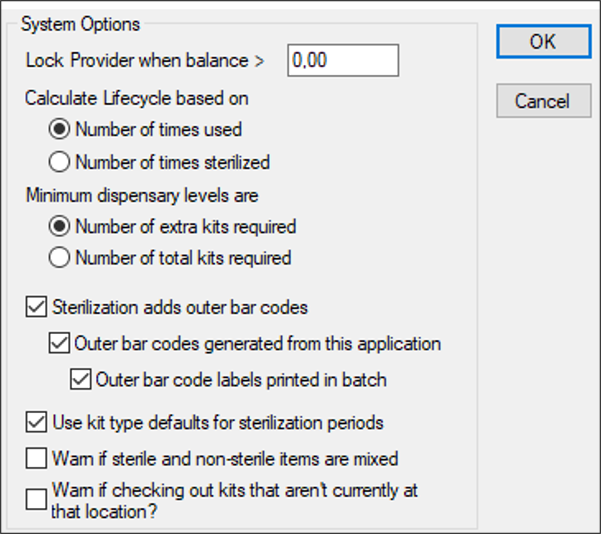
System Options
The Dispensary Setup window > System Options section allows you to control some aspects of Dispensary module behavior, including life cycle calculations, sterilization defaults, and whether to display some types of warnings.
| Field
|
Description
|
| Lock Provider when balance >
|
Enter the maximum balance a provider can have before they can no longer check out items without displaying a Provider Balance Warning.
Example: If the field displays $500.00 and a provider has a balance of $575.00 in replacement costs, the warning displays when they try to check out another item. This can prevent them from checking the item out until their account balance has been reduced to $500.00 or less.
|
| Calculate Lifecycle based on
|
Select a radio button to determine how axiUm calculates an item’s life cycle:
- Number of times used: If selected, axiUm reduces the lifespan by one each time the item is checked out.
- Number of times sterilized: If selected, axiUm reduces the lifespan by one each time the item is marked as sterilized.
Note: An item’s life cycle is set from the Maintenance > Dispensary tab > Instruments > Life Cycle field.
|
| Minimum dispensary levels are
|
Select a radio button to determine how axiUm calculates a dispensary location’s stock needs:
- Number of extra kits required: If selected, axiUm calculates required items as: Required = Requested + Min. Level.
- Number of total kits required: If selected, axiUm calculates required items as: Required = Requested or Min. Level, whichever is greater.
Note: The minimum level is set from Maintenance > Dispensary tab > Dispensary Location Codes > Dispensary Levels > Minimum Level field.
|
| Sterilization adds outer bar codes |
Select the checkbox to indicate that axiUm generates a sterilization (outer) bar code for each item bar code entered in the Sterilize Kits window > Kit field during sterilization.
Note: If selected, the Outer bar codes generated from this application and Outer bar code labels printed in batch checkboxes are enabled.
|
| Outer bar codes generated from this application
|
Note: This checkbox is only enabled if the Sterilization adds outer bar codes checkbox is selected.
Select the checkbox to indicate that axiUm generates the outer bar code that will be used for the sterilization process.
If selected, the Select Printer window displays when users scan a kit in the Sterilize Kits window > Kit field.
If deselected, the sterilization bar codes are not printed from axiUm, and the Select Printer window does not display.
Note: If deselected, it is assumed that sterilization bar codes are printed using a different application.
|
| Outer bar code labels printed in batch
|
This checkbox controls whether users can print sterilization bar codes as a batch or individually.
Select the checkbox to enable the Dispensary window > Labels button to print batch labels and to allow users to print the sterilization bar codes in a single batch, or deselect the checkbox to force users to print sterilization bar codes individually as each item is processed.
If selected, the Outer Code field is enabled during sterilization, allowing you to enter a sterilization bar code manually. These sterilization bar codes are recorded in axiUm and accumulate, then are printed in a single print job.
If deselected, the Outer Code field is disabled during sterilization, forcing axiUm to generate and print the individual sterilization bar codes automatically.
Note: This checkbox is only enabled if the Outer bar codes generated from this application checkbox is selected.
|
| Use kit type defaults for sterilization periods
|
Select the checkbox to default the Sterilize Kits window > Use kit type sterilization defaults checkbox to selected. |
| Warn if sterile and non-sterile items are mixed
|
Select the checkbox to warn users if they scan a clean kit into a location that has dirty items, or vice versa.
Example: If you transfer a clean kit to another location using a dirty cart, axiUm displays an “Are you sure you want to put a clean kit with dirty kits?” message.
|
| Warn if checking out kits that aren’t currently at that location?
|
Select the checkbox to warn users if the item is not in the location from which they are attempting to scan the item.
Example: If you try checking out an item from your dispensary location that is currently in transit on a cart, axiUm displays a “This kit is currently believed to be at location: CART#0001. Are you sure you want to continue?” message.
|
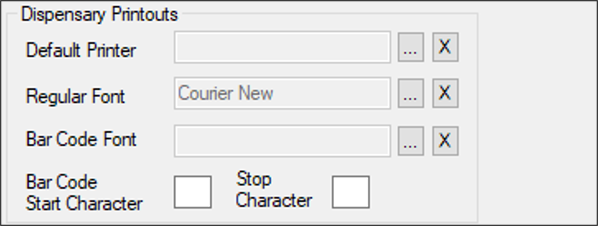
Dispensary Printouts
The Dispensary Setup window > Dispensary Printouts section controls the defaults used for printing from the Dispensary module.
| Field
|
Description
|
| Default Printer
|
This disabled field specifies the default printer for dispensary billing receipts, dispensary billing statements, issue receipts, and return receipts.
(Optional) Click the ellipsis to display the Select Printer window and select a printer or click the X to remove the selected printer.
|
| Regular Font
|
This disabled field specifies the default font for printouts when printing manual dispensary request receipts.
(Optional) Click the ellipsis to display the Font window and select another font or click the X to remove the selected font.
|
| Bar Code Font
|
This disabled field specifies the default font for bar codes.
Important: Your selected font must be a Windows bar code font that is compatible with your bar code scanner.
(Optional) Click the ellipsis to display the Font window and select another font or click the X to remove the selected font from the field.
|
| Bar Code Start Character / Stop Character |
Bar codes must begin and end with special Start Code and End Code characters. These tell the bar code scanner to begin reading the bar code, what kind of bar code will be read, and to stop reading the bar code when it reaches the end. These code characters apply to printing manual dispensary request receipts.
Note: The start character displays at the beginning of the bar code on the dispensary request receipt and the end character displays at the end of the bar code on the dispensary request receipt. The receipt can be printed at the time a manual dispensary request is made.
Enter the Start and End characters for the bar code reader in the text fields.
Important: You must ensure that the Crystal Reports file used to print outer bar codes is customized to make bar codes readable.
|
|