|
Depending on your institution, you may need to work with Summary of Care files.
Examples: Your institution uses Meaningful Use, Consistency of Care, or Carequality.
Note: While this section focuses on the Attachments/Consents module, you can also complete some of these tasks from the EHR module > Attachments/Consents tab, and within the Patients and Scheduler modules.
 Add Summary of Care Files Add Summary of Care Files
You can add (import) a Summary of Care file through the Attachments/Consents module.
- Select a patient and open the Attachments/Consents module.
- Under Section, select an option and click a sub-tab to display all Summary of Care files.
Example: Ambulatory Summary.
- Click the Create a new Record (
 ) icon to display the Add Patient Attachment window. ) icon to display the Add Patient Attachment window.
- Complete the fields as necessary and click OK.
Add Patient Attachment Fields
| Date
|
This defaults to the current date.
Note: If you have access, you can change this to a date in the past when necessary.
|
| Description
|
Enter the description of the patient attachment. |
| Attachment
|
Click the ellipsis to select a Summary of Care file.
Note: This must be a CCD or CCR type file and .xml extension.
|
| Section / Sub-tab
|
Select the section and sub-tab the attachment will save to in the Attachments/Consents module.
Notes:
|
If any basic demographic information in the file does not match the selected patient, axiUm displays a warning, asking you to confirm you want this record added to the patient.
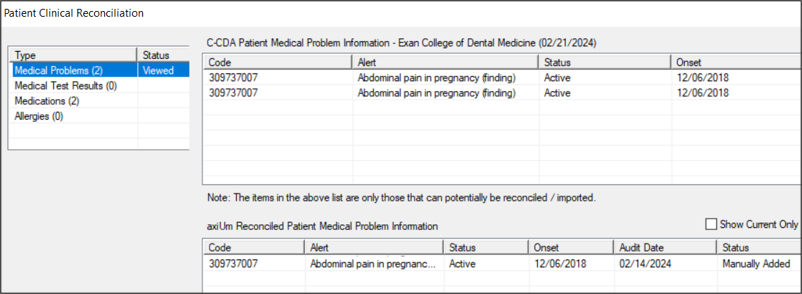
If the basic demographic information matches, the Patient Clinical Reconciliation window displays, allowing you to view any new information and to control what information is added into axiUm.
Note: Any institution that uses Carequality will see a Manually Added status when a record is manually added and reconciled.
-
Under Type, select one of the following to display:
- Medical Problems
- Medications
- Allergies
- Medical Tests
-
Under C-CDA Patient “X” Information, select the listed items you want to add to axiUm, and click Add.
-
Repeat Steps 5-6 as necessary for all item types you need to add.
-
When ready, click OK.
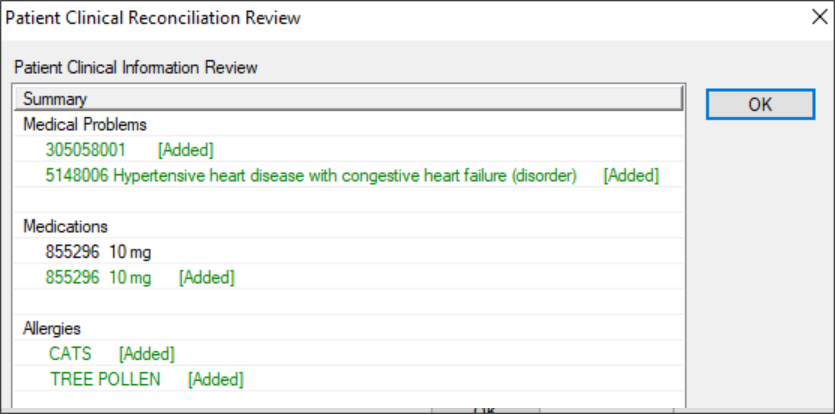
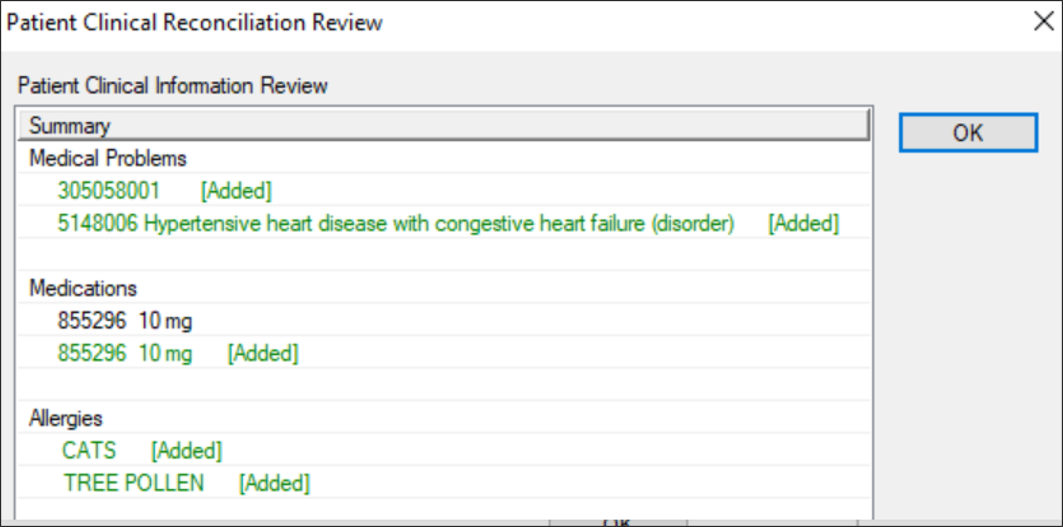
- When prompted with the Patient Clinical Reconciliation Review window, review the information added to the EHR and click OK.
Note: If Carequality is enabled, a Manually Added status will display when a record is manually added and reconciled.
Add Bulk Summary of Care Files
You can bulk generate Summary of Care files for multiple patients through the Info Manager module.
- Open the Info Manager module.
-
Run a report and select the checkbox for each appropriate patient.
-
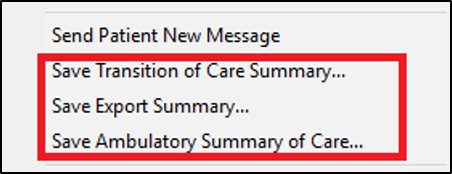
Right-click the result list and select a Summary of Care option:
-
In the Save Summary of Care window, complete the fields as necessary and click OK.
Note: If you select Save as File, a separate file is generated for each patient’s summary of care. It uses the file name specified and the patient’s chart number in brackets to create a unique file name.
The file(s) are generated and saved as specified.
Manage Summary of Care Files
Once a file has been saved to axiUm, it can be viewed and printed. You can also edit the file description and the date information.
Note: The details of the file itself cannot be edited.
To manage Summary of Care files:
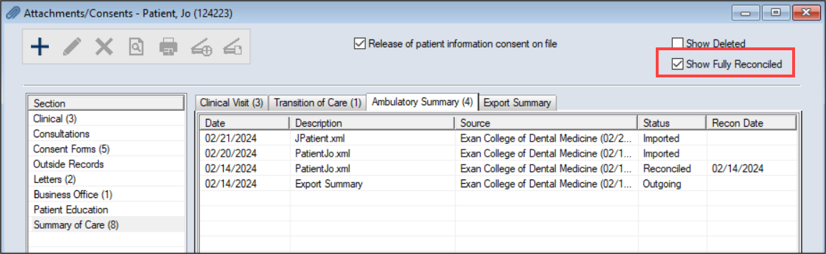
- Select a patient and open the Attachments/Consents module.
- Under Section, select an option and click a sub-tab to display all Summary of Care files.
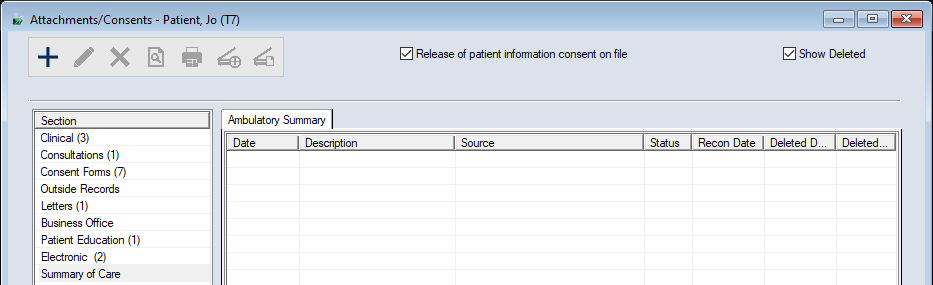
Tip: If necessary, select the Show Deleted checkbox to include all deleted files.
- (Optional) If necessary, deselect the Show Fully Reconciled checkbox so that only files that are partially reconciled or not reconciled display.
Note: The checkbox only displays if the selected sub-tab is configured to hold Summary of Care records and Carequality is enabled.
- Review the listed entries.
- To perform another task, complete any of the following:
View Summary of Care Files
-
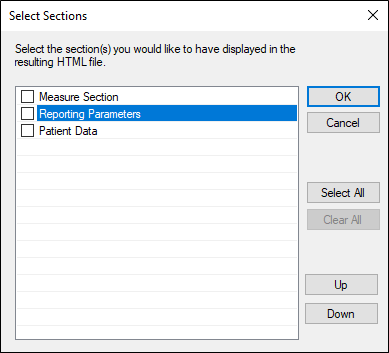
Double-click a listed entry to display the Select Sections window.
Tip: You can also click the Preview Report ( ) icon to display the window. ) icon to display the window.
- (Optional) Select a listed entry and click Up /Down as necessary to reorder in the list.
Tip: You can press Ctrl and multi-select lines to move multiple sections at once.
-
Repeat Step b as necessary.
-
Select the checkbox beside the section(s) you want to display and click OK.
The Summary of Care file displays.
Edit Summary of Care Details
- Select a listed entry and click the Modify Record (
 ) icon to display the Edit Patient Attachment window. ) icon to display the Edit Patient Attachment window.
Tip: You can also right-click a record and select Edit Date/Description.
Note: If applicable, the Entered field indicates the date/time that the entry was created.
- Make any necessary changes and click OK.
Note: The contents of the file cannot be changed.
View Historic Information
When necessary, you can view the history of a specific C-CDA file or all C-CDA files associated with the selected patient. This includes whether a file has been imported, reconciled, or is an outgoing file.
Note: Reconciled statuses may be any of the following if Carequality is enabled:
-
Auto-Reconciled: This status displays if all records in the C-CDA file were auto-reconciled using the auto-reconciliation rules.
-
Partially Reconciled: This status displays if some records in the C-CDA file were auto-reconciled using the auto-reconciliation rules or partially reconciled manually.
-
Reconciled: This status displays if all records in the C-CDA file were reconciled using the (auto-reconciliation rules and manual reconciliation or all records in the C-CDA file were reconciled using manual reconciliation.
-
Right-click a listed entry and select Clinical Records History… or Show Complete Reconciliation History… to display the Patient Clinical Records History window.
Move Summary of Care Files
- Right-click a listed entry and select Move to another tab to display the Move Attachment Items window.
-
Select a new Section and Tab from the drop-down lists and click OK.
Note: Only sections/sub-tabs that are configured to store Summary of Care files display in the drop-down lists.
Print Summary of Care Files
-
Select a listed entry and click the Print Report ( ) icon. ) icon.
Note: Depending on the attachment type, you may see a preview of the file before it prints. Otherwise, the file will print automatically.
Print Summary of Care List
-
Right-click in the attachment list area and select Print List.
A list of all the attachments within the Section and Sub-tab prints.
Reconcile Clinical Records
Clinical reconciliation allows you to review and add individual records (medical problems, medications, and allergies) from an imported Summary of Care file to the patient's existing record in axiUm. After successful reconciliation, all selected information displays in the EHR module.
Tip: In most cases, this occurs when you import a Summary of Care file into axiUm. However, if you chose not to reconcile a Summary of Care file when importing it, you can also reconcile the file’s content from within axiUm.
If your institution uses the Consistency of Care (CoC) or Carequality (CQ) modules, updated Summary of Care files may be imported automatically when available. After reviewing an imported Summary of Care file, you can reconcile all or selected information as necessary.
Auto-reconciliation is also available for any institution that uses Carequality. Once auto-reconciliation rules are enabled, all applicable records in C-CDA files will be auto-reconciled when the files are imported into axiUm.
Note: If any records in a file cannot be auto-reconciled, the file will be available for reconciliation until all remaining records are manually reviewed and reconciled or disregarded.
Warning: Any information that is added into axiUm can have a direct impact on the patient’s health. When necessary, you may need to review changes manually and delete reconciled records from the EHR that are incorrect or no longer needed.
For more information on Consistency of Care or Carequality, refer to the Consistency of Care and Carequality Guides.
To reconcile a clinical record:
- Select a patient and open the Attachments/Consents module.
- Under Section, select an option and click a sub-tab to display all Summary of Care files.
Tip: If necessary, select the Show Deleted checkbox to include all deleted files.
- (Optional) Deselect the Show Fully Reconciled checkbox so that only files that are partially reconciled or not reconciled display.
Note: The checkbox only displays if the selected sub-tab is configured to hold Summary of Care records and Carequality is enabled.
- Review the listed entries.
- Right-click a listed entry and select Reconcile Clinical Records… to display the Patient Clinical Reconciliation window.
Note: If Carequality is enabled, an Auto-Added status will display when a record is auto-reconciled and a Manually Added status will display when a record is manually reconciled.
-
Under Type, select one of the following to display:
-
Medical Problems
-
Medications
-
Allergies
-
Medical Tests
-
Under C-CDA Patient “X” Information, select the listed items you want to add to axiUm, and click Add.
-
Repeat Steps 6-7 as necessary for all item types you need to add.
-
When ready, click OK.
-
When prompted with the Patient Clinical Reconciliation Review window, review the added information added to the EHR and click OK.
Note: If Carequality is enabled, an Auto-Added status will display when a record is auto-reconciled and a Manually Added status will display when a record is manually reconciled.
Once reconciled, the Summary of Care file displays as a second record under the original Summary of Care file.
Note: The original Summary of Care file remains so that it may be tracked and reported on for auditing purposes.
Export Summary of Care Files
Four types of summaries can be created and exported from axiUm:
| Transition of Care Summary
|
Patients
|
| Export Summary
|
Patients
|
| Ambulatory Summary of Care
|
Patients
|
| Clinical Visit Summary
|
Scheduler
|
Export from the Patients Module
- Open the Patients module and search for a patient.
- From the search results, double-click their record to add them to the Patient Selection List.
- Right-click the patient and select the appropriate Summary of Care action.
- Complete the fields as necessary and click OK.
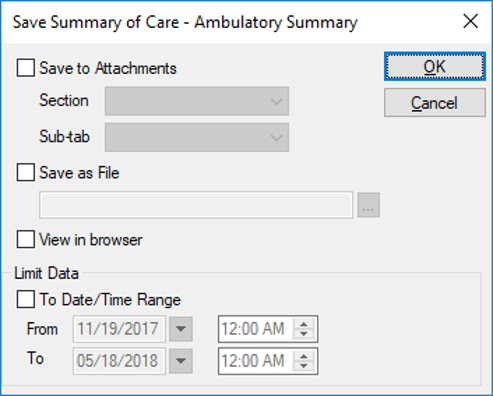
Save Summary of Care - Ambulatory Summary Fields
| Save to Attachments
|
Select the checkbox to save the file to the Attachments/Consents module.
|
| Section / Sub-tab
|
Note: These fields are only enabled if the Save to Attachments checkbox is selected.
Select the Section and Sub-tab to save this file to in the Attachments/Consents module.
Note: Only sections/sub-tabs for Summary of Care attachment types display.
|
| Save as File
|
Select the checkbox to save the file locally or on a network drive.
Click the ellipsis to select where the file will save.
Note: This field is enabled if the Save as File checkbox is selected.
|
| View in Browser
|
Select the checkbox to view the field in your default browser.
Note: You must also select the Save to Attachments or Save as File checkbox.
|
| To Date/Time Range
|
Select the checkbox to limit results based on a specified date/time range.
|
| From / To
|
Enter the start and end date/time that you would like to limit the data to.
Note: These fields are enabled if the To Date/Time Range checkbox is selected.
|
Export from the Scheduler Module
- Open the Scheduler module and locate the patient's appointment.
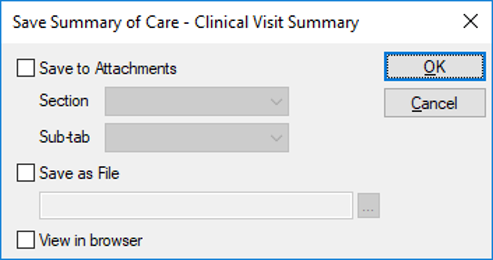
- Right-click the appointment and select Save Clinical Visit Summary... to display the Save Summary of Care – Clinical Visit Summary window.
- Complete the fields as necessary and click OK.
Save Summary of Care - Clinical Visit Summary Fields
| Save to Attachments
|
Select the checkbox to save the file to the Attachments/Consents module.
|
| Section / Sub-tab
|
Note: These fields are only enabled if the Save to Attachments checkbox is selected.
Select the Section and Sub-tab to save this file to in the Attachments/Consents module.
Note: Only sections/sub-tabs for Summary of Care attachment types display.
|
| Save as File
|
Select the checkbox to save the file locally or on a network drive.
Click the ellipsis to select where the file will save.
Note: This field is enabled if the Save as File checkbox is selected.
|
| View in Browser
|
Select the checkbox to view the field in your default browser.
Note: You must also select the Save to Attachments or Save as File checkbox.
|
|